
Have you ever started a simple plumbing repair—maybe fixing a leaky faucet or replacing a section of old pipe—only to find the hardest part is simply making a clean, straight cut? You’re not alone! Many homeowners and even beginner plumbers run into trouble because they don’t know how to cut house copper pipe properly.
The truth is, learning this skill isn’t just about saving the $150+ per hour a pro might charge. It’s about doing the job right, avoiding costly leaks, and gaining the confidence that comes with mastering a key DIY home skill. Whether you’re swapping out a corroded section, extending a water line, or tackling a bathroom remodel, knowing how to cut copper pipe at home will save you time, money, and headaches.
Why Learn How to Cut House Copper Pipe at Home?

Cutting house copper pipe is a foundational DIY plumbing skill. Copper pipes are prized in home plumbing for their durability, corrosion resistance, and safety for drinking water. Most water lines in homes use copper pipes, commonly in Type L, M, or K, which vary in thickness and application. You’ll typically encounter 1/2-inch and 3/4-inch diameters for supply lines, and sometimes 1-inch for main or branch lines.
Why bother learning to cut copper pipe at home?
- Precision: Making clean, straight cuts ensures tight, leak-free joints and reduces the risk of future plumbing disasters.
- Cost Savings: Hiring a plumber for simple pipe cuts adds up. Doing it yourself can save hundreds of dollars per project.
- Satisfaction: There’s a unique pride in completing a plumbing repair or upgrade with your own hands.
Common DIY Scenarios:
- Fixing a leaky section under the sink
- Adding a new shut-off valve
- Extending or rerouting a line for a bathroom or kitchen remodel
- Removing damaged or corroded pipe sectionsn.
Essential Tools and Materials for Cutting Copper Pipe
Before you start, gather the right tools for the job. The quality of your cut depends on the equipment you use. Below is a handy table to help you compare popular methods and their tools:
Tool/Method Best For Price Range Where to Buy
Tube Cutter Small diameters (1/2–1 in) $10–$25 Hardware stores
Hacksaw Budget, larger pipes $5–$15 Home Depot, Ace
Rotary Pipe Cutter Fast, multiple cuts $20–$40 Lowe’s, Menards
Close-Quarters Cutter Tight spaces $15–$30 Amazon, hardware
Auto cut /Multitool Power/speed, versatility $30–$80 Amazon, tool stores
Other Materials:
- Pipe deburrer or reaming tool (for smoothing cut edges)
- Permanent marker or pencil (for marking cut lines)
- Work gloves (to protect your hands)
- Safety goggles (to shield your eyes from metal debris)
- Old towel or bucket (to catch residual water)
Safety First: Precautions Before Cutting Copper Pipe
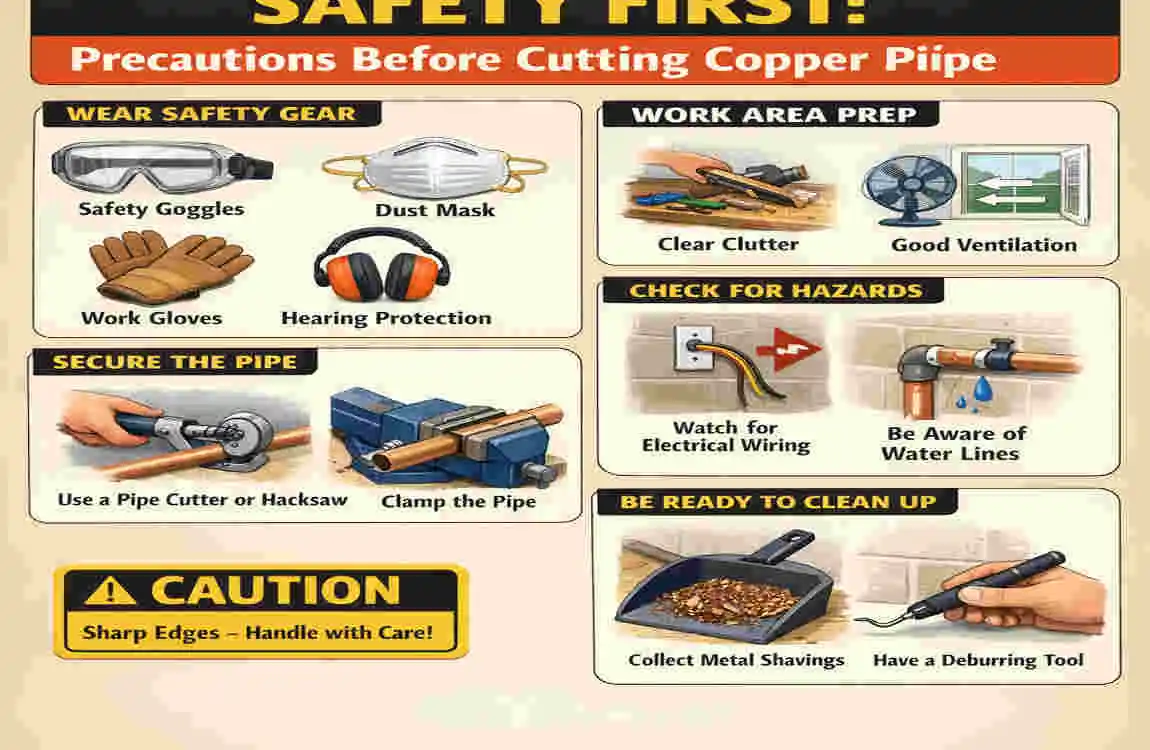
Before you reach for that cutter, it’s crucial to prioritize safety. Cutting copper pipe isn’t dangerous if you take the right steps, but skipping precautions can lead to nasty cuts, flying metal, or even flooding.
Step-by-Step Safety Checklist:
- Shut Off the Water Supply
- Always turn off the main or local shut-off valve, then open a nearby faucet to relieve pressure and drain the water.
- Wear Protective Equipment
- Put on sturdy work gloves and safety goggles. Copper edges are razor-sharp after cutting.
- Ventilate the Workspace
- Cutting, especially with power tools, can release fine metal dust. Open a window or use a fan if working indoors.
- Clear the Area
- Remove any clutter, cords, or hazards from your workspace.
- Check for Electricity
- If the pipe is near electrical wiring, make sure power to the area is off.
Warning:
Copper pipe edges are extremely sharp after a fresh cut. Never run your finger along the cut edge. Use a deburring tool instead.
Using a Manual Tube Cutter (The Pro’s Go-To)
When it comes to cutting house copper pipe, nothing beats the manual tube cutter for clean, professional results. This tool is designed specifically for copper and produces a burr-free, perfectly square cut—essential for leak-free plumbing.
Why It Works
The tube cutter clamps around the pipe and uses a sharp cutting wheel. As you rotate the tool, the wheel scores deeper into the copper until it slices clean through, leaving a smooth edge.
Ideal for:
- Most household pipe sizes (1/8 to 1 1/8 inch)
- Plumbing repairs and new installations
- Ensuring the best possible joint for soldering or compression fittings
Step-by-Step Guide
- Measure and Mark
- Use a tape measure and a permanent marker to make a clear, visible line where you want the cut.
- Position the Tube Cutter
- Open the cutter and place the pipe in the tool, lining up the cutting wheel precisely with your mark.
- Tighten the Knob
- Turn the knob until the cutting wheel touches the pipe. Don’t over-tighten—it should be snug, not crushing.
- Rotate and Tighten
- Rotate the cutter around the pipe several times. Each full rotation, slightly tighten the knob. Continue until the pipe snaps apart.
- Deburr the Edge
- Use the built-in deburring tool or a separate reamer to remove any sharp edges or burrs on the inside and outside of the cut.
Pros and Cons Table
Pros Cons
Precise, clean cuts. Slower for thick pipe
No sparks or dust. Not ideal for very tight spots
Leaves pipe round. The initial cost is higher than that of a hacksaw
Pro Tips:
- Don’t rush: Over-tightening the cutter will deform the pipe. Go slow for the best results.
- Even rotation is key: Keep the cutter perpendicular to the pipe for a straight cut.
- Practice on scrap pipe first if you’re new to the tool.
Hacksaw with Miter Box (Budget-Friendly DIY Hack)
If you’re on a tight budget or working with larger pipe sizes, a hacksaw and miter box can do the trick. This is the classic DIY method—no fancy tools required.
Why It Works
A hacksaw’s thin, fine-toothed blade can cut through copper quickly. Using a miter box helps you make straight, square cuts—crucial for leak-free joints.
Ideal for:
- Occasional repairs
- Cutting 3/4-inch or larger pipes
- Homeowners with basic toolkits
Step-by-Step Guide
- Secure the Pipe in the Miter Box
- Place the pipe in a miter box (or clamp it securely to your workbench). Ensure it won’t move during cutting.
- Use a Fine-Toothed Blade
- Fit your hacksaw with a 32 teeth-per-inch (tpi) blade for the cleanest cut.
- Start the Cut Slowly
- Score the pipe with a few gentle strokes. Once a groove forms, saw with steady, even pressure.
- Keep the Cut Straight
- Let the miter box guide your blade. Don’t force it—let the saw do the work.
- Deburr the Edges
- Use a file or sandpaper to smooth out the rough, sharp burrs left by the saw.
Example:
Cutting a 3/4-inch copper pipe with a hacksaw typically takes about 2 minutes, including cleanup.
Pros and Cons
- Pros: Cheap, accessible, no special tools needed
- Cons: Leaves rougher edges, more cleanup, can be hard to cut perfectly straight
Rotary Pipe Cutter (Fast and Effortless)
A rotary pipe cutter is a step up in speed and convenience, especially useful if you have to make multiple cuts or deal with thicker pipes.
Why It Works
This tool uses a ratcheting action and sharp cutting wheel, allowing you to quickly slice through pipes up to 1 5/8 inches in diameter. It’s a favorite for pros working on big jobs.
Ideal for:
- Multiple cuts
- Larger-diameter copper pipes
- Fast, repeatable results
Step-by-Step Guide
- Align Rollers and Mark
- Mark your cut line and position the pipe between the cutter’s rollers, aligning the wheel with the mark.
- Squeeze Handles
- Squeeze and release the handles repeatedly. The tool ratchets itself around the pipe, cutting deeper with each squeeze.
- Snap and Deburr
- Once the pipe is almost cut through, a gentle twist will snap it apart. Finish by deburring as usual.
Visual:
A before-and-after comparison shows the difference in speed and finish compared to other tools.
Pros and Cons
- Pros: Fast, minimal effort, easy on the hands, portable
- Cons: Slightly more expensive, overkill for small jobs, not ideal for very tight spaces
Close-Quarters Cutter (Tight Spaces Solution)
Sometimes, copper pipes are tucked away in wall cavities, under sinks, or behind cabinets. That’s where the close-quarters cutter shines.
Why It Works
This miniaturized tube cutter fits into spaces where a standard tool can’t. It’s perfect for in-place repairs in cramped or awkward spots.
Ideal for:
- Pipes close to walls or corners
- Under-sink repairs
- Working inside cabinets
Step-by-Step Guide
- Mark the Pipe
- As always, measure carefully and mark your cut line clearly.
- Position the Mini Cutter
- Fit the cutter onto the pipe and align the wheel with the mark.
- Tighten and Rotate
- Turn the cutter around the pipe, tightening a little after each full rotation.
- Work in Awkward Angles
- Use short rotations if space is limited. Be patient; it might take a few extra turns.
- Deburr Carefully
- Finish with a small deburring tool to smooth the inside edge.
Tips:
- Work slowly in tight spaces to avoid slipping or damaging surrounding materials.
- Keep a flashlight handy to see your work clearly.
Autocut or Multitool with Metal Blade (Modern Power Option)
For the ultimate in speed and versatility, reach for an autocut tool or an oscillating multitool with a metal blade.
Why It Works
Auto cut tools snap onto the pipe and cut as you rotate them—no manual tightening needed. Oscillating multitools, meanwhile, use a fast-moving metal blade to slice through copper with ease.
Ideal for:
- Professional plumbers
- Quick, repetitive cuts
- Cutting in awkward or hard-to-reach spots
Step-by-Step Guide
- Select a Fine Metal Blade
- For multitools, choose a blade rated for non-ferrous metals.
- Clamp or Stabilize the Pipe
- Use a pipe clamp or hold the pipe securely. Power tools can cause the pipe to vibrate.
- Make the Cut
- For autocut, snap the tool onto the pipe and rotate until the cut is complete. For multitools, guide the blade slowly through the pipe.
- Safety Note:
- Multitools can create sparks. Always wear eye protection and work in a clear, dry area.
- Deburr as Needed
- Clean up the edge for a professional finish.
Comparison Table of All 5 Methods:
Method Ease of Use Cost Precision Best For
Tube Cutter 9/10 $$ 9/10 All-around, clean cuts
Hacksaw + Miter Box 6/10 $ 6/10 Budget, larger pipes
Rotary Pipe Cutter 8/10 $$$ 8/10 Multiple, fast cuts
Close-Quarters Cutter 7/10 $$ 8/10 Tight spaces
Auto cut/Multitool 8/10 $$$ 7/10 Pros, versatility
Troubleshooting Common Issues When Cutting Copper Pipe
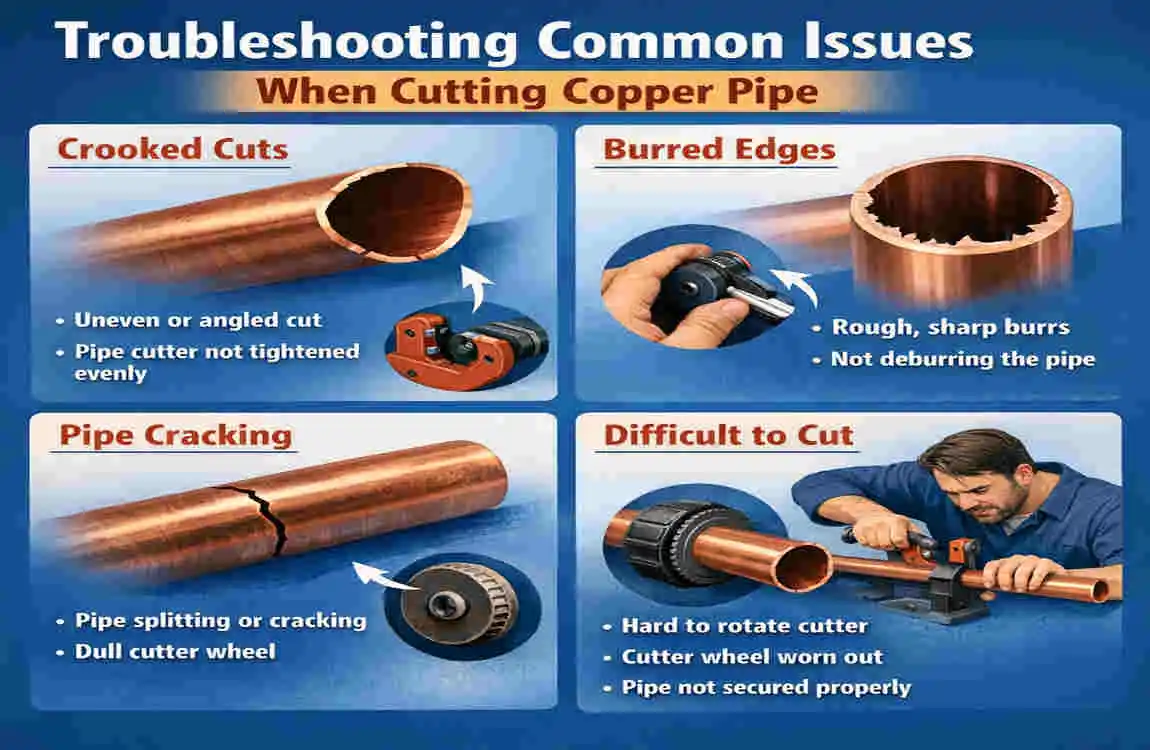
Even the best DIYers run into problems. Here’s how to fix the most common issues when learning how to cut house copper pipe:
- Burrs or Sharp Edges:
- Always use a deburring tool to smooth cut edges. Burrs can snag pipe fittings and cause leaks.
- Uneven Cuts:
- Double-check your measurements and use guides, such as a miter box. Practice makes perfect!
- Pipe Crushes or Deforms:
- Don’t over-tighten your cutter. If the pipe flattens, you’ll need to start over.
- Leaks at Joints:
- Uneven, jagged cuts don’t seal well. Re-cut if necessary, and always deburr before joining.
- Problems Cutting in Tight Spaces:
- Use a close-quarters cutter or multitool for better access.
Pro Tips for Perfect Copper Pipe Cuts Every Time
- Measure Accurately:
- Mark your cut line with a permanent marker for visibility.
- Practice on Scrap:
- If you’re new to cutting copper, try it on a leftover piece first.
- Test Fit Before Soldering:
- Always dry-fit your joints before committing to solder or install compression fittings.
- Keep Your Tools Clean:
- Wipe down your cutter blades and lubricate moving parts for longer life and smoother cuts.
- Store Your Tools Safely:
- Keeping everything organized prevents damage and saves time on your next project.
FAQs: How to Cut House Copper Pipe
Q: What’s the best tool to cut house copper pipe?
A: For most homeowners, a manual tube cutter offers the best mix of precision, affordability, and ease of use.
Q: Can I cut copper pipe with a Dremel or rotary tool?
A: Yes, with a metal-cutting wheel, but it’s harder to make straight, clean cuts—use with care.
Q: How do I cut copper pipe without a cutter?
A: A hacksaw is your best backup. Pair with a miter box for straight cuts, and always deburr the edge afterward.
Q: Do I need to turn off the water before cutting?
A: Absolutely! Shut off and drain the line before making any cuts.
Q: How do I avoid burrs inside the pipe?
A: Always use a deburring tool after cutting—never skip this step!
Q: Can I use a pipe cutter on old, corroded copper?
A: Yes, but go slowly—corrosion makes the pipe more brittle and prone to cracking.
Q: What’s the safest way to cut house copper pipe in a wall?
A: Use a close-quarters cutter or multitool with care; always check for hidden wires or obstacles first.