
You’ve just purchased a stack of raw plywood for your next DIY project. Whether it’s for a sleek set of kitchen cabinets, a rustic bookshelf, or a modern wall panel, you’re excited to transform this humble material into something extraordinary. But here’s the catch—raw plywood, while functional, lacks the polished look and durability you want for your home. That’s where staining comes in.
Staining house plywood is a game-changer for affordable home upgrades. Not only does it enhance the natural beauty of the wood grain, but it also protects the plywood from moisture, wear, and tear. Whether you’re a seasoned DIY enthusiast or a beginner, learning how to stain plywood at home can elevate your projects to a professional level.
Benefits of Staining House Plywood
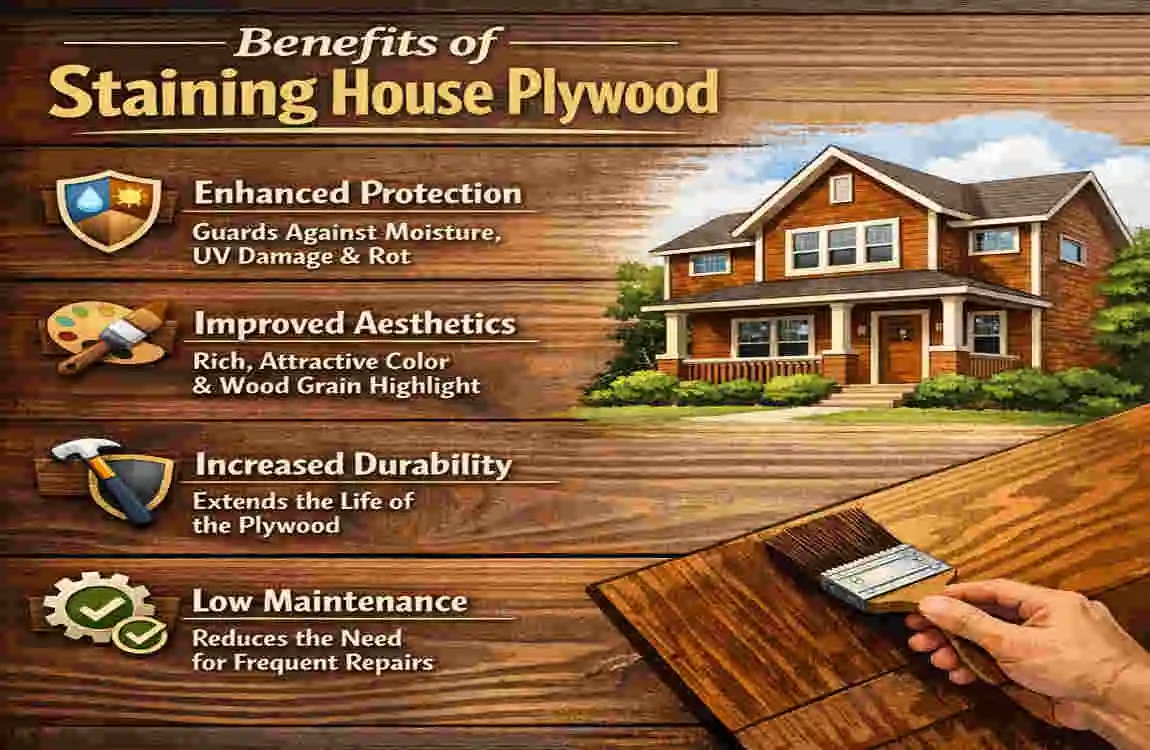
Staining plywood isn’t just about aesthetics—it’s a practical choice that offers a range of benefits. Let’s break it down:
Aesthetic Upgrades
Staining transforms raw plywood into a premium-looking material that mimics the appearance of solid wood. Whether you’re aiming for a rustic vibe or a sleek, modern finish, stains come in a range of shades to match your style. The natural grain of plywood, when enhanced with stain, adds warmth and character to any space.
Enhanced Durability
One of the biggest advantages of staining is the added protection it provides. Stains, especially when paired with a sealant, create a barrier against moisture, scratches, and general wear. This makes stained plywood ideal for high-traffic areas like floors, walls, or furniture.
Cost-Effective Solution
Plywood is already a budget-friendly material, but staining takes it a step further. Unlike painting, which can mask the natural beauty of wood, staining enhances its appearance without breaking the bank. For just a small additional cost, you can achieve a high-end look.
Here’s a quick comparison to highlight the difference:
Aspect Unstained Plywood Stained House Plywood
Durability Low (absorbs moisture) High (sealed protection)
Appearance Raw, industrial Warm, customized grain
Cost per sq ft $1-2 +$0.50 (stain/seal)
Home Use Cases Temporary builds Furniture, paneling
Tools and Materials Needed
Before you begin, gather the right tools and materials. Here’s what you’ll need:
Essential Tools
- Sandpaper (80-220 grit): For smoothing the surface.
- Tack cloths: To remove dust after sanding.
- Wood conditioner: Ensures even stain absorption.
- Stains (oil-based, gel, or water-based): Choose based on your project needs.
- Brushes or foam applicators: For applying stain and sealant.
- Sealers (e.g., polyurethane): To lock in the stain and add durability.
Safety Gear
- Gloves
- Masks
- Drop cloths to protect your workspace
Budget-Friendly vs. Pro Options
Here’s a breakdown of costs to help you plan:
Item Budget Option Pro Option Purpose
Sandpaper Set $10 $20 orbital sander Smooth surface
Wood Stain $15 quart $25 gel stain Even color absorption
Polyurethane Sealer $12 $30 Premium finish Long-lasting protection
Choosing the Right Plywood and Stain
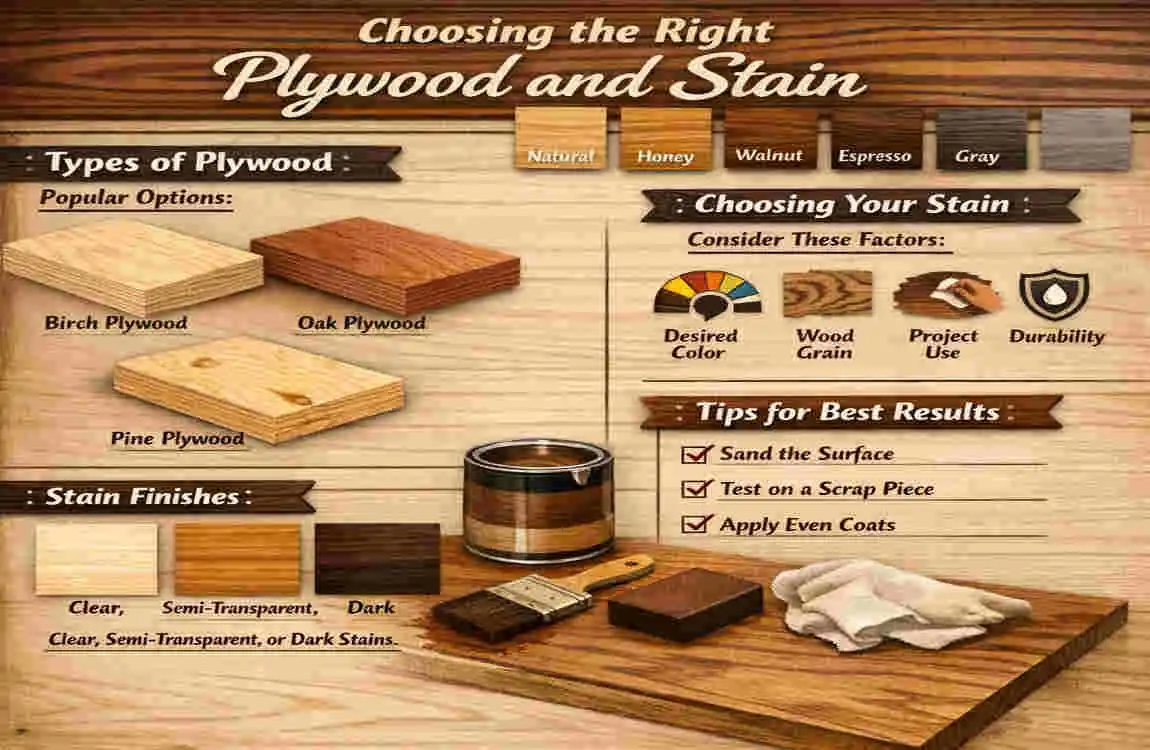
Plywood Types
Not all plywood is created equal. For staining, opt for high-quality options like birch plywood, which has a smooth surface and attractive grain. Avoid construction-grade plywood for visible projects, as it often has knots and imperfections.
Stain Types
Choosing the right stain is crucial for achieving your desired look. Here’s a comparison:
Stain Type: Best For House Plywood Pros Cons
Oil-Based Interiors : Deep penetration , Longer dry time
Water-Based Quick projects , Low odor, May raise grain
Gel Stain Blotchy woods No wipe-off needed Thicker application
Pro Tip: Always test your stain on a scrap piece of plywood before applying it to your project. This ensures you’re happy with the color and finish.
Surface Preparation Steps
Proper preparation is the foundation of a successful staining project. Follow these steps:
- Clean the Surface
- Remove dust, grease, or debris using a damp cloth or mild soap solution. For stubborn stains, use rubbing alcohol.
- Sand the Plywood
- Start with 80-grit sandpaper to remove rough spots, then progress to 220-grit for a smooth finish. Always sand in the direction of the grain to avoid scratches.
- Apply Wood Conditioner
- Soft plywood can absorb stains unevenly, leading to blotches. A wood conditioner helps the stain penetrate evenly. Apply it with a brush and let it sit for 5-15 minutes.
- Wipe with Tack Cloth
- After sanding and conditioning, use a tack cloth to remove any remaining dust.
Common Mistake to Avoid: Over-sanding the edges can expose the inner plies of the plywood, which may not absorb stain evenly.
Step-by-Step Staining Process
Now comes the fun part—staining! Here’s how to do it:
Set Up Your Workspace
Choose a well-ventilated area and protect your surfaces with drop cloths. Use sawhorses to elevate your plywood for easy access.
Apply Pre-Stain Conditioner
Using a brush, apply the conditioner evenly across the surface. Let it sit for 15 minutes before wiping off any excess.
Test and Stir the Stain
Always stir your stain to evenly mix the pigments. Test it on a scrap piece of plywood to ensure the color matches your expectations.
Apply the Stain
- Use a rag or brush to apply the stain in the direction of the grain.
- Let it sit for 5-15 minutes, depending on the desired color depth.
- Wipe off excess stain with a clean cloth.
Seal the Edges
Plywood edges are particularly porous. Apply a pre-seal layer to the edges before staining to ensure even absorption.
Lightly Sand Between Coats
For a smooth finish, sand lightly with 220-grit sandpaper between coats. Apply a second coat if needed and let it dry for 24 hours.
Timeline: Allow the stain to cure fully for 72 hours before using the plywood.
Sealing and Finishing
Sealing is the final step to protect your stained plywood. Here’s how:
- Choose Your Sealer
- Polyurethane: Offers waterproof protection and comes in matte, satin, or glossy finishes.
- Wax: Provides a natural sheen but is less durable.
- Apply Thin Coats
- Use a brush or foam applicator to apply 2-3 thin coats of sealer. Sand lightly between coats for a smooth finish.
- Maintenance
- For high-use areas, reapply the sealer annually to maintain durability.
Common Mistakes and Fixes
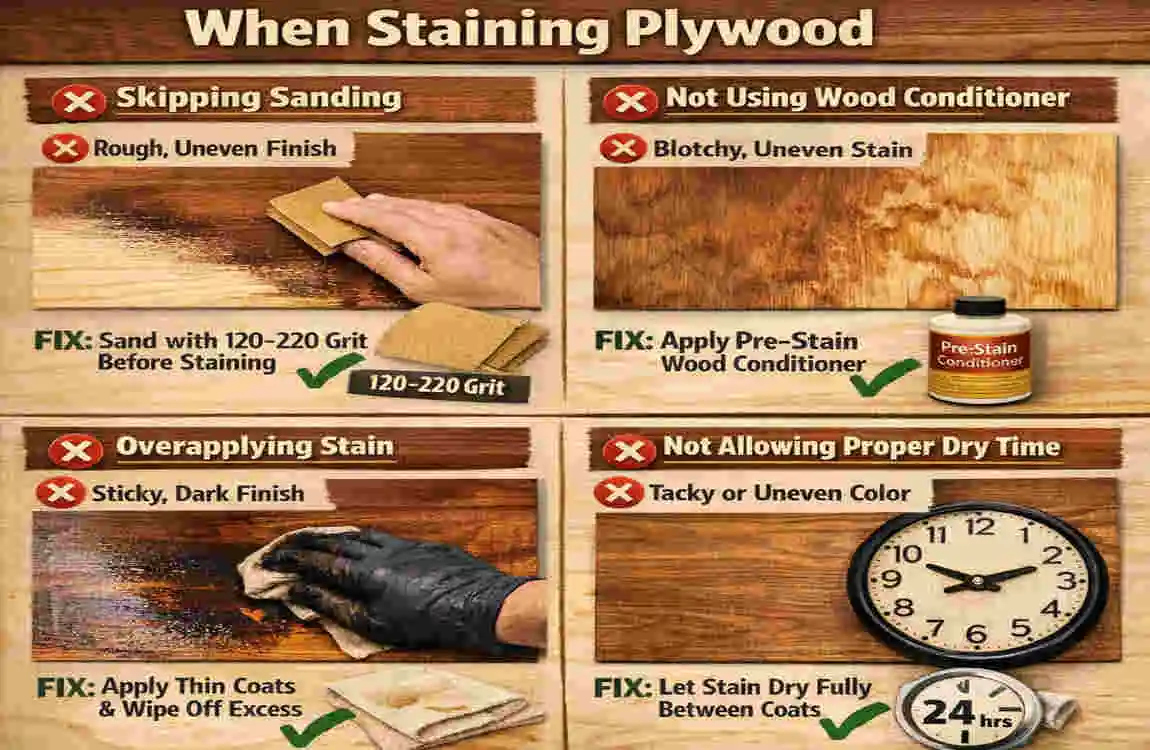
Issue Cause Fix
Uneven Color : No conditioner . Sand and reapply stain
Sticky Finish Excess stain Wipe off after 10 minutes
Blotching Poor prep Always clean and condition first
Home Project Ideas
Need inspiration? Here are some ideas for stained plywood projects:
- Kitchen Cabinets: Use a dark walnut stain for a rich, elegant look.
- Wall Paneling: Light oak stain creates a modern farmhouse vibe.
- Shelving: Gray gel stain adds an industrial touch.
FAQs About Staining House Plywood
Q: Can you stain plywood?
Yes, you can stain plywood, but it requires special preparation compared to solid wood. Plywood tends to absorb stain unevenly because of its layered construction and varying veneer quality, so proper sanding and conditioning are essential to avoid blotchy results .
Q: How do I prevent blotching when staining plywood?
Blotching happens when the stain soaks unevenly into the wood. To prevent this, lightly sand the plywood with fine-grit sandpaper and apply a wood conditioner before staining. The conditioner helps the stain absorb evenly, especially on softer plywood veneers .
Q: What type of stain is best for house plywood?
Oil-based stains penetrate deeply and provide rich color but take longer to dry. Water-based stains dry faster and have low odor but may raise the wood grain. Gel stains are thicker and good for blotchy woods since they don’t require wiping off excess stain .
Q: Do I need to seal stained plywood?
Yes, staining only changes the color and does not protect the wood. Applying a sealer or finish, such as polyurethane or lacquer, locks in the stain and adds durability and moisture resistance .
Q: How long does it take for stained plywood to dry?
Typically, stain dries to the touch within 24 hours, but full curing can take up to 72 hours depending on the stain type and environmental conditions. It’s best to wait this full period before heavy use or applying a sealer .
Q: Can I stain exterior plywood?
You can stain exterior plywood, but it must be sealed with a waterproof finish to protect it from weather damage. Without sealing, moisture can penetrate and cause warping or deterioration .
Q: What’s the best way to apply stain on plywood?
Apply stain with a brush or rag following the wood grain. Let it sit for a few minutes to penetrate, then wipe off excess with a clean cloth. Multiple coats can deepen the color, but always sand lightly between coats for smoothness .