
For many homeowners and DIY enthusiasts, plywood is often viewed merely as a structural material—something to be hidden behind drywall or painted over. However, high-quality plywood veneers can rival the beauty of solid wood when treated with respect and the right techniques. Staining house plywood is the ultimate upgrade for your kitchen cabinets, built-in shelving, and custom furniture projects. It offers significant cost savings compared to solid lumber, allows for full customization of color, and significantly increases the wood’s longevity.
Why Stain House Plywood? Benefits and Common Myths
Before we dive into the “how-to,” it is important to understand the “why.” Why should you choose stain over paint? And is plywood really good enough to show off?
Plywood Basics for Home Use
First, let’s distinguish between the types of wood we are talking about. When we discuss staining house plywood, we aren’t talking about the rough, knotty sheathing used for roofing. We are talking about cabinet-grade plywood.
This type of plywood features a core made of softwood layers, but the top layer—the face veneer—is a thin slice of high-quality hardwood. Common types you will find at your local hardware store include:
- Birch Plywood: Known for its pale color and smooth, tight grain. It takes stain relatively well but can be prone to blotching if not prepped correctly.
- Oak Plywood: Features a very distinct, open grain pattern that loves stain. It is the classic choice for traditional furniture.
- Pine Plywood: Very affordable but soft. It has a wild grain pattern that looks rustic but requires extra care to stain evenly.
- Maple Plywood: Hard and smooth with a subtle grain. It can be tricky to stain dark colors but looks beautiful with lighter tones.
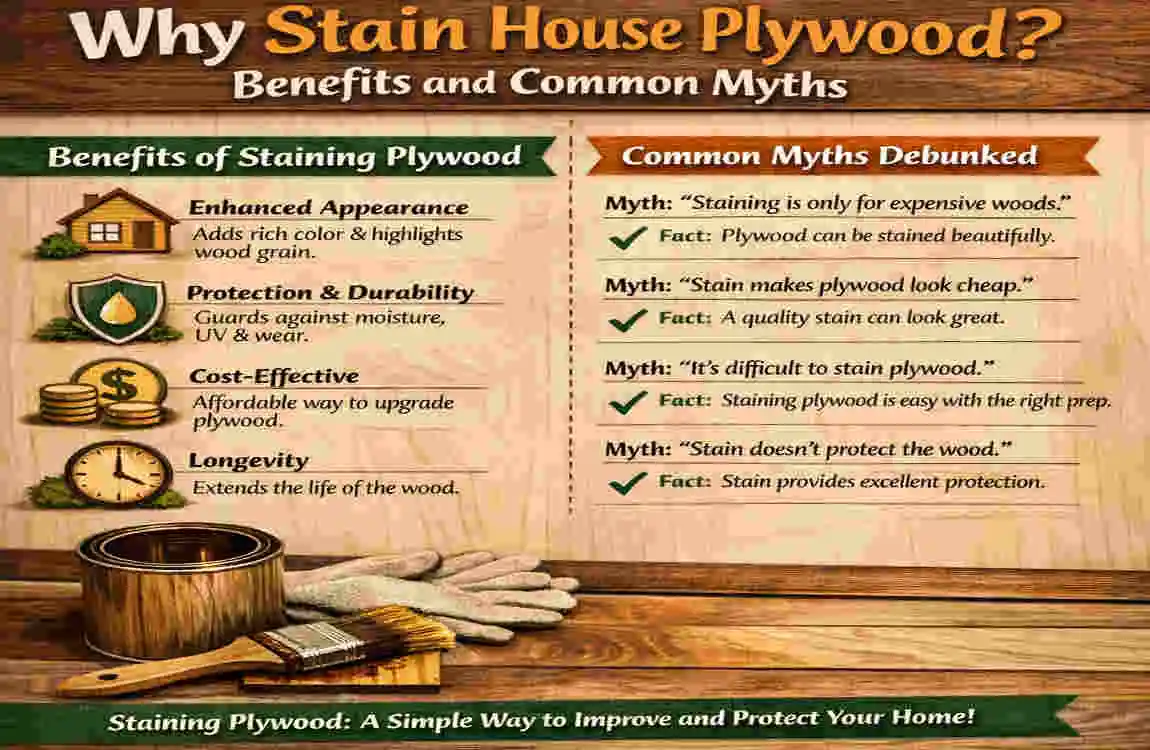
Top Benefits of Staining
Why go through the effort of staining? Here are the top reasons professionals choose this finish:
- Grain Enhancement: Paint covers the wood; stain celebrates it. Staining highlights the natural beauty, knots, and unique grain patterns of the veneer, giving your piece character and warmth.
- Protection and Durability: A proper stain-and-seal job does more than look good. It acts as a barrier against moisture, UV rays, and daily wear and tear. According to home improvement studies, well-maintained, stained plywood cabinets can last 10 to 15 years longer than untreated or poorly finished alternatives.
- Resale Value: Natural wood finishes are timeless. While paint colors come and go, the look of stained wood suggests quality and permanence, which can subtly boost your home’s perceived value.
Debunking Myths
There is a persistent myth that “plywood doesn’t stain well.” This is simply false.
The issue isn’t the material; it is the technique. Plywood is wood. The face veneer is real wood. The reason some people struggle is that they treat it like a solid 2×4. Plywood veneers are thin, and different species absorb stain at different rates. If you have ever seen a “zebra-stripe” or blotchy effect, that wasn’t the plywood’s fault—it was a lack of wood conditioner or improper sanding. We are going to show you how to completely bypass those issues.
Materials and Tools You’ll Need for Staining House Plywood
You cannot do a professional job with amateur tools. However, you don’t need to buy out the entire hardware store. Here is the essential list of what you need to effectively stain house plywood.
The Essentials
- Sandpaper: You will need a variety of grits. Grab 120-grit for initial smoothing, 180-grit for intermediate sanding, and 220-grit for the final polish before staining.
- Sanding Block or Orbital Sander: An electric orbital sander saves time, but a hand block gives you better control on edges.
- Pre-Stain Wood Conditioner: Do not skip this. This is the secret sauce for preventing blotches on plywood.
- Wood Stain: Choose between Oil-Based (easier to work with, longer drying time, richer color) or Water-Based (low odor, fast drying, but raises the grain).
- Stir Sticks: Never shake stain; always stir it.
- Applicators: Lint-free rags (old t-shirts work great) or foam brushes.
- Protective Gear: Nitrile gloves and a respirator mask (especially for oil-based products).
- Topcoat/Sealer: Polyurethane or Polycrylic to lock in the color.
Budget Breakdown for Beginners
If you are new to this, it helps to know what to look for. Here is a quick reference table to help you shop smart.
Tool/Material Purpose Recommended Brands
Sandpaper Smoothing the surface and removing scratches. 3M Pro Grade or Norton
Pre-Stain Conditioner Prevents blotchiness by sealing pores. Minwax or Varathane
Wood Stain Provides color and highlights grain. Minwax (Oil) or General Finishes (Gel)
Polyurethane Protects the wood from scratches and water. Minwax (Fast-Drying)
Tack Cloth Removes fine dust before staining. HDX or generic brands
Step-by-Step Guide: Best Techniques for Staining House Plywood
Now, let’s get to work. This section is the core of your project. Follow these steps in order, and do not rush the process. Staining house plywood is an art that rewards patience.
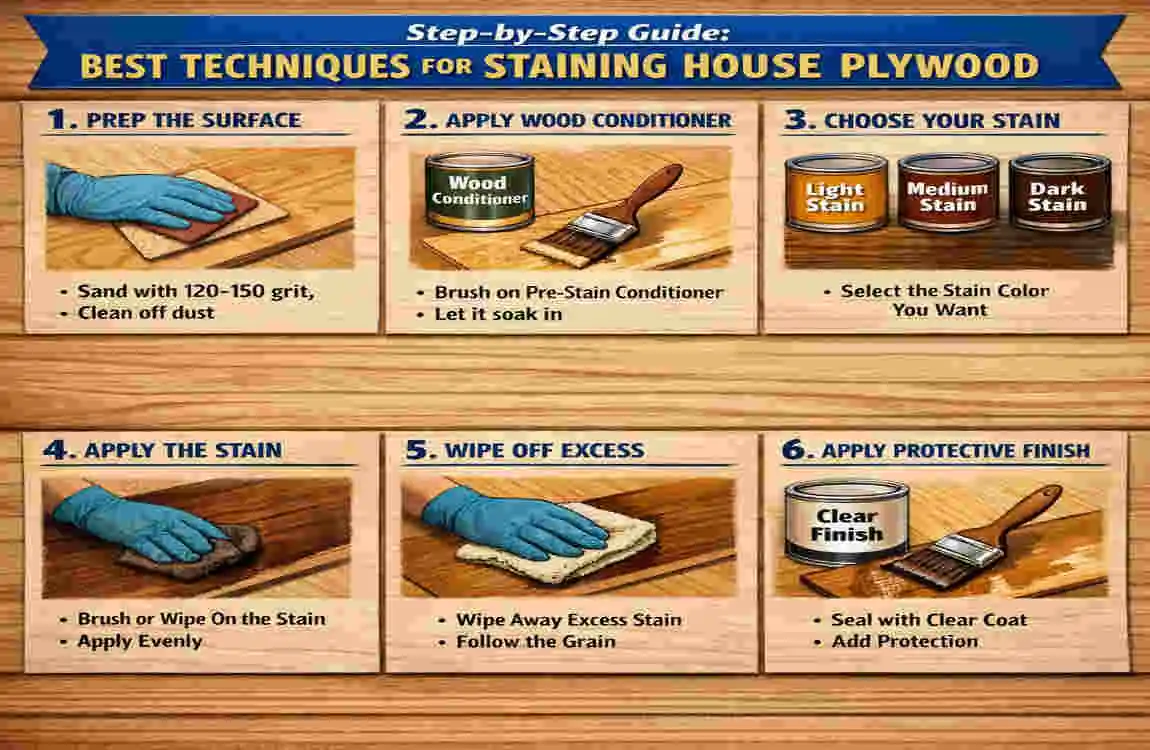
Prep Work: The Foundation of Success
The difference between a DIY disaster and a pro finish is 80% preparation. You cannot stain over a dirty or rough surface.
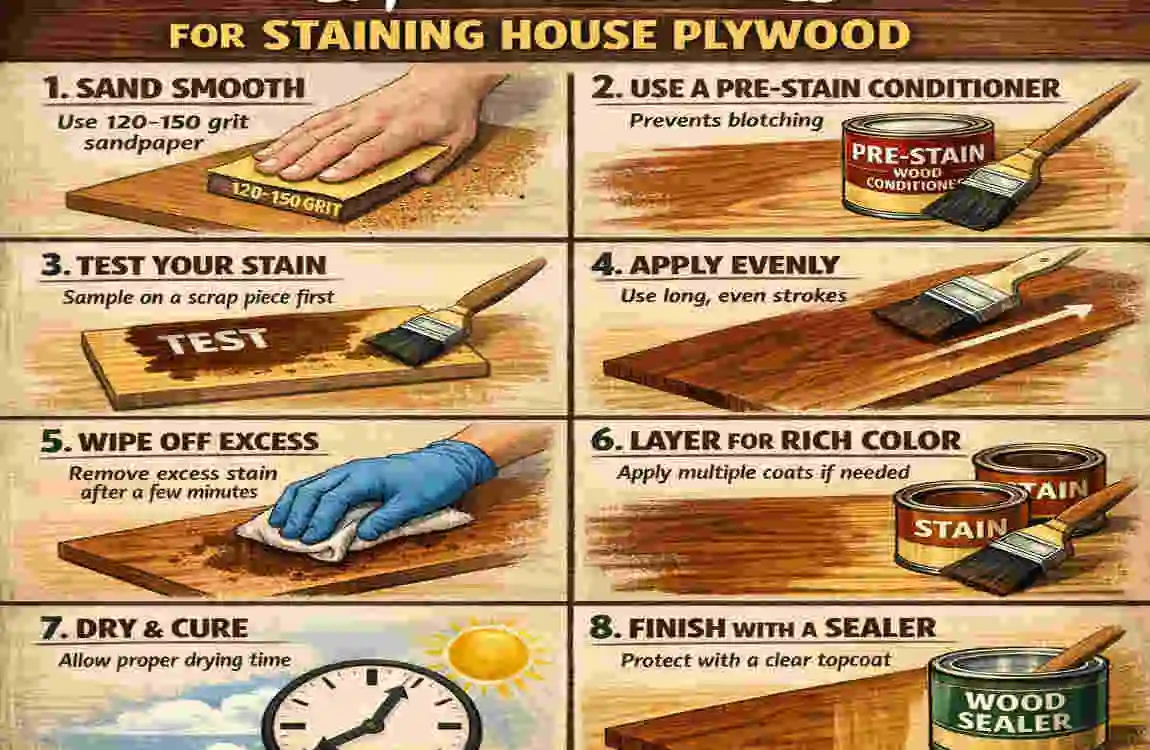
Sanding Sequence: Start by sanding your plywood. Even “pre-sanded” plywood from the store needs work.
- Begin with 120-grit sandpaper. Move the sander in the direction of the grain (the lines in the wood). If you go across the grain, you will leave scratches that the stain will highlight later.
- Wipe off the dust.
- Move to 180-grit, and finally 220-grit.
- Warning: Be careful not to sand too aggressively. Plywood veneers are thin (sometimes less than 1/32 of an inch). If you sand too hard in one spot, you might burn through the veneer to the ugly core layers beneath.
Cleaning: Once sanding is complete, use a vacuum with a brush attachment to remove dust from the pores. Finally, wipe the entire surface with a tack cloth. This sticky cloth grabs the microscopic dust that vacuums miss.
Water Popping (Optional but Recommended for Dark Stains): If you want a very dark, rich color, you can “pop the grain.” Wipe the wood with a damp rag (not soaking). Let it dry. This opens the wood fibers, allowing them to absorb more pigment.
Choosing and Testing Stain
Never apply stain directly to your project without testing it first. Plywood absorbs stain differently than the color swatch on the can suggests.
Use a scrap piece of the same plywood you are using for the project. Apply your stain and let it dry. Move the scrap piece into the room where the furniture will live. Look at it under daylight and under your lamps at night.
Pro Tip: If the color is too dark, you can dilute oil-based stain with mineral spirits. If it is too light, you will need multiple coats.
Applying the Stain – Pro Techniques
This is the moment of truth.
The Conditioner Step: Before opening the stain can, apply a coat of Pre-Stain Wood Conditioner. Brush it on, let it sit for about 5-15 minutes (check the can instructions), and wipe off the excess.
- Why? Softwoods like pine and birch have pores that soak up stain like a sponge in some spots and resist it in others. Conditioner levels out the playing field, ensuring an even color.
- Timing: You usually have a 2-hour window to stain after conditioning. Don’t wait too long!
The Application: Stir your stain thoroughly to mix the pigments that have settled at the bottom.
- Dip and Wipe: Dip a lint-free rag or foam brush into the stain. Apply it to the wood in long, smooth strokes, following the grain.
- Saturation: Ensure the wood is fully wet with stain. Don’t worry about it looking uneven while it’s wet; just make sure there are no dry spots.
- The Wait: Let the stain penetrate for 5 to 15 minutes. The longer you leave it, the darker it gets.
- The Wipe-Off: This is the most critical step. Using a clean rag, wipe off all excess liquid from the wood. You want to wipe until the wood looks dry. Do not let excess stain dry on the surface. Stain is meant to be in the wood, not on it. If it dries on top, it will peel later.
Layering for Depth: If the first coat isn’t dark enough, wait for it to dry completely (according to the can), lightly sand with fine steel wool, and apply a second coat.
Drying and Between-Coat Tips
Patience is your best friend here.
- Oil-based stains typically need 24 hours to dry.
- Water-based stains might be dry in 4 to 6 hours.
High humidity will slow down drying times. If the wood feels tacky or cool to the touch, it is not dry. Do not apply a sealer yet!
Sealing for Lasting Beauty
Stain provides color, but it offers almost no protection. You need a topcoat.
- Polyurethane (Oil-Based): Adds a slight amber/yellow tone. Incredible durability. Great for darker woods.
- Polycrylic (Water-Based): Dries crystal clear. Best for light woods or white-washed looks where you don’t want yellowing.
Application:
- Stir the poly gently (shaking creates bubbles).
- Use a high-quality synthetic brush. Apply in long, even strokes.
- Let the first coat dry.
- Sand lightly with 220-grit sandpaper to remove any dust bumps or raised grain.
- Wipe clean and apply a second coat.
- Three coats are usually standard for tabletops; two coats are fine for vertical sides.
Top Stain Colors for House Plywood Projects
Choosing a color can be the hardest part. Trends change, but some classics remain. Here are the top choices for staining house plywood in modern homes.
Natural Tones
- Golden Oak: This highlights the wood’s yellow and orange hues. It warms up a room and looks great in traditional kitchens. It is very forgiving on plywood grain.
- Puritan Pine: A very light, subtle stain that just barely tints the wood. Perfect if you want that “Scandi-style” raw-wood look, but with a bit more depth.
Rich & Traditional
- Dark Walnut: The king of stains. It turns inexpensive birch plywood into something that looks like high-end heritage furniture. It’s a deep, chocolate brown that hides imperfections well.
- Red Mahogany: Adds a deep red/purple tint. It’s formal and elegant, often used for libraries or office desks.
Bold & Modern
- Ebony: This gives you a near-black finish while still letting the grain texture show through. It is perfect for modern, minimalist aesthetics.
- Classic Gray / Weathered Oak: The “farmhouse” look is still huge. These stains simulate aged, driftwood effects.
- Note: Gray stains can look blue on some plywood. Always test first!
Custom Blends
Did you know you can mix stains? If Walnut is too dark and Golden Oak is too yellow, mix them 50/50 in a separate container. This allows you to create a completely custom color for your staining house plywood project that perfectly matches your home decor.
Expert Tips and Tricks for Pro-Level Results
To truly elevate your work, keep these expert tips in mind. These are the lessons usually learned the hard way!
- Handle the Edges: Plywood has ugly, layered edges. Before staining, apply “edge banding.” This is a roll of wood veneer with glue on the back that you iron onto the edge. Once applied and sanded, it makes the plywood look like a solid board.
- Fixing Mistakes: Blotches: If you forgot conditioner and have blotches, you can try lightly sanding the dark spots or applying a darker gel stain over the whole piece to hide the variation.
- Drips: If a drip dries, use a sharp razor blade to carefully scrape it flat, then dab a little stain on the spot and blend it.
- Safety First: Ventilation: Always work in a garage or a well-ventilated room. The fumes can be strong.
- Rag Disposal: This is critical. Oily rags can spontaneously combust (catch fire) if wadded up and thrown into the trash. Lay them flat outdoors to dry completely until they are hard and brittle, then throw them away.
- The “Gel Stain” Cheat: If your plywood is low-quality or has ugly grain, consider using Gel Stain. It is thicker, like pudding, and sits on top of the wood rather than soaking in. It provides very even coverage and hides grain issues.
Maintenance: Keeping Your Stained Plywood Beautiful Long-Term
You have put in the work; now make it last. Properly finished plywood is easy to care for.
- Cleaning: Dust regularly with a soft, dry cloth. For deeper cleaning, use a damp cloth with mild soap and water. Avoid harsh chemical cleaners, ammonia, or bleach, which can strip the polyurethane.
- Humidity Control: Wood expands and contracts with moisture. Try to keep your home’s humidity levels consistent. Drastic changes can cause the veneer to crack over time.
- Annual Touch-ups: You don’t need to re-stain every year. However, if you notice scratches in the clear coat, you can lightly sand the surface and apply a fresh coat of polyurethane to restore the shine and protection.
Frequently Asked Questions (FAQ) About Staining House Plywood
Can you stain any type of plywood?
Technically, yes, but results vary. Construction-grade plywood (like CDX used for roofing) is very rough, has many knots, and is made of soft pine that absorbs stain unevenly. It will look rustic and industrial. For furniture, cabinets, or shelves, you should always use Cabinet-Grade Plywood (like Baltic Birch, Oak, or Maple). These have a smooth “face veneer” intended for staining and will give you that professional, solid-wood look.
How do I stop my plywood from looking blotchy or splotchy?
The secret weapon is Pre-Stain Wood Conditioner. Plywood veneers (especially pine and birch) have uneven density. Some spots are thirsty and drink up stain instantly (turning black), while others resist it.
- The Fix: Apply a coat of Pre-Stain Conditioner before you stain. It penetrates the wood and limits how much stain it can absorb, ensuring an even, consistent color. Never skip this step on softwoods!
Do I really need to sand “pre-sanded” plywood?
Yes, absolutely. “Pre-sanded” from the factory usually just means it’s smooth enough not to give you splinters, but it isn’t ready for stain. The factory machines often leave invisible crush marks or “mill glaze” that prevents stain from soaking in.
- Pro Tip: Lightly sand with 180-grit and then 220-grit sandpaper. This opens the wood pores. Just be careful not to sand too hard, or you might sand right through the thin top layer of wood!
Is Gel Stain better for plywood than liquid stain?
It depends on the look you want.
- Liquid Stain (Penetrating): Soaks into the wood. It highlights the grain pattern beautifully but is harder to control on blotchy woods.
- Gel Stain: Sits on top of the wood, like a translucent paint. It is fantastic for plywood because it doesn’t blotch easily and provides very rich, uniform color. If your plywood has an ugly grain pattern you want to hide, Gel Stain is the best choice.
Why is my stain sticky and not drying?
You likely applied too much or didn’t wipe it off. Stain is not paint; it is not meant to form a thick layer on top. The wood can only absorb so much.
- The Fix: If it’s been a few hours and it’s sticky, take a clean rag dampened with a little mineral spirits and wipe the surface gently to remove the excess goo. Then, let it dry for another 24 hours. If you leave sticky stain, your clear coat (polyurethane) will peel off later.
How do I hide the ugly layered edges of the plywood?
Use Iron-On Edge Banding. The edges of plywood show the stacked layers (the “sandwich”), which looks unfinished.
- The Fix: Buy a roll of real wood Edge Banding (veneer tape) that matches your plywood species (e.g., Oak banding for Oak plywood). It has heat-activated glue on the back. You simply iron it onto the edge with a household iron, let it cool, and trim the excess with a utility knife. Once stained, it looks like a solid piece of wood.
Should I use oil-based or water-based polyurethane to seal it?
It comes down to color preference and drying time.
- Oil-Based Poly: Very durable, but it adds a slight amber/yellow tint. This looks great on warm colors (like Walnut or Oak) but can make gray stains look greenish or white stains look yellow. It takes longer to dry.
- Water-Based Poly (Polycrylic): Dries crystal clear and stays clear. It’s perfect for gray, white, or very light natural stains. It dries very fast (in about 2 hours).
Can I stain over old, finished plywood?
Not directly. Stain needs to penetrate the wood pores. If there is old varnish, paint, or wax on the plywood, the stain will just sit on top and wipe right off.
- The Fix: You must strip the old finish completely using a chemical stripper or sanding. However, be very careful sanding old plywood—you risk sanding through the veneer. If you can’t strip it, use a Gel Stain or a “Poly-Stain” (stain and sealer in one), as these can bond to older finishes better than penetrating stains.