
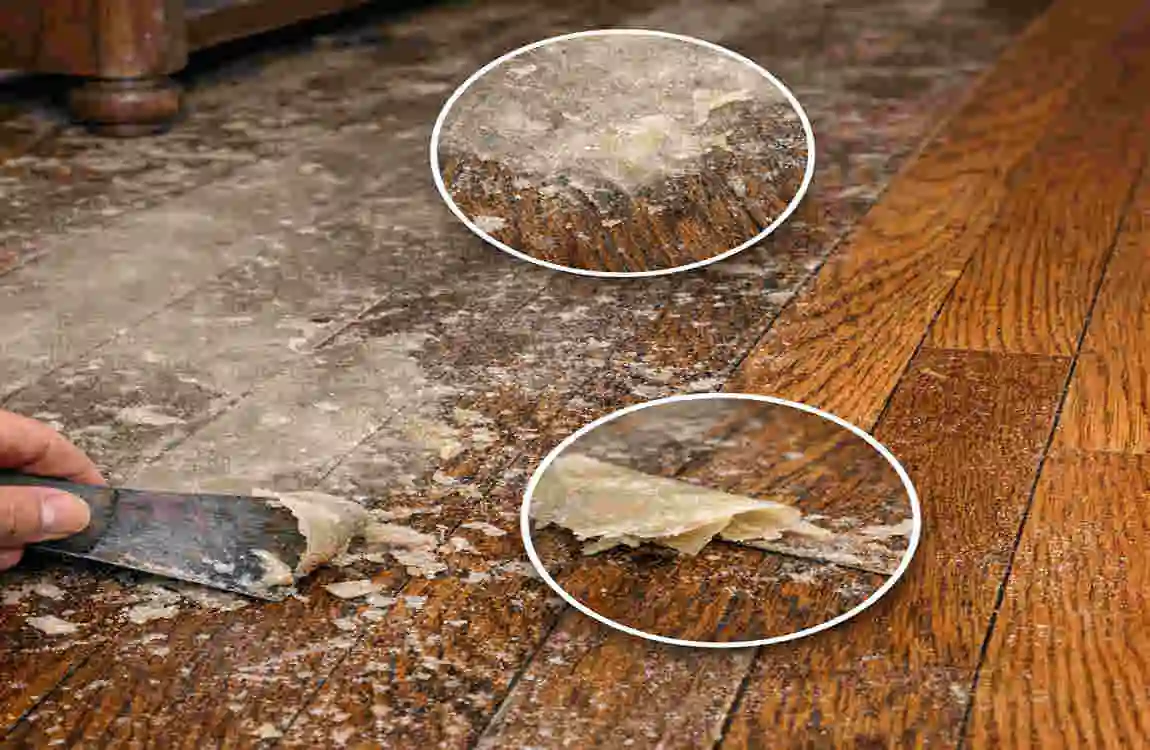
Wax buildup on wood floors can make a beautiful floor look dull, cloudy, and sticky. In some cases, it can also trap dirt and leave uneven patches that are hard to clean. If you have noticed that your floor no longer shines the way it used to, wax may be the reason.
The good news is that you can fix this without hurting the wood. The key is to use gentle methods, work slowly, and avoid harsh cleaning steps. If you are wondering how to remove wax from wood floors, the answer starts with the right supplies and the right process.
Understanding Wax Buildup on Wood Floors
What Causes Wax Buildup?
Wax buildup usually happens little by little. Many people apply wax more than they need to because they want a stronger shine. Over time, those layers stack up, creating a thick film.
Another common cause is using the wrong cleaning products. Some sprays, polishes, or heavy cleaners leave a residue that mixes with wax, making the floor look cloudy. If you keep adding product without fully removing the old layer, the problem gets worse.
A lack of regular maintenance can also lead to buildup. When dirt, dust, and old polish are left on the floor, they settle into the wax, making the surface look dull. Instead of a clean shine, you get a sticky, uneven finish.
Signs Your Wood Floor Has Too Much Wax
One of the first signs is a cloudy or hazy look. The floor may seem shiny in some spots and dull in others, even after cleaning. That uneven look is often a clear sign of extra wax.
You may also notice that the floor feels sticky or slippery underfoot. This strange texture occurs when wax layers thicken and do not dry or wear evenly. It can make walking across the room feel unpleasant.
Another sign is dirt trapped in the surface. If the floor seems to collect dust very quickly, the wax may be holding onto it. In some cases, the shine may look patchy, with some spots reflecting light and others looking flat.
If you see these signs, it is a good time to remove the extra wax before it causes more problems.
How Do You Remove Wax from Wood Floors?
Gather the Necessary Supplies
Before you start, gather everything you need. Having your tools ready makes the process smoother and helps you work carefully.
You will usually need:
- Soft cloths
- Microfiber mop
- Mineral spirits, if the floor type allows it
- Plastic scraper
- Protective gloves
Keep the tools simple. You do not want anything rough that can scratch the wood. A soft cloth and a microfiber mop are usually enough for light buildup. For heavier buildup, you may need a stronger remover, but always check that it is safe for your floor finish.
Test a Small Hidden Area First
This step matters a lot. Even gentle cleaners can react differently depending on the floor’s finish, age, or condition. A small test spot helps you avoid damage across the whole room.
Choose a hidden place, such as under a piece of furniture or in a corner. Apply a small amount of your chosen cleaner and wait a few minutes. Then check whether the finish looks faded, cloudy, or damaged.
If the test area looks fine, you can continue. If it changes for the worse, stop and try a different method. This simple step can prevent a lot of harm to your floor.
Step-by-Step Wax Removal Process
Start by sweeping or vacuuming the floor. Remove all loose dust, grit, and debris first. This keeps small particles from scratching the surface while you work.
Next, apply the wax-removal solution to a soft cloth, not directly onto the wood, unless the product instructions say otherwise. Work in a small section at a time. This helps you control the process and avoid over-wetting the floor.
Let the solution soften the wax for a short time. Do not rush this part. When the wax starts to loosen, it becomes easier to wipe away without force.
Then gently wipe or scrape the residue. If needed, use a plastic scraper, not a metal one. A plastic scraper can lift soft wax without digging into the wood.
Finally, buff the floor with a clean cloth. This removes leftover haze and helps restore a cleaner look. Repeat the process as needed until the wax buildup is gone.
Safe Methods for Removing Wax
Using Mineral Spirits
Mineral spirits can work well for heavy wax buildup. They are often used when the wax layer is thick and does not come off easily with mild cleaning.
To use them safely, apply a small amount to a cloth and wipe one section at a time. Do not soak the wood. Work in a well-ventilated room, wear gloves, and keep the area away from flames or sparks.
Mineral spirits can be effective, but they are not for every floor. That is why the test spot is so important. If the finish reacts badly, stop right away.
Using Vinegar and Warm Water
For light wax residue, a mixture of vinegar and warm water can help. This is a gentler option when the buildup is not too heavy.
A simple ratio is 1 cup of vinegar to 1 gallon of warm water. Dip a microfiber cloth into the mixture, wring it out well, and gently wipe the floor. The cloth should be damp, not wet.
This method works best on small areas and light residue. It is not always strong enough for thick wax, but it can help loosen surface buildup without using harsh products.
Commercial Wax Removers
Commercial wax removers are made to break down buildup more quickly. They can be a good choice when the floor has several layers of old wax or when other methods do not work well.
The most important thing is to read the instructions carefully. Different products have different directions, drying times, and safety warnings. Some are designed for certain finishes only.
Use the product exactly as directed and test it first. This keeps you from removing more than the wax and helps protect the wood finish underneath.
Mistakes to Avoid When Removing Wax
Using Excess Water
Too much water can be a big problem for wood floors. Wood absorbs moisture, and that can lead to swelling, warping, or finish damage.
Always use a damp cloth, not a soaking wet one. If water pools on the surface, wipe it up right away. The goal is to clean the wax, not feed the wood too much moisture.
Scrubbing Too Aggressively
It may be tempting to scrub hard when the wax does not come off fast. But strong scrubbing can scratch the wood or wear down the finish.
Instead, use a gentle touch and let the cleaner do the work. If a spot stays sticky, repeat the process rather than forcing it off. Patience protects the floor.
Using Harsh Chemicals
Some strong cleaners can strip the finish completely. That may remove the wax, but it can also leave the wood exposed and dry.
Avoid bleach, abrasive powders, and random heavy-duty cleaners unless they are clearly safe for wood floors. When in doubt, choose the mildest effective option first.
Skipping the Test Spot
This is one of the most common mistakes. If you skip the test area, you risk damaging the full floor before you know how it will react.
A small hidden test takes only a few minutes, but it can prevent costly repairs. Always check before moving forward.
How to Restore Shine After Wax Removal
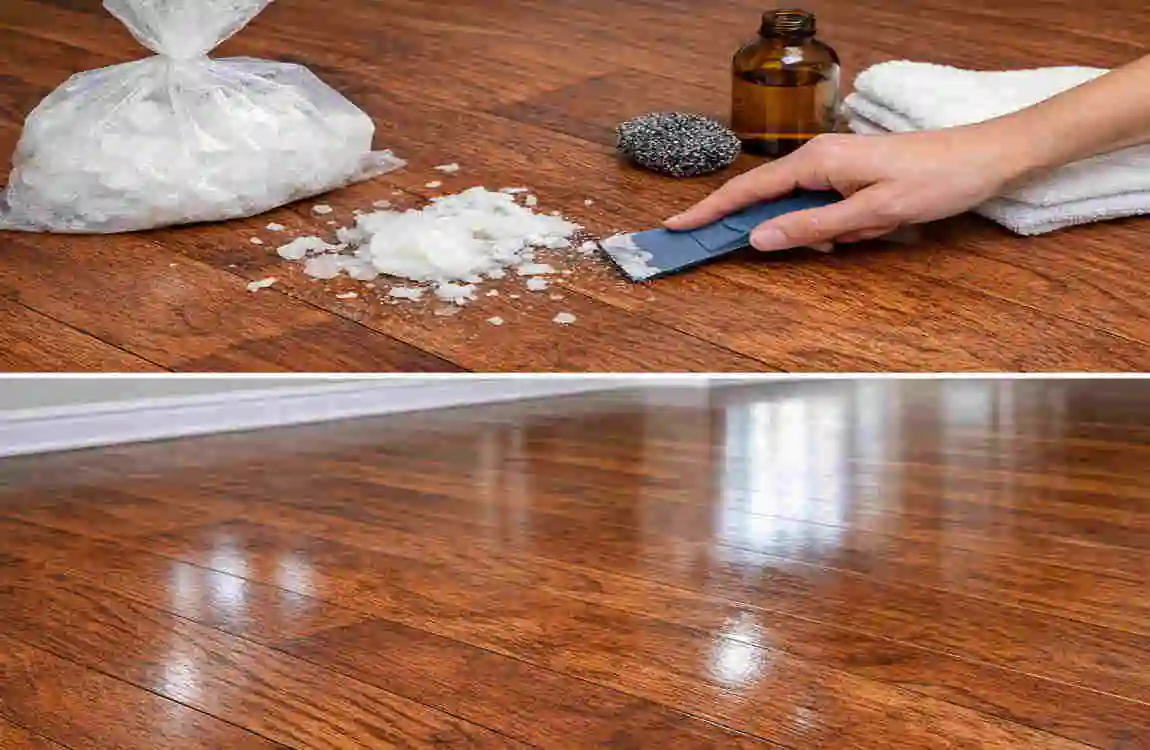
Buffing the Floor
After the wax is gone, the floor may look a little dull at first. That is normal. Buffing helps bring back a smoother, cleaner shine.
Use a dry microfiber cloth or a soft buffing pad. Move in small circles or gentle back-and-forth motions. This helps even out the surface and remove any leftover haze.
Do not press too hard. Light buffing is usually enough to improve the look without harming the finish.
Applying a New Protective Finish
If the floor still needs protection after the wax is removed, think carefully before adding anything new. Wax and polyurethane are not the same, and they do not work the same way.
Some wood floors already have a sealed finish and do not need wax at all. Others may benefit from a light protective layer, but only if the floor type allows it. If you are unsure, check the flooring instructions or ask a professional.
The goal is to protect the floor, not overload it with more product.
Regular Maintenance Tips
After you restore the shine, keep the floor looking good with simple habits. Dust it often, clean spills quickly, and avoid using too much polish.
A soft broom, dry mop, or microfiber cloth is usually enough for regular care. This helps keep dirt from settling into the surface again.
Preventing Future Wax Buildup
Use the Right Cleaning Products
Choose wood-floor-safe cleaners that do not leave a sticky film behind. Avoid products that promise a heavy shine unless your floor specifically needs wax.
Simple, safe cleaning usually works best. The less residue you leave behind, the less buildup you will have later.
Follow Recommended Waxing Intervals
Do not wax more often than needed. Extra layers do not always improve the floor. In fact, too much wax can cause the same cloudy look you are trying to avoid.
Always follow the flooring maker’s advice. If the floor does not need frequent waxing, keep it simple and let regular cleaning do most of the work.
Clean Spills Quickly
Spills can mix with wax, leaving marks or sticky patches. Clean them as soon as you see them.
Use a soft cloth and a small amount of water or wood-safe cleaner. Quick cleanup helps prevent residue from settling into the surface.
Frequently Asked Questions
How do you remove wax from wood floors naturally?
A mixture of warm water and vinegar can help loosen light wax buildup, then gently buff with a microfiber cloth.
Can vinegar damage hardwood floors?
When diluted properly and used sparingly, vinegar can be safe for some floors, but always test in an inconspicuous area first.
What is the best wax remover for hardwood floors?
Mineral spirits and commercial hardwood floor wax removers are often effective for heavy wax buildup.
Can I remove floor wax without sanding?
Yes. Most wax buildup can be removed using wax-removal solutions and gentle buffing without sanding.
How often should wood floors be waxed?
Most wood floors only need waxing occasionally. Follow the flooring manufacturer’s recommendations.
What should I do after removing wax from wood floors?
Buff the surface, clean away residue, and apply a suitable protective finish if needed.
| Method | How to Do It | Why It’s Safe | |
|---|---|---|---|
| Harden the wax | Place an ice pack or ice cubes in a plastic bag on the wax for 5–10 minutes | Cold hardens wax so it lifts off without scratching | |
| Scrape gently | Use a plastic scraper, credit card, or dull knife to lift the hardened wax | Plastic won’t scratch the wood finish like metal tools | |
| Apply heat & absorb | Cover remaining wax with a paper towel, then warm with a hair dryer (low heat) or iron on lowest setting | Heat melts wax; paper towel absorbs it without moisture damage | |
| Clean residue | Wipe with a damp cloth + mild dish soap, then dry immediately | Gentle soap dissolves film; quick drying prevents water damage | |
| Optional solvent | For stubborn spots, dab with mineral spirits or rubbing alcohol on a cloth (test first!) | Dissolves wax without harming sealed wood if tested | |
| Final clean | Use a wood floor cleaner suitable for your floor type to remove any solvent traces | Restores natural finish and removes remaining residue |