Have you ever stepped into the shower only to be greeted by a disappointing trickle of water? Or have you noticed your washing machine taking forever to fill up? These frustrating experiences often point to one common culprit: improper water pressure in your home’s plumbing system.
Low water pressure turns simple tasks into time-consuming ordeals. Your morning shower becomes less invigorating, dishes take longer to rinse, and your sprinkler system struggles to keep your lawn green. On the flip side, excessive water pressure poses even more serious risks. It can cause pipes to burst, fixtures to leak prematurely, and appliances to fail before their time. High pressure also wastes water and drives up your utility bills.
Understanding Water Pressure in Home Plumbing

What Is Water Pressure and Why Does It Matter?
Think of water pressure as the force that pushes water through your pipes and out of your fixtures. Just as your blood pressure keeps your body functioning, your plumbing system needs the right amount of pressure to function correctly. Too little, and water struggles to reach its destination. Too much, and you risk damaging the very system meant to deliver it.
Water pressure directly impacts every water-using activity in your home. It determines how quickly your toilet tank refills, how powerfully your shower spray feels, and how efficiently your dishwasher cleans. When pressure levels are optimal, these everyday tasks happen seamlessly. But when they’re off, you’ll notice immediately.
The Ideal Pressure Range for Your Home
Most plumbing professionals agree that residential water pressure should fall between 40 and 60 PSI (pounds per square inch). Some experts extend this range slightly, suggesting 45-65 PSI as acceptable. However, the sweet spot for most homes sits right around 50 PSI.
Why this specific range? At 40 PSI or below, you’ll start experiencing weak water flow, which can make daily tasks frustrating. Above 60 PSI, the increased force begins stressing your pipes, fixtures, and appliances. Many building codes actually require pressure-reducing valves when municipal water pressure exceeds 80 PSI.
Measuring Water Pressure: Tools and Techniques
Before you can adjust your water pressure, you need to know what you’re working with. Measuring water pressure requires a simple tool called a pressure gauge, which you can find at most hardware stores for under $20.
These gauges typically feature:
- A threaded connection that attaches to hose bibs or faucets
- An easy-to-read dial showing pressure in PSI
- A maximum pressure indicator (helpful for catching pressure spikes)
To get an accurate reading, attach the gauge to an outdoor spigot or laundry tub faucet. Make sure all other water fixtures in your home are turned off, then fully open the valve. The gauge will display your static water pressure within seconds.
Recognizing the Signs of Pressure Problems
Your home often sends clear signals when water pressure isn’t correct. Low-pressure symptoms include:
- Showers that produce weak, unsatisfying streams
- Faucets that take forever to fill pots or buckets
- Multiple fixtures are losing pressure when used simultaneously
- Washing machines and dishwashers with extended cycle times
- Toilets that refill slowly after flushing
High-pressure warning signs are equally vital to recognize:
- Banging or hammering sounds in pipes (water hammer)
- Faucets that splash excessively or feel harsh
- Frequent leaks in fixtures or appliances
- Toilet valves that constantly run or leak
- Unusually high water bills without increased usage
Causes of Water Pressure Problems
Common Culprits Behind Low Water Pressure
When your water pressure drops, several factors may be to blame. Mineral buildup ranks among the most frequent offenders, especially in areas with hard water. Over time, calcium and magnesium deposits accumulate inside pipes, gradually narrowing the passages through which water flows. This buildup particularly affects older galvanized steel pipes, which can become almost completely blocked after decades of use.
Hidden leaks represent another major pressure thief. Even small leaks can significantly impact your water pressure, especially if they occur in main supply lines. These sneaky problems often go unnoticed until they cause visible damage or sky-high water bills.
A faulty pressure regulator can also trigger low pressure throughout your home. These devices, designed to reduce high municipal pressure to safe levels, can fail over time. When they malfunction, they might minimize pressure too much or stop working altogether.
Sometimes the problem lies with partially closed valves. Your home has at least two main shutoff valves: one at the meter and another at the point where the main line enters your house. If either valve isn’t fully open, it restricts water flow to your entire home.
Understanding High Water Pressure Risks
While less common than low pressure, excessive water pressure poses serious risks to your plumbing system. Municipal water supplies sometimes deliver water at pressures exceeding 100 PSI, especially in areas near water towers or at the bottom of hills.
High pressure accelerates wear on every component of your plumbing system. Fixture seals and washers deteriorate faster, leading to drips and leaks. Water heater tanks experience additional stress, potentially shortening their lifespan by years. Even your pipes themselves can develop pinhole leaks from the constant high-pressure assault.
The financial impact extends beyond repairs. High pressure wastes water with every use, inflating your utility bills month after month. Appliances like washing machines and dishwashers can fail prematurely when subjected to excessive pressure over time.
Municipal Supply Fluctuations and Their Impact
Your local water utility plays a significant role in your home’s water pressure. Municipal systems must maintain enough pressure to serve all customers, including those at higher elevations or far from pumping stations. This means homes closer to water sources often receive higher pressure than necessary.
Pressure can also fluctuate based on community water usage patterns. During peak morning and evening hours, when everyone showers and runs appliances, system-wide pressure often drops. Conversely, late-night pressure might spike when demand decreases.
How Plumbing Layout Affects Water Flow
Your home’s plumbing configuration significantly influences water pressure at individual fixtures. Homes with complex pipe layouts, multiple stories, or long runs from the main line often experience pressure variations between different areas.
Pipe diameter also matters tremendously. Older homes might have undersized supply lines that can’t deliver adequate flow to modern fixtures and appliances. When multiple fixtures operate simultaneously, these undersized pipes create bottlenecks that reduce pressure throughout the system.
Step-by-Step Guide: How to Adjust Water Pressure in House Plumbing
Locate Your Water Pressure Regulator
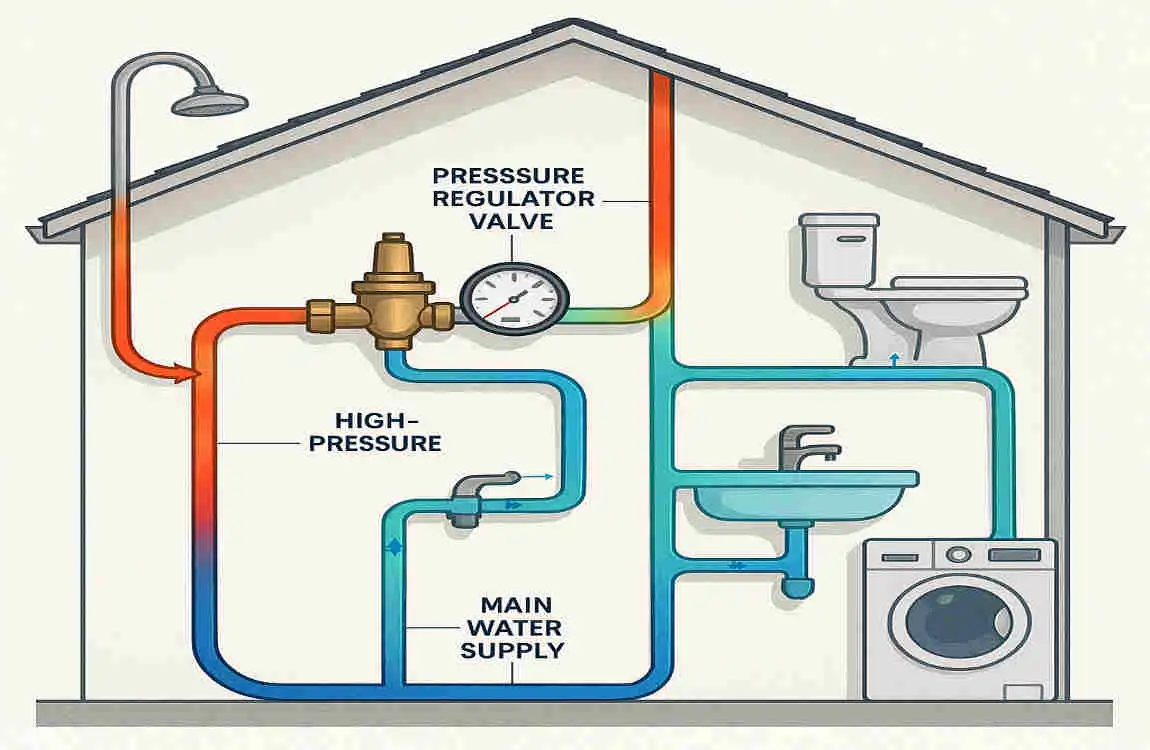
Your journey to better water pressure begins with finding your home’s pressure regulator, also called a pressure-reducing valve (PRV). This bell-shaped brass fitting typically sits on the main water line where it enters your home, often near the main shutoff valve.
Look for the regulator in these common locations:
- Basement or crawl space near the water heater
- Utility room or mechanical closet
- Garage near the main water line entry point
- Outside near the water meter (in warmer climates)
Not every home has a pressure regulator. Homes built before the 1980s or those in areas with naturally moderate water pressure might lack this device. If you can’t find a regulator, you might need to install one, especially if you’re dealing with high-pressure issues.
The regulator features an adjustment screw or bolt on top, usually covered by a lock nut. This screw controls the spring tension inside the valve, which determines how much it reduces incoming water pressure. Some newer models include a pressure gauge, making adjustments easier to monitor.
Safety Precautions Before Adjustment
Before touching any plumbing components, take these essential safety steps to protect yourself and your home. First, locate your main water shutoff valve. While you won’t necessarily need to turn off the water completely, knowing its location prepares you for any unexpected issues.
Gather your tools before starting:
- Adjustable wrench or channel locks
- Flat-head screwdriver
- Water pressure gauge
- Bucket or towels for potential drips
- Flashlight if working in dim areas
Alert household members about your plans. Ask them to avoid using water while you’re making adjustments. This prevents pressure fluctuations that could affect your readings or cause unexpected spray if connections loosen.
Consider wearing safety glasses, especially when working in tight spaces where debris might fall. Keep your work area well-lit and clear of obstacles. If your regulator shows signs of corrosion or damage, stop and consult a professional plumber.
Check Current Water Pressure Using a Gauge
Accurate pressure measurement forms the foundation of successful adjustment. Attach your pressure gauge to an outdoor hose bib or laundry tub faucet closest to where water enters your home. This location provides the most accurate reading of your system’s static pressure.
Ensure all water-using appliances and fixtures are turned off. This includes dishwashers, washing machines, irrigation systems, and all faucets. Even a slowly running toilet can affect your reading.
Open the test faucet completely and observe the gauge reading. Take note of the pressure, then wait a few minutes and check again. Pressure should remain relatively stable. Significant fluctuations indicate problems beyond simple adjustment needs.
Test at different times of day to understand your pressure patterns. Morning and evening readings often differ due to neighborhood usage patterns. Document these readings to establish a baseline before making adjustments.
Adjusting the Pressure Regulator
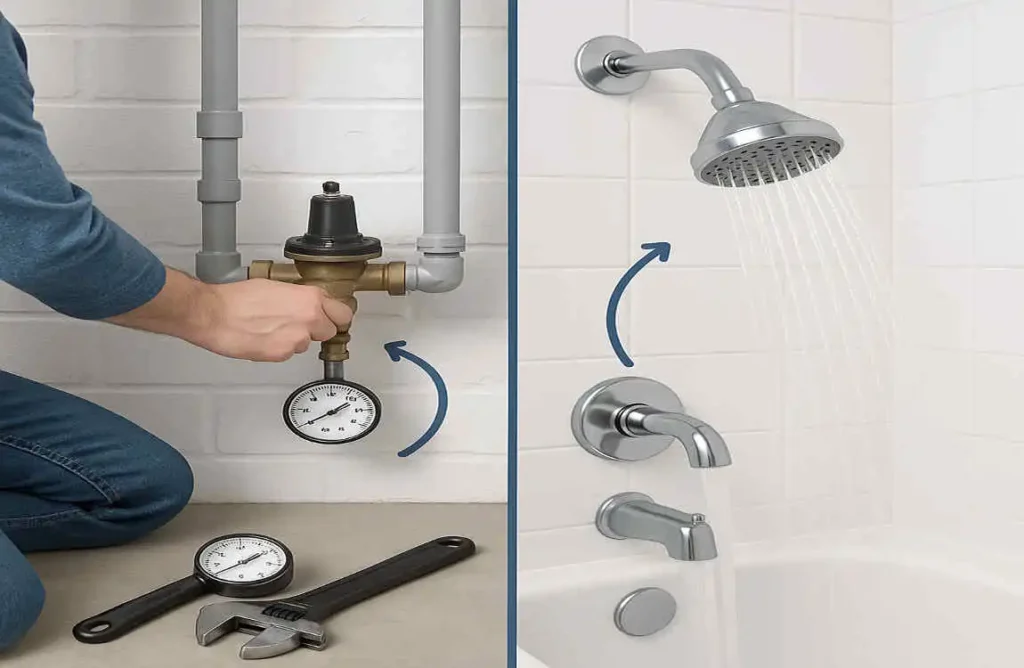
Now comes the actual adjustment process. First, loosen the lock nut on top of the regulator using your wrench. Turn it counterclockwise just enough to free the adjustment screw beneath. Don’t obliterate it.
The adjustment screw works simply but precisely:
- Turning clockwise increases water pressure
- Turning counterclockwise decreases water pressure
Make minor adjustments, turning the screw just one-quarter to one-half turn at a time. This gradual approach prevents overshooting your target pressure and potentially damaging your plumbing system.
After each adjustment, retighten the lock nut temporarily and test the pressure again. Run water from the test faucet for 30 seconds to stabilize the flow, then take a new reading. Repeat this process until you achieve your desired pressure, ideally between 50 and 60 PSI.
Remember that adjustment results aren’t always immediate. Water already in your pipes maintains its current pressure until used. Run multiple fixtures briefly to cycle fresh water through the system at the new pressure setting.
Once you reach optimal pressure, securely tighten the lock nut to prevent the adjustment screw from moving. Double-check your pressure one final time to ensure the adjustment held.
Fixing Low Water Pressure Without a Regulator
If your home lacks a pressure regulator or adjustments don’t solve the low-pressure issue, several other solutions might help. Start with the simplest fixes before considering major plumbing work.
Clean your aerators and showerheads first. These fixtures collect mineral deposits that restrict flow, mimicking low-pressure problems. Unscrew aerators from faucets and soak them in white vinegar overnight. For showerheads, fill a plastic bag with vinegar, secure it around the fixture with rubber bands, and let it soak.
Check for leaks throughout your system. Walk through your home listening for running water when all fixtures are off. Check under sinks, around toilets, and near your water heater. Even small leaks can significantly impact pressure.
Inspect both main shutoff valves to ensure they’re fully open. The valve at your water meter might require a special tool to adjust. The house-side valve should turn freely by hand. Open both valves completely by turning counterclockwise until they stop.
Consider installing a water pressure booster pump if municipal pressure consistently falls below 40 PSI. These electric pumps increase pressure to optimal levels and include built-in pressure switches to maintain consistent flow.
When to Call a Professional Plumber
While many pressure adjustments fall within the capabilities of DIYers, certain situations require professional expertise. Recognizing these scenarios saves time, money, and potential water damage.
Call a plumber immediately if you notice:
- Water pressure exceeding 80 PSI that won’t adjust lower
- Visible damage or severe corrosion on your pressure regulator
- Pressure that fluctuates wildly despite adjustments
- Signs of major leaks or pipe damage
- No improvement after trying basic troubleshooting
Professional plumbers possess specialized tools and knowledge to diagnose complex pressure problems. They can perform video pipe inspections, detect hidden leaks, and identify issues with municipal supply lines. Their expertise proves especially valuable when dealing with older plumbing systems or homes with unique configurations.
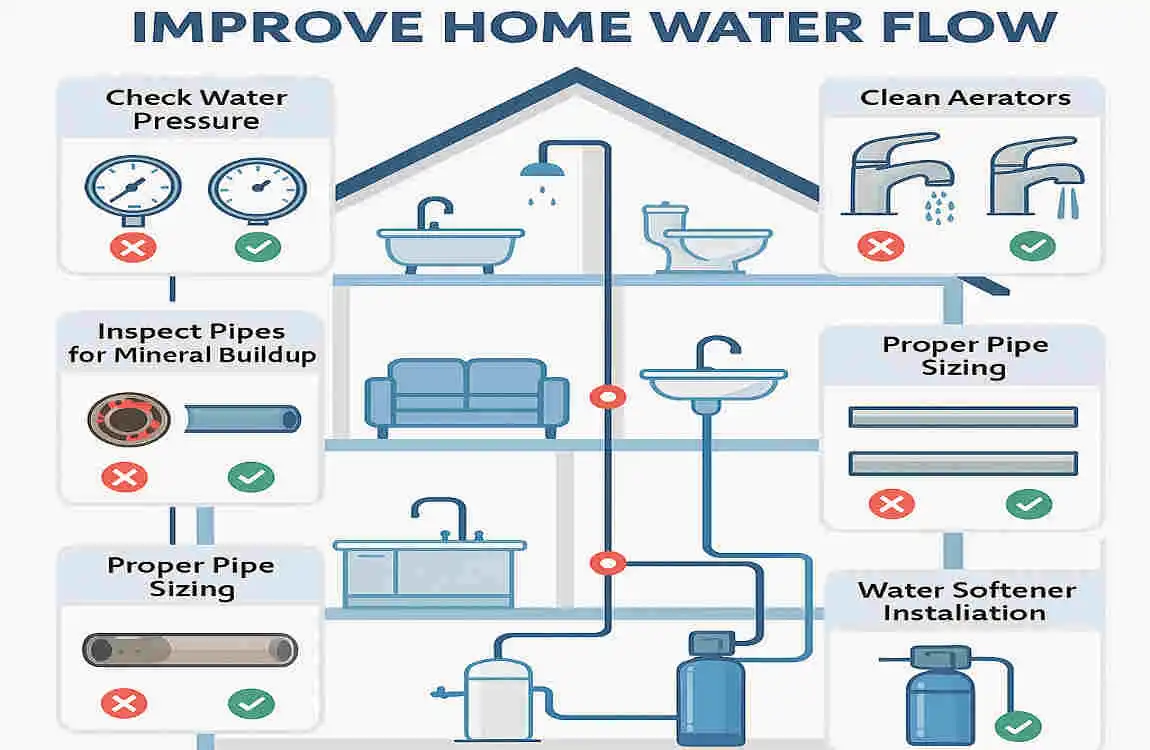
Additional Tips to Improve Home Water Flow

Regular Maintenance for Optimal Performance
Maintaining consistent water flow requires ongoing attention to your plumbing system. Develop a maintenance routine that keeps fixtures clean and pipes flowing freely.
Clean aerators and showerheads every three to six months, depending on your water hardness. Remove them completely for thorough cleaning, using an old toothbrush to scrub away stubborn deposits. This simple task often restores flow without any pressure adjustments.
Flush your water heater annually to remove sediment buildup. This debris not only affects hot water pressure but also reduces heater efficiency and lifespan. Turn off the heater, connect a hose to the drain valve, and flush until water runs clear.
Exercise shutoff valves twice yearly by fully closing and reopening them. This prevents them from seizing up when you need them most. Apply a drop of valve oil to stems if they feel stiff.
Leak Detection and Prompt Repairs
Even tiny leaks impact water pressure and waste hundreds of gallons monthly. Develop a habit of regular leak inspection to catch problems early.
Check these common leak locations monthly:
- Under-sink connections and P-traps
- Toilet flappers and fill valves
- Water heater temperature and pressure relief valves
- Outdoor hose bibs and irrigation systems
- Washing machine hoses and connections
Your water meter is an excellent tool for leak detection. Turn off all water fixtures, then check if the meter dial moves. Any movement indicates a leak somewhere in your system.
Installing a Water Pressure Booster Pump
When municipal pressure consistently falls short, a booster pump offers a permanent solution. These devices increase incoming water pressure to optimal levels throughout your home.
Modern booster pumps include:
- Variable speed motors for energy efficiency
- Pressure sensors for automatic operation
- Built-in pressure tanks to reduce cycling
- Quiet operation suitable for indoor installation
Installation typically requires basic plumbing skills and electrical connections. The pump installs on your main water line after the meter but before any branches to fixtures. Most units plug into standard outlets, though some require dedicated circuits.
Replacing Old or Corroded Pipes
Sometimes, improving water flow means replacing deteriorated pipes. Older homes with galvanized steel or lead pipes often benefit tremendously from repiping with modern materials.
Signs you might need pipe replacement:
- Rust-colored water from faucets
- Frequent pinhole leaks
- Visible corrosion on exposed pipes
- Consistently low pressure despite other fixes
Modern pipe materials, such as PEX and copper, offer superior flow characteristics and longevity. While repiping represents a significant investment, it eliminates ongoing pressure problems and prevents catastrophic pipe failures.
Benefits of Water Softeners on Flow and Pressure
Hard water wreaks havoc on plumbing systems, creating scale buildup that restricts flow over time. Water softeners remove minerals responsible for this buildup, protecting your pipes and maintaining optimal flow.
Beyond preserving water pressure, softeners provide additional benefits:
Benefit Impact on Your Home
Reduced scale buildup, maintains pipe diameter and flow capacity
Extended appliance life protects water heaters, dishwashers, and washing machines
Improved fixture appearance, prevents mineral stains on faucets and showerheads
Better soap efficiency reduces soap scum and improves lathering
Softer skin and hair. Eliminates mineral residue after bathing
Common Mistakes to Avoid When Adjusting Water Pressure
Over-Adjusting Pressure Leading to Pipe Damage
The excitement of fixing low pressure sometimes leads homeowners to overcorrect the problem. Cranking up pressure beyond 60-65 PSI might feel great in the shower initially, but it sets the stage for expensive issues.
Excessive pressure stresses every joint, fitting, and fixture in your plumbing system. Flexible supply lines to toilets and faucets become particularly vulnerable. These connectors can burst suddenly, causing significant water damage before you discover the problem.
Instead of making significant adjustments, increase pressure gradually and test thoroughly. Give your system time to reveal any weaknesses before settling on a final pressure setting.
Ignoring the Root Cause of Pressure Problems
Adjusting your pressure regulator provides a quick fix, but it might mask underlying issues requiring attention. Low pressure often signals problems like leaks, pipe corrosion, or municipal supply issues that worsen over time.
Before adjusting pressure, investigate potential causes. Check for running toilets, dripping faucets, and signs of hidden leaks. Examine visible pipes for corrosion or mineral buildup. Consider whether pressure problems affect your entire home or specific fixtures.
Not Using Proper Tools or Skipping Safety Steps
Attempting adjustments with inappropriate tools risks damaging equipment and injuring yourself. Pliers might seem like an acceptable substitute for a proper wrench, but they can strip lock nuts and adjustment screws, making future adjustments impossible.
Never skip pressure testing before and after adjustments. Flying blind without measurement tools leads to pressure settings that damage your plumbing system or fail to solve the original problem.
DIY Attempts When Professional Help Is Needed
While many pressure adjustments are within a homeowner’s capabilities, recognizing your limits prevents costly mistakes. Complex problems involving main line issues, severely corroded components, or pressure exceeding 80 PSI require professional intervention.
Warning signs you need a plumber include water hammer that persists after pressure reduction, regulators that won’t hold adjustments, or pressure problems accompanied by discolored water. These symptoms suggest issues beyond simple pressure adjustment.

