
Is there anything more frustrating than looking out at your flat roof after a heavy rainstorm and seeing a mini-lake sitting right in the middle of it? It’s a sight that makes every homeowner nervous. That standing water, often called “ponding,” isn’t just an eyesore—it is a ticking time bomb for leaks, mould, and structural damage.
If you are struggling with ponding water on your flat roof, you aren’t alone. It is one of the most common issues with flat roofing systems. But here is the good news: you don’t always need to tear the whole house down or hire an expensive crew to fix it. You can learn how to make a flat roof slope safely with this comprehensive, step-by-step DIY guide.
In this article, we are going to dive deep into the world of roof pitches. We will explain exactly why your flat roof needs that slight angle to drain properly, which will prevent leaks and significantly extend the lifespan of your home. We will also tease the massive benefits, including the incredible cost savings of doing it yourself versus a professional installation, and how this simple modification can improve your home value.
Why Your Flat Roof Needs a Slope: The Risks of Going Flat
You might be wondering, “If it was designed to be flat, why is it a problem?” The truth is, no roof should ever be perfectly flat. Even “flat” roofs are supposed to have a very slight angle. When that angle isn’t there, or if the house has settled over time, you run into serious risks. Let’s break down why learning how to make a flat roof slope is a necessity, not just a luxury.
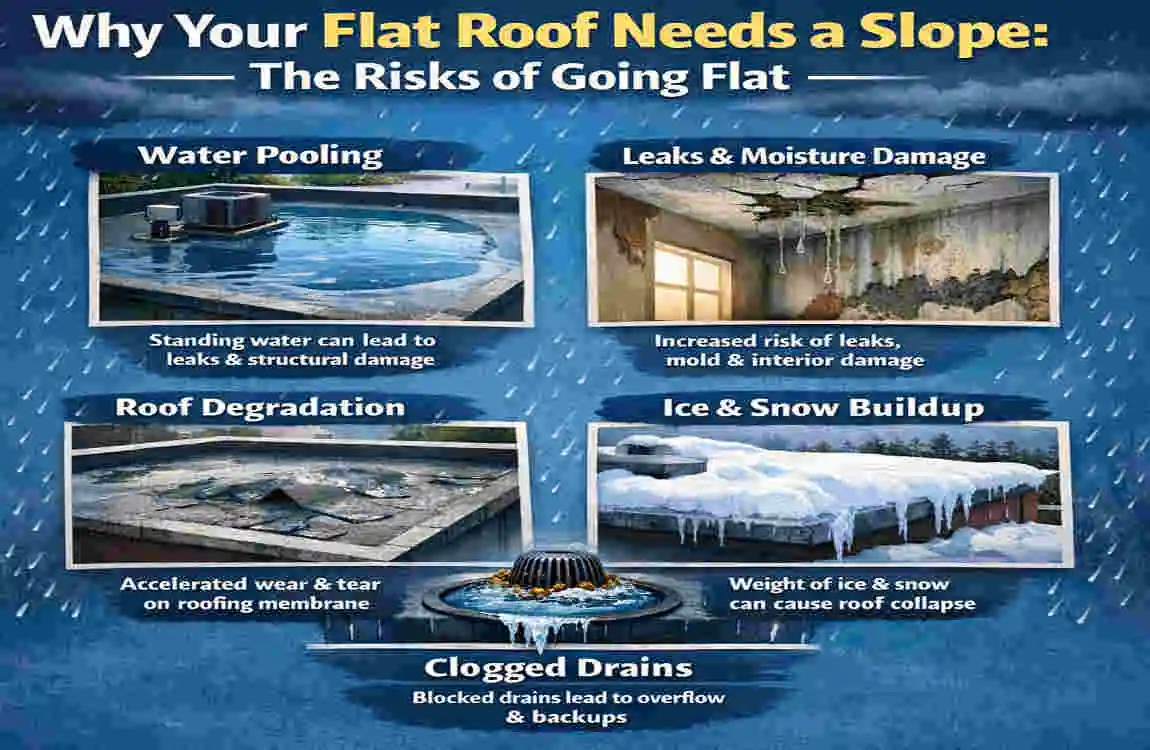
Common Flat Roof Problems
The biggest enemy of any roof is water. On a pitched roof, gravity does the work for you. On a flat roof, gravity needs help. When water pools and sits for more than 48 hours, it starts to degrade the roofing materials. The sun heats that standing water, which can boil the oils out of asphalt-based roofs or cause rubber membranes to crack prematurely.
Here is a scary statistic: nearly 80% of flat roof failures are caused directly or indirectly by poor drainage. It’s not just about a drip in your living room ceiling.
- Structural Damage: Water is heavy. A 1-inch deep pool of water over a 20×20 foot area weighs roughly 2,000 pounds. That creates sagging, which creates deeper pockets for water, which adds more weight. It is a vicious cycle.
- Mould and Pests: Stagnant water is a breeding ground for mosquitoes and bacteria. If that moisture seeps into your insulation, you are looking at mould growth that can affect your family’s health.
- Energy Loss: Wet insulation doesn’t insulate. If your roof is holding water, your HVAC system has to work overtime, driving up your bills.
Ideal Roof Slope Standards
So, what are we aiming for? You aren’t trying to turn your flat roof into a church steeple. You need enough tilt to get the water moving toward the gutters or scuppers.
In the roofing industry, the gold standard for a minimum slope is a 1/4:12 pitch.
- What does that mean? It means for every 12 inches (1 foot) of horizontal distance, the roof creates a vertical rise of 1/4 inch. This results in a roughly 2% slope.
- Is that enough? For drainage, yes. However, if you are living in an area with heavy rainfall, like during the monsoon season, aiming for a 1/2:12 pitch (1/2 inch rise per foot) is even better.
Flat vs. Sloped Roof Comparison
Feature Perfectly Flat Roof Properly Sloped “Flat” Roof
Drainage Poor; relies on evaporation. Excellent; gravity assists flow.
Lifespan 10-15 years (often less). 20-30+ years.
Maintenance High; frequent leak repairs. Low; routine cleaning only.
Debris collects leaves and dirt. Wind and rain wash debris away.
When to Slope Your Roof
You shouldn’t wait for the ceiling to collapse to act. Your house is likely telling you it needs help right now. Look for these signs:
- Standing Water: If puddles remain 48 hours after rain, the slope is insufficient.
- Recurring Leaks: Fixing the same leak spot twice means the water is gathering there.
- Membrane Wear: If the roof surface looks like alligator skin (cracked and bubbling), it’s from water damage.
- Sagging Deck: If you can visually see a dip in the middle of the roof, you need to correct the structure immediately.
Benefits of Learning How to Make a Flat Roof Slope Yourself
Taking on a roofing project can seem intimidating, but learning how to make a flat roof slope yourself comes with massive rewards. It empowers you as a homeowner and puts money back in your pocket.
Massive Cost Savings
Let’s talk numbers. Professional roofing is expensive because you are paying for labour, insurance, overhead, and profit margins.
- Professional Cost: You might pay anywhere from $15 to $25 per square foot for a pro to come in, taper the insulation, and re-roof.
- DIY Cost: By doing it yourself, you are looking at roughly $5 to $10 per square foot for materials. On a standard 1,000 sq. ft. roof, that is a savings of thousands of dollars. You are paying yourself a high hourly wage to do the work.
Customisation for Your Climate
When you do the job yourself, you can tailor it to your specific environment. For example, if you live in Lahore or other regions with intense monsoon seasons, you know that a “standard” slope might not handle a sudden downpour well. By managing the project, you can opt for a slightly steeper pitch to ensure rapid runoff, something a generic contractor might overlook to save on material costs.
Boosting Property Value
A house with a well-drained, waterproofed roof is a major selling point. Home inspectors always check the roof first. If they see a flat roof with tapered insulation and good drainage, they know the house has been well-maintained. This can boost your property value by 5-10%. It signals to buyers that they won’t have to deal with water damage headaches.
Eco-Friendly Perks
Believe it or not, sloping your roof is good for the planet.
- Extended Material Life: By preventing rot, your roofing materials last longer, meaning less waste in landfills.
- Better Insulation: The materials used to create the slope (like rigid foam) are excellent insulators. This reduces your carbon footprint by lowering your heating and cooling needs.
Quick Wins List:
- DIY sloping prevents 90% of potential water damage.
- You gain valuable skills for future home renovations.
- You have total quality control over the materials used.
Tools and Materials for Sloping a Flat Roof
You can’t build a house without a hammer, and you can’t fix a roof without the right gear. To successfully figure out how to make a flat roof slope, you need to gather your supplies beforehand. This list covers the essentials to ensure a smooth workflow.
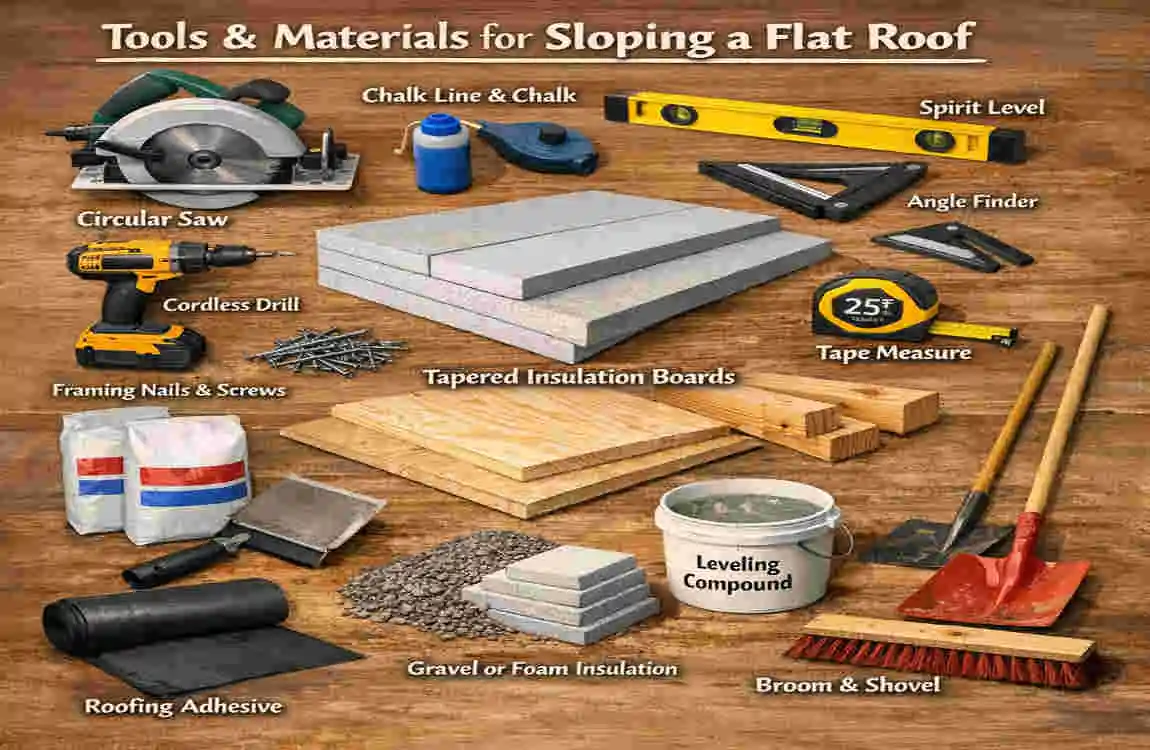
Essential Tools
You don’t need heavy industrial machinery, but you do need precision tools.
- Levels: A 4-foot level is crucial. A digital laser level is even better for accuracy.
- Chalk Line: To snap straight lines across the roof for layout.
- Circular Saw: For cutting plywood or furring strips.
- Utility Knife: For cutting insulation boards and membrane.
- Drill/Driver: A cordless impact driver is best for driving screws into the deck.
- Safety Gear: This is non-negotiable. Get a quality safety harness, sturdy work boots with grip, and heavy-duty gloves.
- Caulk Gun: For applying sealants and adhesives.
Best Materials by Budget
There are different ways to create a slope. You can build a wood frame, or you can use tapered insulation. Here is a breakdown to help you decide.
Budget Level Material Method Est. Cost / Sq Ft Durability Best Use Case
Low Foam Tapered Insulation $2 – $4 10-15 Yrs Good for quick fixes and sheds. Easy to cut.
Mid Rigid Polyiso Boards $4 – $6 20+ Yrs The industry standard. High R-value (insulation) and very strong.
High Custom Wood Framing $6 – $10 30+ Yrs Best for structural correction. Involves building a new deck over the old one.
Sourcing Tips
Finding these materials requires more than a trip to the corner store.
- Lumber Yards: For plywood and framing lumber, local yards often have better quality than big-box stores.
- Roofing Supply Houses: Specialised stores will carry tapered insulation systems. They can often take your roof measurements and “prescribe” a layout of boards for you.
- Local Suppliers (Pakistan context): If you are in regions like Lahore, suppliers like Master Plywood or specialised roofing vendors are your best bet. You can also check online marketplaces like Amazon or local equivalents for membranes and tools.
Step-by-Step Guide: How to Make a Flat Roof Slope (DIY Method)
Now we arrive at the core of the project. We are going to walk through how to make a flat roof slope using the Tapered Insulation Method, as this is generally the most DIY-friendly approach that offers great insulation benefits.
Assess and plan Your Flat Roof Slope
Before you buy a single screw, you need a plan. You cannot eyeball this; water follows the path of least resistance, and you need to dictate that path.
- Measure the Current Pitch: Use your level. Place it on the roof. If the bubble is dead centre, you have zero pitch. If it’s leaning, measure the gap under the level at the low end to see what your current slope is.
- Calculate the Slope: Use the formula Slope = Rise / Run.
- If you want a 1/4 inch slope per foot, and your drain is 10 feet away from the edge, you need the edge of the roof to be 2.5 inches higher than the drain (10 feet x 0.25 inches).
- Sketch the Design: Draw your roof on paper. Mark where the drains or scuppers are. Your goal is to create a funnel effect. You want the insulation to be thickest at the perimeter and thinnest near the drain.
- Identify Low Spots: Mark the areas where water creates puddles with chalk. These areas might need extra “fill” or attention.
Safety First – Prep Your Roof
Roofing is dangerous work. Do not take shortcuts here.
- Check the Weather: You need a window of at least 3-4 completely dry days. Check the long-range forecast. You do not want to be caught with an open roof during a storm.
- Clear the Deck: Sweep away all leaves, dirt, and loose gravel. If you have an existing membrane that is in terrible shape, you might need to tear it off down to the deck. If it is decent, you can build over it (check local codes).
- Harness Up: If your roof is higher than 6 feet, use a safety harness tied to a secure anchor point.
- Permits: Before you start hammering, check with your local authority (like the Lahore Building Control Authority or your city council). Structural changes often require a permit.
install Tapered Insulation for Slope
This is the magic step where you actually change the geometry of the roof. Tapered insulation boards come pre-cut at an angle.
- Understand the System: Tapered boards are usually labelled (e.g., Q, X, Y, Z). “Q” might range from 0.5 inches to 1.5 inches thick. “X” might go from 1.5 to 2.5 inches.
- Dry Fit the Boards: Lay them out on the roof, starting from the drain (the low point), working outwards to the edges (high point). It should look like a very shallow ramp.
- Cut to Fit: Use your utility knife or a fine-tooth saw to cut boards to fit around chimneys, vents, or skylights.
- Secure the Boards: You can adhere them using special roofing foam adhesive (great for avoiding holes) or use screws and plates.
- Pro Tip: If you are screwing them down, make sure the screws are long enough to go through the thickest part of the insulation and bite into the roof deck below.
- Create “Crickets”: A cricket is a triangular structure built behind obstacles (like a chimney) to divert water around them so it doesn’t get stuck. Do not skip this!
Add Framing and Sheathing (Optional/Hybrid)
If you aren’t using pre-tapered foam, you can use wood. This is often called “furring.”
- Rip the Strips: You will need to cut long strips of wood (furring strips) that are tapered. You cut a 2×4 diagonally so it is 2 inches at one end and near-zero at the other. This requires a table saw and skill.
- Install Furring: Screw these strips onto your existing joists, aligning them to point toward the drain.
- Install Plywood: Place new plywood sheathing over these tapered strips. Screw it down every 6 inches.
- Seal Joints: Leave a tiny 1/8th-inch gap between plywood sheets for expansion, but cover the seams with flashing tape.
Apply New Roofing Membrane
Now that you have a slope, you need to waterproof it.
- Choose Your Membrane: EPDM (rubber) is great for DIYers because it comes in large rolls and can be glued. TPO (plastic) reflects heat well but requires a heat gun to weld seams (harder for beginners).
- Roll it Out: Roll the membrane over your new sloped substrate. Let it “relax” for 30 minutes to get the wrinkles out.
- Adhere: Fold half the sheet back, apply adhesive to the insulation and the back of the sheet, wait for it to get tacky, and roll it back. Repeat for the other half.
- Detailing: This is critical. Use cover tape and sealant around vents, pipes, and the edges. 99% of leaks happen at the penetrations.
- Drains: Make sure the membrane goes into the drain, not just up to the edge of it. You want a smooth transition for the water.
Test and Finish
You are almost done!
- The Flood Test: If possible, block the drain and run water onto the roof with a hose. Let it sit (under supervision) to ensure no bubbles or leaks appear.
- The Flow Test: Unblock the drain. Watch the water. It should move steadily toward the drain. It should not stop at the pool.
- Clean Up: Remove all tools and debris. Sharp off-cuts of metal or screws left behind can puncture your brand-new roof.
Common Mistakes to Avoid When Sloping a Flat Roof
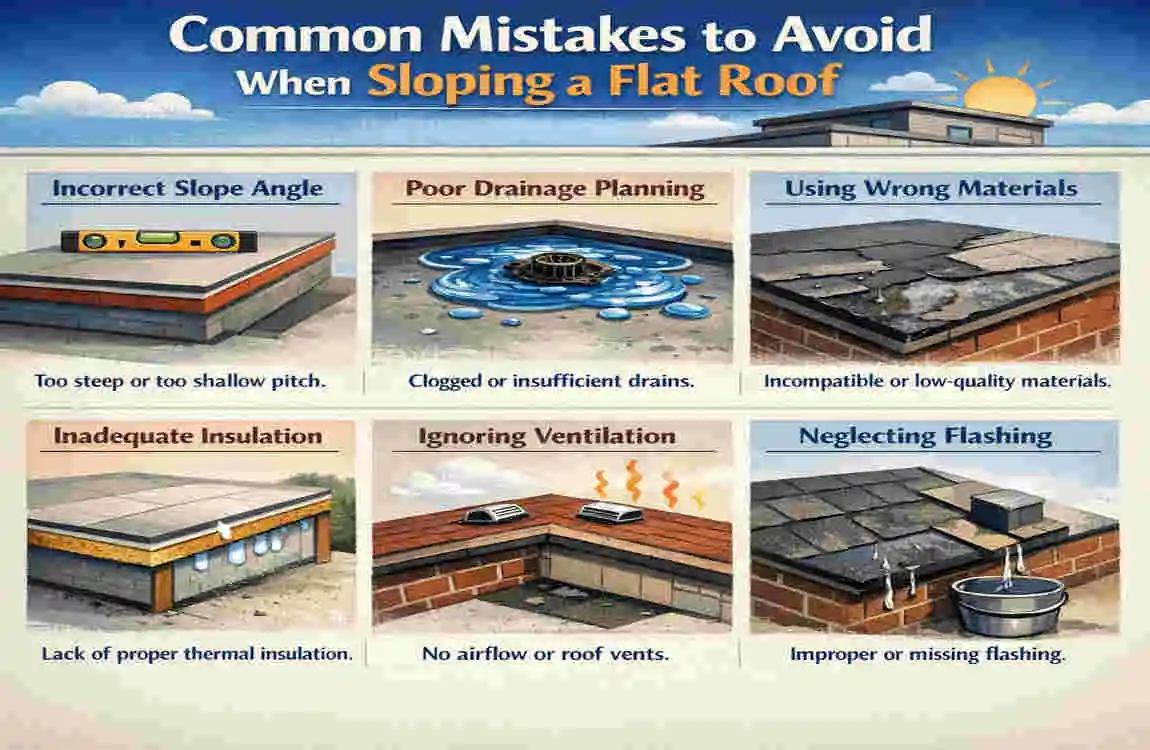
Even smart DIYers make mistakes. When figuring out how to make a flat roof slope, avoiding these errors is just as important as following the steps.
Creating New Low Spots
The most ironic mistake is fixing one puddle but creating two new ones. This happens if your tapered insulation isn’t laid out perfectly or if the substrate underneath is uneven. Fix: Use a string line across the tops of your installed insulation to check for dips before you lay the membrane.
Skipping the Vapour Barrier
In many climates, warm air from inside the house rises. If it hits the cold bottom of your roof, it condenses into water inside the roof structure. Fix: Always install a vapour barrier sheet directly on the deck before laying down insulation.
Ignoring Weight Load
You are adding material. Insulation is light, but plywood and multiple layers of roofing are heavy.
- The Math: Calculate the Load = Dead Load (materials) + Live Load (snow/people).
- Risk: If you add too much weight to an old roof, you risk collapse. If you are unsure, pay a structural engineer for a 1-hour consult. It is worth the peace of mind.
Poor Perimeter Flashing
You might have a perfect slope, but if the edges where the roof meets the wall aren’t sealed, water will run down the slope and right into your walls. Fix: Ensure your membrane runs up the parapet walls at least 6 inches and is terminated with a metal counter-flashing bar.
Incompatible Materials
Don’t mix asphalt products with rubber (EPDM) or PVC. Chemical reactions can eat holes in the roof. Fix: Stick to one system. If you use EPDM, use EPDM-approved glues and sealants.
Cost Breakdown: How Much to Make a Flat Roof Slope
Budgeting is key. Here is a realistic look at what this project might cost you, using Pakistani Rupee (PKR) estimates for a localised context, though the ratios apply globally.
Item Category DIY Cost Estimate (PKR / sq meter)Professional Cost Estimate
Materials (Insulation, Membrane, Glue, Screws) 1,500 – 3,000 4,000+ (includes markup)
Tools (One-time purchase, reusable) 5,000 – 15,000 (Total) N/A (Included in labour)
Labour 0 (Your sweat equity) 1,500 – 2,500 / sq meter
Total Project (Approx 100 sq meters) 200,000 – 350,000 500,000+
The ROI (Return on Investment): While spending 200,000+ PKR sounds like a lot, consider the alternative. Replacing a rotted roof deck and fixing water-damaged ceilings inside the house can cost double that. By doing this DIY project, you typically recoup your investment in 2-3 years simply by avoiding repair costs.
Pro Tips for Long-Lasting Sloped Flat Roofs
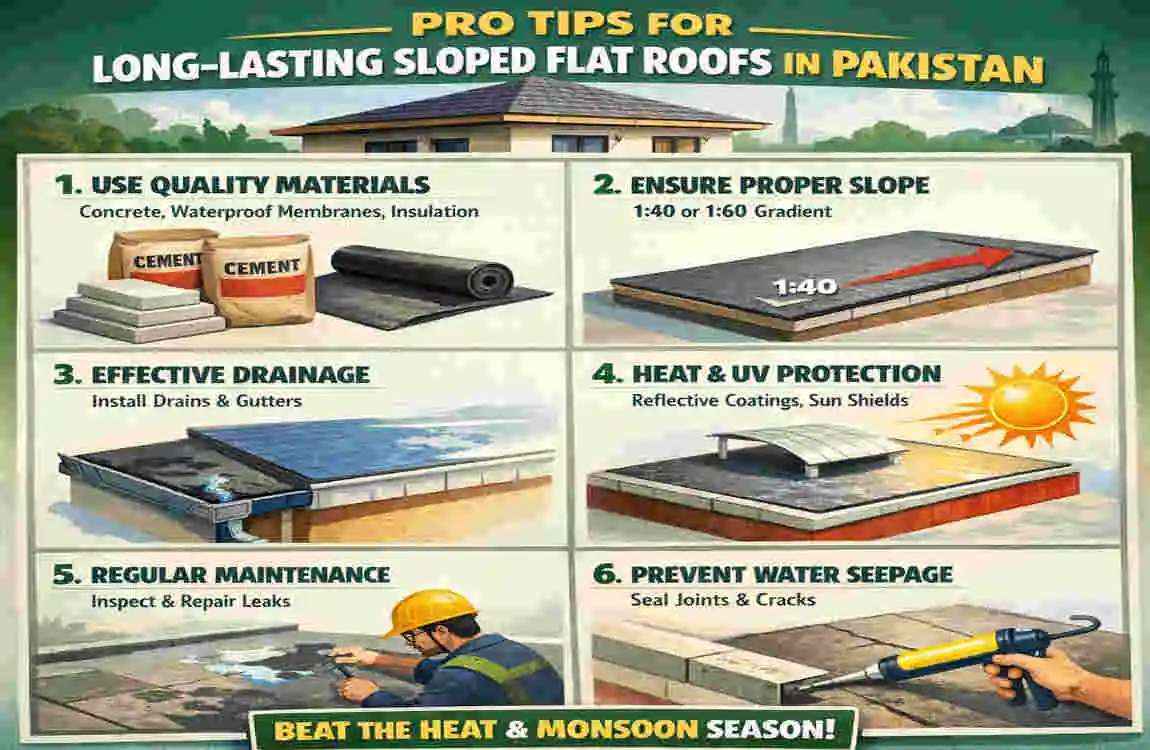
If you want your roof to last 30 years instead of 10, follow these expert tips, especially if you are dealing with harsh weather conditions like those in South Asia.
- Monsoon-Proofing: Choose a membrane that is UV-resistant. In Lahore or similar hot climates, the sun damages roofs as much as the rain. TPO (white membrane) is excellent because it reflects sunlight, keeping the building cooler.
- Gutter Integration: A slope is useless if the water has nowhere to go. Ensure your gutters are oversized (6-inch K-style) to handle the increased speed of water runoff.
- Annual “Health Check”: Once a year, go up and check the seals. Caulk dries out. A tube of sealant costs pennies; a new roof costs a fortune. Catching a crack early is the key to longevity.
- Walk Pads: If you have AC units or water tanks on your roof, install heavy-duty rubber walk pads leading to them. This protects your slope and membrane from foot traffic damage.
FAQ: How to Make a Flat Roof Slope
Q: How much slope does a flat roof actually need? A: The minimum standard is a 1/4:12 pitch. This means for every 12 inches of horizontal run, the roof rises 1/4 inch. This is sufficient for drainage, though 1/2 inch is better for heavy rain areas.
Q: Can I really DIY how to make a flat roof slope? A: Yes, absolutely. If the roof area is manageable (under 200 sq meters or 2000 sq ft) and you have basic carpentry skills, it is very doable. However, if the roof has complex shapes or severe structural rot, consult a pro.
Q: How long does this project take? A: For a standard home, expect it to take 2 to 5 days with two people working. This accounts for prep, installation, and detailing. Do not rush the detailing work.
Q: Is this legal in places like Lahore? A: Generally, yes. Improving drainage is encouraged. However, if you are raising the height of the roof significantly (changing the building’s profile), you must check with the LDA (Lahore Development Authority) or your local council to ensure you aren’t violating height restrictions.