
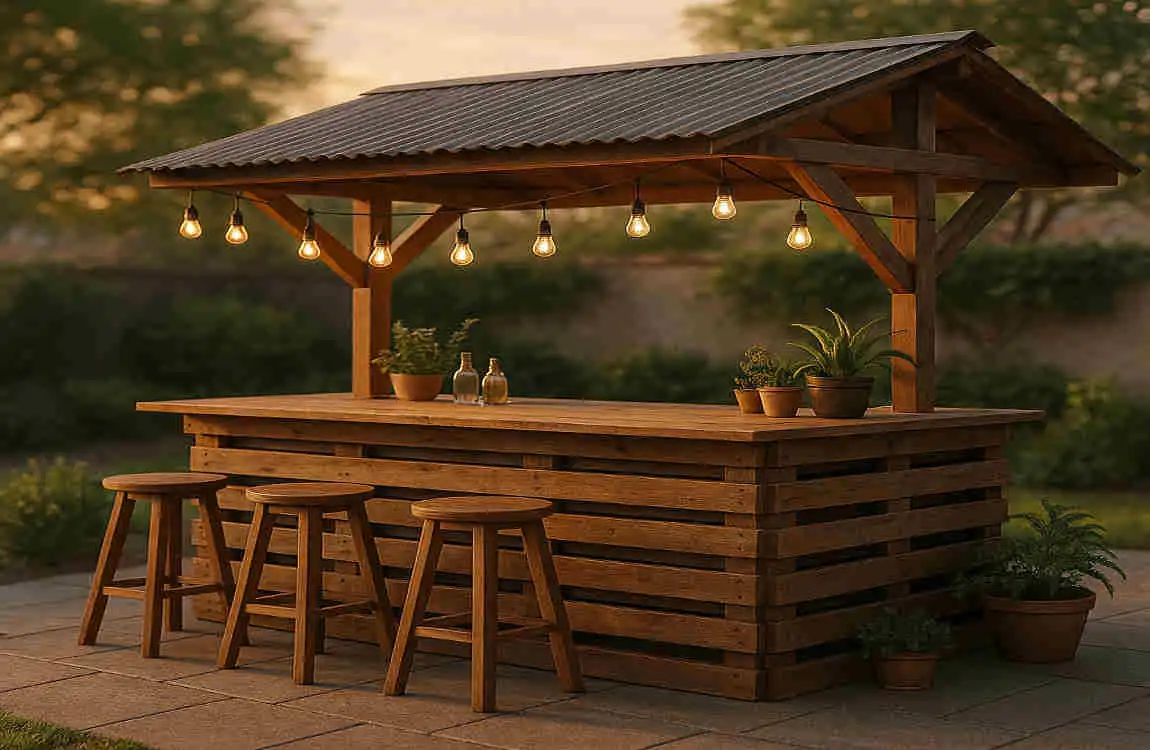
Creating your own outdoor space is both satisfying and practical. One of the most popular DIY projects for outdoor enthusiasts is building a pallet bar with a roof. It serves as a functional and stylish addition to your garden or backyard and opens the door to entertaining guests or enjoying quiet evenings outdoors.
Planning Your Pallet Bar with Roof
Planning is the most crucial step before you pick up a single tool. A well-thought-out plan ensures your pallet bar suits your space, meets your needs, and is safe and durable.
Choosing the Right Location
The first step is selecting the perfect spot for your pallet bar. Look for a flat and stable area in your backyard or garden. Ideally, the location should be:
- Close to your house for convenience.
- In a shaded or semi-shaded area to provide extra comfort.
- Positioned to complement your outdoor decor or seating arrangement.
Design Considerations
When designing your pallet bar, consider both size and style.
Size and Dimensions
- Measure the available space in your backyard or garden.
- Determine the height and width of the bar based on your needs. For most people, a bar height of 42 inches works well for standing or using bar stools.
Style and Roof Type
- Choose a roof style that suits your outdoor aesthetic. Popular options include:
- Pitched roof: Adds a classic look and allows rain to drain easily.
- Flat roof: Minimalistic and modern, great for smaller spaces.
- Tropical grass roof: Adds a fun, tiki-bar vibe to your space.
Materials and Tools Needed
To build your pallet bar with a roof, you’ll need the following:
Materials:
- Pallet wood: Look for high-quality, heat-treated pallets (marked with “HT”).
- Lumber: 2x4s or similar wood for structural support.
- Roofing materials: Options include pallet boards, metal sheets, or tarpaulin for waterproofing.
- Screws, nails, and brackets.
Tools:
- Saw (hand saw or power saw).
- Drill and screwdriver.
- Sandpaper or an electric sander.
- Measuring tape.
- Paintbrush or roller (for finishing).
Safety and Preparation Tips
- Inspect your pallets carefully. Avoid pallets with signs of rot, cracks, or chemical treatment.
- Wear safety gear like gloves, goggles, and a dust mask while working.
- Ensure your work area is clean, dry, and well-lit.
Planningahead will set you up for a smooth and enjoyable building process.
Preparing the Pallets and Frame Construction
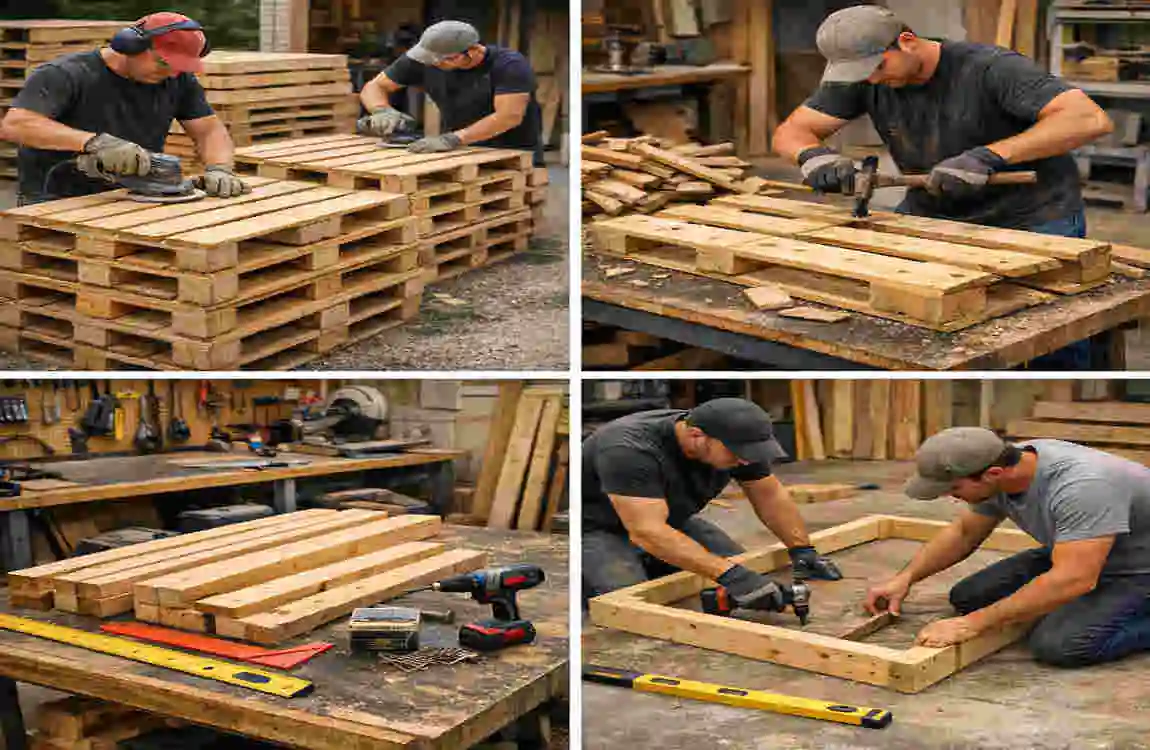
Now that your plan is in place, it’s time to prepare your materials and assemble the frame.
Preparing the Pallets
Start by cleaning and prepping your pallet wood. Pallets often come with rough edges, so sanding is essential for a safe and polished surface. Here’s how to do it:
- Clean the pallets: Use a stiff brush and warm, soapy water to remove dirt and debris. Let them dry completely.
- Sand the wood: Use sandpaper or an electric sander to smooth out rough edges and prevent splinters. Focus on corners and surfaces you’ll frequently touch.
- Cut to size: If your pallets are too large, use a saw to cut them to your desired dimensions.
Building the Frame
The frame is the backbone of your bar, so make sure it’s strong and level.
- Use pressure-treated 2x4s for the frame to ensure durability in outdoor conditions.
- Assemble a rectangular base using screws or nails. Ensure it’s level by using a spirit level.
- Add vertical supports at the corners to form the structure for the bar’s height.
Attaching Pallets to the Frame
Once the frame is in place, attach the pallet boards to create the bar’s body.
- Start with the front panel, securing the pallet boards to the frame with screws.
- Repeat for the sides and back of the bar.
- Attach small blocks or feet to the bottom of the bar for added stability.
You can customize your bar by adding shelves to store bottles, glasses, and other essentials. With the frame and pallets securely, you can move on to the bar top and sides.
Constructing the Bar Top and Sides
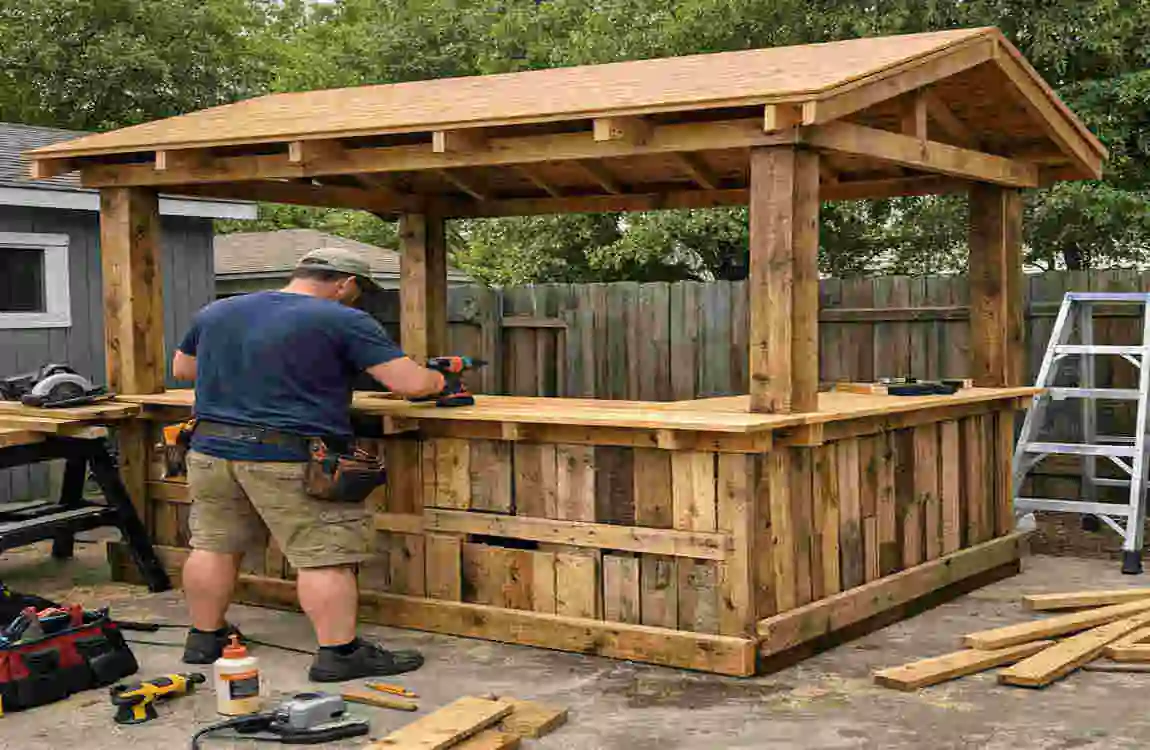
Now that the main structure is complete, it’s time to create sturdy and stylish bar top and side panels.
Building a Sturdy Bar Top
The bar top is one of the most important parts of your pallet bar, as it will be the most used.
- Select smooth, durable boards for the bar top. You can use pallet wood or purchase new lumber with a sleeker finish.
- Layer the boards to create a thick, polished surface. For a professional look, miter the edges to create clean, angled joints.
- Secure the boards to the top of the frame with screws, ensuring they’re level and stable.
Adding Side Panels
Attach additional boards to the sides to give your bar a finished look.
- Measure and cut the boards to fit the sides of the bar.
- Attach them securely with screws, making sure the edges align neatly.
Finishing Touches on the Bar Structure
Before moving on to the roof, take the time to sand the bar top and sides again. This will ensure a smooth, splinter-free surface ready for painting or staining.
Building and Installing the Roof
The roof is what sets this project apart from a basic pallet bar. A well-constructed roof offers shade, protection, and a polished look.
Creating Roof Supports
- Construct vertical supports using pallet wood or 2x4s. These will hold up the roof.
- Attach the supports securely to the bar’s frame or top corners. Use screws and metal brackets for extra strength.
Building the Roof Frame
- For a pitched roof, create triangular blocks to form the slope. Attach these to the vertical supports.
- Secure lateral boards across the triangular blocks to form the roof’s skeleton.
Installing Roof Boards
- Measure and cut pallet boards or other roofing materials to fit the frame.
- Attach the boards to the roof frame, leaving no gaps for rain to seep through.
- Add additional support boards underneath if needed for extra stability.
Choosing Roofing Materials
Here are some options for roofing materials:
- Pallet boards: Affordable and match the overall design.
- Metal sheets: Durable and weather-resistant.
- Grass roof: Ideal for a tropical or tiki-bar style.
- Waterproof coverings: Prevents leaks and protects against rain.
Weatherproofing and Durability Tips
- Apply a waterproof sealant to the roof and bar structure.
- Use weather-resistant paint or stain to protect the wood from moisture and UV damage.
Finishing and Decorating Your Pallet Bar

Now that the construction is complete, it’s time to add the finishing touches to make your pallet bar truly yours.
Sanding and Painting
- Sand all surfaces one last time for a smooth finish.
- Paint or stain the bar in a color that complements your outdoor space. Consider bold colors for a vibrant look or natural stains for a rustic feel.
Adding Accessories
- Shelves: Install inside shelves for storage.
- Hooks: Add hooks for hanging glasses or utensils.
- Bar Stools: Choose stools that match your bar’s style.
- Lighting: Include string lights or LED strips for ambiance.
Maintenance Tips
To keep your pallet bar in top shape:
- Reapply weatherproof sealant annually.
- Store any removable decorations indoors during harsh weather.
How to Build a Pallet Bar With a Roof: FAQ
Q: Can I really build a pallet bar with a roof myself?
Yes. Many DIY builds use basic tools and pallet wood, and tutorials show simple methods for adding a small roof frame using boards and brackets , .
Q: What materials do I need?
Most DIY pallet bars use 2–4 pallets, pallet boards for the counter and roof , plus pressure‑treated wood, screws, and galvanized steel for a sturdy roof frame .
Q: How do I build the bar base?
Start by connecting the pallets to form the front and sides of the bar, using screws or brackets for stability—a common approach in pallet bar tutorials .
Q: How do I attach the roof posts?
Many builders set posts using ground post holders or metal anchors, then attach beams to support the roof structure , .
Q: How do I build the roof itself?
You can make a simple roof by fixing two boards and a triangular support block together, then securing pallet boards or slats as roofing material . Some guides also use wooden boards and basic tools for an affordable roof design .
Q: Do I need to cut pallets for the roof?
Often yes—DIY builds frequently cut extra pallets into slats for the counter and roof panels .
Q: How long does it take to build?
Basic pallet bars can be made in a few hours , but adding a roof may take longer depending on your design.
Q: Is this beginner‑friendly?
Yes. Most guides describe pallet bars with roofs as easy DIY projects, suitable for anyone with basic carpentry skills , .