
As homes get smaller and open-concept living becomes the norm, the bathroom often suffers the most. We all crave privacy, but traditional renovations involving drywall and heavy construction are expensive, messy, and permanent. This is where bathroom partitions for home come in as the ultimate hero of interior design.
Imagine separating your toilet area from the vanity without blocking out the light. Picture creating a private changing nook in a master bath without building a wall. Bathroom partitions for the home let you maximize your square footage, enhance your privacy, and inject a serious dose of modern style into your space.
Why Choose Bathroom Partitions for Home?
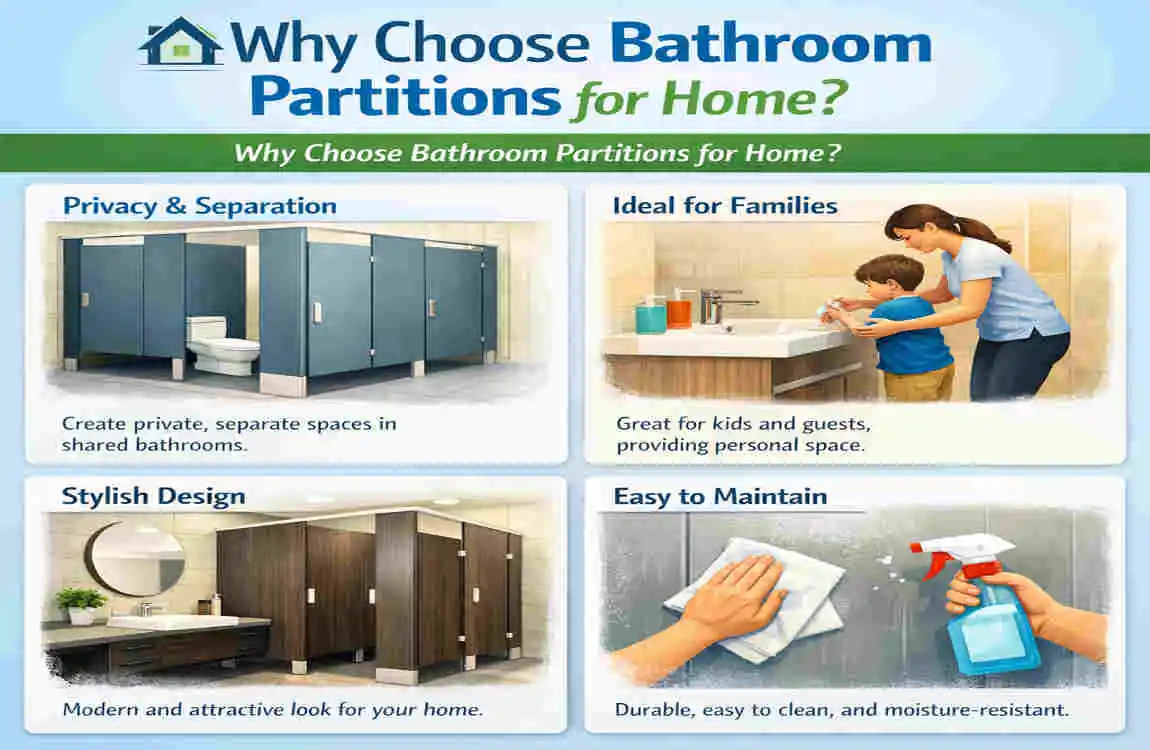
Before we jump into the specific ideas, let’s talk about why you should consider a partition over a traditional wall. When we talk about bathroom partitions for the home, we refer to temporary, semi-permanent, or modular dividers that break up a room without the heavy commitment of structural changes.
The Space-Saving Magic
The biggest advantage is right in the name: space saving. A standard stud wall with drywall can eat up 4 to 6 inches of floor space. That might not sound like much, but in a 5×8 bathroom, every inch counts. Partitions are often thin—sometimes just a fraction of an inch—meaning you keep more of your floor area usable.
A Massive Privacy Boost
Open-plan master suites look great in magazines, but in reality? They can be awkward. Partitions offer opaque, frosted, or textured options that give you visual privacy exactly where you need it (like around the toilet or shower) without making the room feel like a dark box.
Style Upgrade
Gone are the days of ugly, beige office stall dividers. Modern partitions are design elements. They come in sleek glass, rustic wood, industrial metal, and bohemian fabrics. They can act as a focal point, matching your minimalist, industrial, or farmhouse decor perfectly.
Cost-Effective Solutions
Let’s be real about the budget. Building a wall involves framing, drywall, taping, sanding, and painting. It can easily cost upwards of $2,000. In contrast, many bathroom partitions for home range from $50 to $500. You get the same function for a fraction of the price.
Did you know? According to a 2025 home design report, modular bathroom partitions have risen by 30% in urban homes, indicating that homeowners are prioritizing flexibility over rigid floor plans.
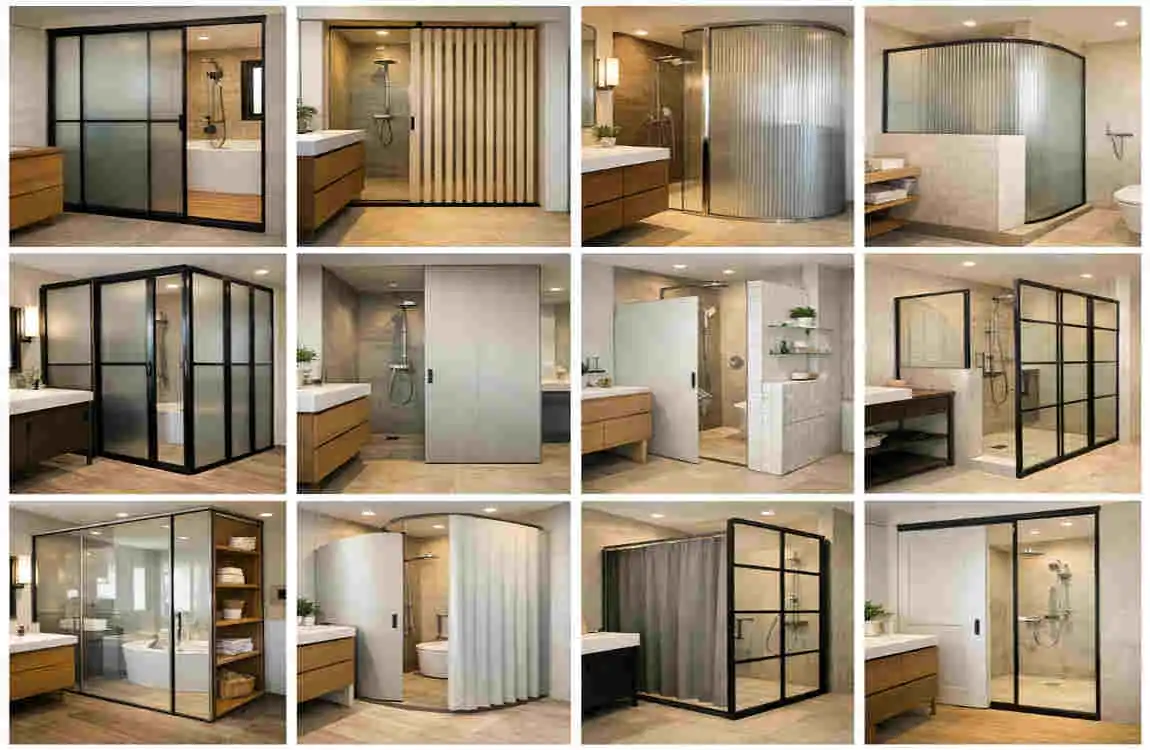
Types of Bathroom Partitions for Home: Material Guide
Choosing the right material is crucial. Your bathroom is a wet, humid environment, so you can’t just throw up a piece of cardboard and call it a day. You need durability and moisture resistance.
Wood and Engineered Wood
Wood offers warmth and a natural “spa-like” vibe. However, raw wood warps in humidity. If you choose wood, go for sealed options like Teak or Cedar, or opt for high-quality engineered wood that resists swelling.
Glass and Acrylic
This is the go-to for small spaces. Glass partitions let light through, keeping the room feeling airy and open. Frosted or textured glass provides privacy without darkness. Acrylic is a safer, lighter, and cheaper alternative to glass, perfect for homes with kids.
Metal
For an industrial look, stainless steel or powder-coated aluminum is fantastic. It is rust-proof, incredibly durable, and very thin, making it the ultimate space-saver.
Fabric and Composite
Heavy-duty, mildew-resistant fabrics or composite materials are excellent for soft, flexible dividers. These are usually the most affordable and easiest to move if you are renting.
Quick Comparison Table: Choosing Your Material
Material Best For…Moisture Resistance Privacy Level Cost Estimate
Sealed Wood Spa aesthetics, warmth Medium (Needs sealing) High $$$
Frosted Glass Small spaces, light flow High (Waterproof) Medium $$$$
Acrylic Safety, budget renovations High (Waterproof) Medium $$
Metal Industrial style, durability High (Rust-proof) High $$$
Treated Fabric Renters, soft texture Low to Medium High $
12 Space-Saving Bathroom Partitions for Home Ideas
Here is the core of our guide. We have ranked these 12 practical, stylish bathroom partitions for home generally by ease of installation, starting with the DIY-friendly options and moving to the pro-level upgrades.
Sliding Barn Door Partitions
If you love that modern farmhouse look, this is your winner. A sliding barn door doesn’t swing out like a traditional door, which saves a massive amount of floor space.
- Description: A wooden or composite door mounted on a visible metal track above the opening. It slides to the side to open and close.
- Installation Steps: Locate studs above the opening for the track.
- Install the metal track using a level.
- Attach rollers to the top of the door.
- Hang the door and install floor guides to stop swinging.
- Cost Estimate: $150 – $400 depending on the wood quality.
- Pros: high privacy, excellent style point, saves swing space.
- Cons: Requires wall space next to the opening for the door to slide over.
- User Take: “I installed a barn door to separate our master bath from the bedroom. It feels like a boutique hotel now!”
Frosted Glass Panels
For a sleek, modern look that doesn’t make the room feel small, frosted glass is the champion. It blocks the view but lets the sunshine in.
- Description: Tempered glass panels with a sandblasted or acid-etched finish. These can be fixed panels or hinged.
- Installation Steps:Measure the area precisely (glass cannot be cut comfortably at home).
- Install U-channels or clips into the floor and ceiling/wall.
- Slide the glass panel into the channels.
- Seal edges with clear silicone.
- Cost Estimate: $300 – $600.
- Pros: Waterproof, lets light in, very modern.
- Cons: Needs frequent cleaning to remove water spots; harder to install DIY.
Accordion Folding Screens
This is a classic for a reason. Accordion folding screens are ultra-portable and perfect for renters who cannot drill holes.
- Description: Panels connected by hinges that fold in a zig-zag pattern. Materials range from wood to vinyl or fabric.
- Installation Steps:Buy the screen.
- Unfold it.
- Place it where you want. That’s it!
- Cost Estimate: $50 – $150.
- Pros: No installation, portable, cheap, instant privacy.
- Cons: Can be unstable if bumped; takes up floor space when open.
Tension Pole Dividers
Looking for DIY bathroom partitions for small homes that require zero tools? Meet the tension pole.
- Description: Vertical poles that extend from floor to ceiling, held in place by tension. You can hang curtains, shelves, or panels between them.
- Installation Steps:Assemble the poles.
- Adjust the height to fit your ceiling.
- Tighten the tension mechanism until rigid.
- Attach your fabric or lightweight panels.
- Cost Estimate: $80 – $200.
- Pros: Renter friendly, no drilling, customizable.
- Cons: Not as sturdy as screwed-in options; weight limits apply.
Pivot Mirror Partitions
This is a brilliant two-in-one solution. Why have a mirror when it can also be a wall?
- Description: A tall, floor-length mirror mounted on a central pivot point (floor and ceiling). It spins to reveal or hide the space behind it.
- Installation Steps:Requires professional mounting hardware for the pivot.
- Secure the bottom pivot to the floor and top to a ceiling joist.
- Mount the mirror frame to the pivots.
- Cost Estimate: $400 – $800.
- Pros: Makes room look bigger, dual functionality, very high-end look.
- Cons: Expensive; installation is tricky and requires precision.
Bamboo Roll-Up Blinds
Ideally suited to humid climates, bamboo is naturally moisture-resistant and adds an earthy, organic touch.
- Description: Roll-up blinds usually used for windows, but hung from the ceiling to act as a flexible wall.
- Installation Steps:install ceiling hooks or a mounting rail.
- Clip the bamboo blind machinery into place.
- Test the roll-up mechanism.
- Cost Estimate: $40 – $100.
- Pros: Very affordable, eco-friendly, adjustable height/visibility.
- Cons: Not soundproof; offers only “visual” privacy; can mold if of low quality.
IKEA Hack Shelving Units
We love a good IKEA hack. Using open shelving like the KALLAX units creates a partition that doubles as storage.
- Description: Freestanding cube shelving placed perpendicular to a wall to divide the toilet from the sink.
- Installation Steps:Assemble the shelving unit.
- Secure it to the side wall with L-brackets for safety (to prevent tipping).
- Fill shelves with baskets, towels, or plants to create privacy blocks.
- Cost Estimate: $100 – $200.
- Pros: Massive storage gain, easy to customize, affordable.
- Cons: Takes up the full width of the floor; wood particleboard can swell if it gets soaking wet.
Magnetic Modular Walls
This is new home tech. These are panels that snap together, originally designed for offices but adapted for wet zones.
- Description: High-pressure phenolic panels that click together or use strong magnets. They are waterproof and practically indestructible.
- Installation Steps:install a slim floor and ceiling track.
- Click the panels into the track.
- Snap the vertical edges together.
- Cost Estimate: $500–$ 1,000.
- Pros: Extremely durable, waterproof, looks like a real wall, re-usable.
- Cons: High upfront cost; industrial aesthetic might not suit all homes.
Curtain Rod Canopy Dividers
For a touch of romance and luxury, look up. A ceiling-mounted track with heavy velvet or waterproof canvas can feel very regal.
- Description: A flexible curtain track screwed into the ceiling, following a curve or straight line to section off a tub or changing area.
- Installation Steps:Map out the curve on the ceiling.
- Screw in the flexible track.
- Insert curtain hooks and hang your fabric.
- Cost Estimate: $50 – $150.
- Pros: Softens the room acoustics, very cheap, feels luxurious.
- Cons: Fabric needs washing; curtain can get clingy or moldy if not ventilated.
Freestanding Room Dividers (Ornate Screens)
If you want decor first and function second, an ornate carved screen is beautiful.
- Description: Intricately carved wood or metal screens that stand on their own feet. They filter light beautifully, creating patterns on the floor.
- Installation Steps:Unbox and position.
- Ensure feet are level so it doesn’t wobble.
- Cost Estimate: $150 – $300.
- Pros: Art piece, allows airflow, easy to move.
- Cons: Very little visual privacy (see-through gaps); not sturdy against kids/pets.
Pocket Door Inserts
This is the “Pro Tip” for major remodels. If you are tearing down walls anyway, install a pocket door partition.
- Description: A door that slides into the wall itself, completely disappearing when not in use.
- Installation Steps:Requires opening the wall to install the “cage.”
- Framing the opening.
- Drywalling over the cage.
- Cost Estimate: $500–$ 1,500 (mostly labor).
- Pros: The ultimate space-saver, a seamless look, and an increase in home value.
- Cons: Requires major construction; difficult to fix if the track breaks.
Vertical Garden Partitions
Bring the outdoors in with a “living wall.” This is perfect for biophilic design lovers.
- Description: A trellis or shelving system filled with high-humidity plants (like ferns or pothos) that grow dense enough to create a screen.
- Installation Steps:install a floor-to-ceiling trellis or wire grid.
- Secure planters at various heights.
- Plant fast-growing, bathroom-friendly vines.
- Cost Estimate: $100 – $300 (plus plant care).
- Pros: Purifies air, reduces stress, looks incredible.
- Cons: High maintenance (watering/trimming); attracts bugs if not careful.
Installation Tips for Bathroom Partitions for Home
Even the best bathroom partitions for home can fail if installed poorly. Here is a general guide to ensure success.
Step-by-Step Guide
- Measure Twice, Buy Once: Bathrooms have weird angles. Measure the width at the top, middle, and bottom. Walls are rarely perfectly straight.
- Prep Your Surfaces: If you are using adhesives or drilling into tile, clean the surface with alcohol to remove soap scum.
- Check for Pipes: Before drilling into any bathroom wall, use a stud finder that detects metal/pipes. Hitting a water pipe is a disaster.
- Seal It Up: If your partition is near a shower, use 100% silicone caulk around the base to prevent water from seeping underneath and causing mold.
Common Mistakes to Avoid
- Ignoring Ventilation: Don’t box in a toilet or shower completely; leave a gap at the top or bottom for steam to escape.
- Weight Overload: Hanging a heavy barn door from drywall anchors will cause a crash. Always find the studs or use toggle bolts rated for the weight.
- Slippery Bases: If using a freestanding divider, ensure it has rubber feet to prevent it from sliding on wet tile.
DIY vs. Hiring a Pro
If the job involves simple drilling (curtains, shelves), it is a safe DIY project. If the partition requires structural support (heavy glass) or moving plumbing/electrical to accommodate it, hire a professional. It is worth the safety assurance.
Cost Breakdown and Budgeting for Bathroom Partitions for Home
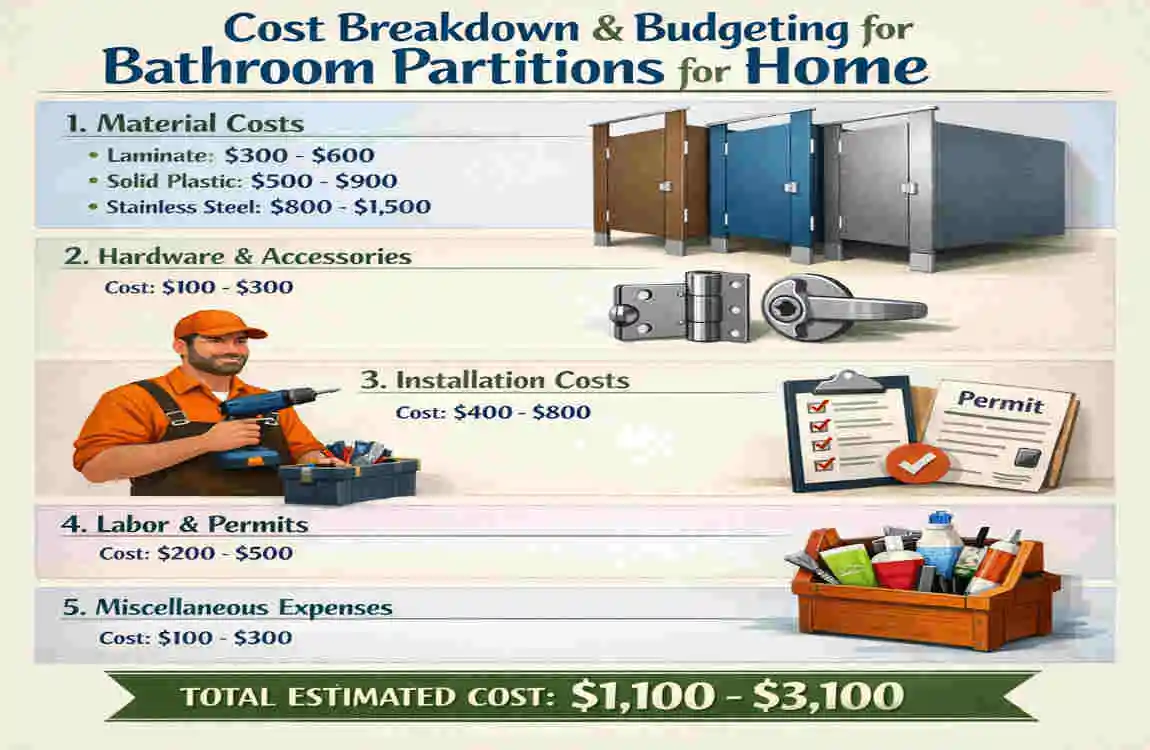
Budgeting is key. Here is a realistic look at what you might spend to get these bathroom partitions for home up and running.
Idea CategoryLow-End Cost (DIY)High-End Cost (Pro)Return on Investment (ROI)
Fabric / Curtains $40 $150 Low (Personal comfort)
Freestanding Screens $80 $400 Medium (Decor value)
DIY Wood / Shelving $100 $500 Medium (Storage value)
Glass / Acrylic $300 $1,200 High (Modern appeal)
Structural (Pocket/Barn) $200 $2,000 Very High (Home value)
Savings Hack: Check secondhand marketplaces or Habitat for Humanity ReStores. You can often find vintage doors or glass panels for a fraction of the retail price. Buying hardware in bulk online is also cheaper than buying it at big-box hardware stores.
Maintenance and Styling Hacks
Once your partition is up, you want to keep it looking fresh.
Cleaning Tips:
- Glass: Use a 50/50 water-and-white-vinegar mixture to cut through soap scum without streaks.
- Wood: Wipe down with a microfiber cloth weekly. If it is real wood, re-apply a sealant or oil every 6–12 months to protect against humidity.
- Fabric: Ensure your curtains are machine washable. Wash them monthly to prevent mildew spores from settling.
Styling Your Partition: Don’t let the partition stand out like a sore thumb. Integrate it!
- Lighting: Add an LED strip light along the top or bottom of the partition for a cool, ambient glow.
- Color Match: Paint the frame of your partition to match your vanity hardware (e.g., matte black or brushed gold).
- Hooks: If possible, add hooks to the dry side of the partition for towels or robes.
FAQs
What are the best bathroom partitions for home in small apartments?
The best options for small apartments are those that don’t take up floor space or block light. Frosted glass panels and hanging curtain dividers are top choices because they are thin and visually light.
Are bathroom partitions for home renter-friendly?
Absolutely! Many options, like tension pole dividers, freestanding screens, and accordion folds, require no drilling and leave no damage behind, making them perfect for getting your security deposit back.
How to install space-saving bathroom partitions DIY?
Most DIY installations involve measuring your space, buying a kit (like a track system or tension rod), and following the manufacturer’s instructions. For non-drill options, it’s as simple as assembling the unit and placing it. Always use a level to ensure it sits straight.
Can I use wood for bathroom partitions in humid climates?
Yes, but be careful. In humid climates, you must use sealed wood (like marine-grade varnish) or naturally resistant woods like Teak or Cedar. Alternatively, look for “wood-look” aluminum or composite materials that mimic the aesthetic without the risk of warping.
Where can I buy affordable bathroom partitions?
You can find affordable options at major retailers like IKEA, Home Depot, and Amazon. for unique or custom sizes, check Etsy or local glass fabrication shops. Secondhand stores are also great for finding unique screens or doors to repurpose.