
Have you ever walked into your basement, garage, or utility room and felt your eyes immediately drawn to the ceiling? Not because of a stunning light fixture, but because of a tangled mess of discolored, rusty, or just plain ugly pipes running along the beams?
You aren’t alone. It is a relatable scenario for millions of homeowners. You invest time and money in making your home beautiful, following the latest trends like “Industrial Chic” or “Modern Farmhouse,” only to have the vibe ruined by a bright orange PVC pipe or a tarnished copper line that looks like it’s seen better days.
Why Paint House Plumbing Pipes? Benefits and Myths
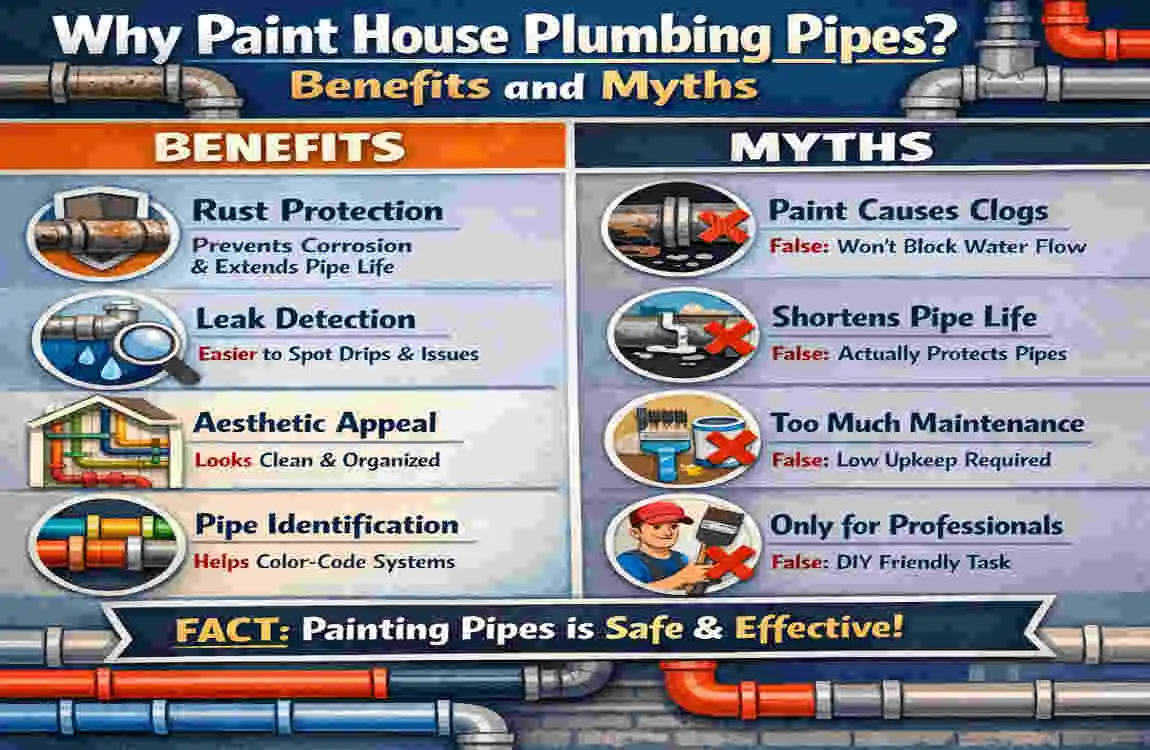
Before we grab a paintbrush, it is helpful to understand why you should bother doing this. It isn’t just about covering up something ugly; there are functional benefits to painting your plumbing, too. Plus, there are a few scary myths floating around the internet that we need to debunk so you can proceed with confidence.
The Aesthetic Upgrade
The most obvious reason to paint your pipes is to upgrade the look of your home. Exposed ductwork and plumbing have become a staple in modern interior design, especially with the rise of industrial-style lofts and basement renovations.
However, “exposed” doesn’t have to mean “messy.” By painting your pipes, you can:
- Camouflage them: Painting pipes the same color as your ceiling (often matte black or white) makes them disappear into the background.
- Highlight them: Turning a copper pipe into a bold gold or bronze feature can add a touch of luxury.
- Unify the look: Mixing PVC (plastic) and copper (metal) makes them look disjointed. Painting them all one color creates a cohesive, intentional design.
The Protection Boost
Believe it or not, paint is more than just a pretty face. It acts as a protective shell.
- Rust Prevention: For metal pipes like galvanized steel or cast iron, a good coat of oil-based or epoxy paint prevents moisture in the air from causing surface rust.
- UV Protection: If you have PVC pipes running along the outside of your house or in a sunlit area, the sun’s UV rays can actually make the plastic brittle over time. A coat of paint acts as sunblock for your plumbing.
- Condensation Control: While paint isn’t insulation, a thick layer of specialized coating can slightly reduce the “sweating” on cold water pipes.
Debunking Common Myths
Let’s clear the air regarding some rumors you might have heard from a skeptical neighbor or an old forum post.
- Myth 1: “Painting pipes voids your warranty.”Fact: Generally, no. As long as you aren’t painting over valves, serial numbers, or crucial access points, painting the exterior of the pipe usually does not void warranties. However, always check your specific manufacturer details for PEX or specialized systems.
- Myth 2: “Paint will clog the pipes.”Fact: This is impossible if you are painting the outside. We are definitely not pouring paint down the drain here!
- Myth 3: “It is unsafe and flammable.”Fact: Professional painters do this all the time. As long as you use heat-resistant paint for hot-water lines and standard paint for drains, it is perfectly safe.
Did You Know? According to recent home improvement surveys, nearly 30% of homes have exposed plumbing in living areas (like finished basements or laundry rooms). You are definitely not the only one looking for a solution!
Types of Plumbing Pipes: Which Can You Paint?
Not all pipes are created equal. Before you run to the hardware store, you need to identify exactly what material is hanging from your ceiling. Different materials require different primers and paints to ensure the color sticks and doesn’t peel off in a week.
Copper Pipes
These are the gold-standard for water supply lines. They are metal, brownish-gold (like a penny), and turn green if they oxidize.
- Can you paint them? Yes.
- The Catch: Copper is very smooth. If you don’t sand it and use a metal primer, the paint will slide right off.
PVC and CPVC (Plastic)
These are usually white (PVC) or cream/yellow (CPVC) and are used for drains and water lines.
- Can you paint them? Yes, but be careful.
- The Catch: Plastic expands and contracts with temperature. You need a flexible paint, often labeled as “plastic-safe” (like Krylon Fusion).
Galvanized Steel
Found in older homes, these are grey, magnetic metal pipes.
- Can you paint them? Yes.
- The Catch: These are prone to rust. You usually need to clean them with vinegar or a rust-remover before painting to ensure you aren’t sealing in corrosion.
Cast Iron
These are the big, heavy, black pipes usually found in older basements serving as the main sewer stack.
- Can you paint them? Yes.
- The Catch: They have a rough texture. Using a spray paint or a thick epoxy works best to fill in the bumps.
PEX (The Exception)
PEX is the flexible blue, red, or white plastic tubing found in newer homes.
- Can you paint them? Generally, No.
- Why? Manufacturers of PEX often advise against painting because the solvents in some paints can weaken the tubing’s plastic structure, leading to leaks. Since PEX expands significantly, paint almost always cracks.
- The Solution: Use pipe covers or sleeves instead of paint for PEX.
Quick Reference: Pipe Painting Compatibility
Pipe TypePaintable?Best Paint TypeCrucial Prep Step
Copper Yes Metal Enamel / Spray Scuff sand & Prime
PVC (Plastic) Yes Plastic-Bonding Spray Clean w/ Acetone
Galvanized Steel Yes Oil-Based / Rust-Stop Remove Rust
Cast Iron Yes Epoxy / Oil-Based Wire Brush Cleaning
PEX Tubing No N/A Use Pipe Sleeves
Pro Tip: Never paint hot or cold water supply lines while they are “active” and wet with condensation. Turn off the water or wait for a dry, low-humidity day to ensure the pipe surface is bone dry.
Safety First: When and How to Paint Plumbing Pipes Safely

Safety might seem boring, but when dealing with chemicals in an enclosed space like a basement, it is the most critical step. Painting pipes presents a few unique risks compared to painting a wall.
Ventilation is Non-Negotiable
Most paints that adhere to metal and plastic are oil-based or solvent-heavy spray paints. These release strong fumes (VOCs).
- Open Windows: Create a cross-breeze.
- Use Fans: Set up a box fan to blow fumes out of the room, not just swirl them around.
- Wear a Mask: A simple dust mask isn’t enough for spray paint fumes. Use a respirator with organic vapour cartridges when painting a large area.
The Temperature Trap
Pipes carry water that changes temperature.
- Hot Water Pipes: If you paint a hot pipe while it is hot, the paint will dry too fast, bubble, and peel.
- Cold Water Pipes: These “sweat.” If there is condensation on the pipe, the paint will not stick.
- The Fix: Shut off the water supply if possible, or paint during a time when water won’t be used for a few hours, allowing the pipes to reach room temperature.
Lead and Asbestos Warning
If your home was built before 1978, be cautious.
- Lead: Old existing paint on pipes might contain lead. Do not sand old paint without first testing it.
- Asbestos: Old steam pipes often have white, fabric-like wrapping insulation. Do not disturb, sand, or paint this insulation. It likely contains asbestos. If you see wrapped pipes, call a professional to assess them before touching them.
When to Call a Pro
While this is a great DIY project, you should call a plumber or professional painter if:
- The pipes are already leaking (paint doesn’t fix leaks!).
- You have high-pressure steam pipes (these require specialized high-heat coatings).
- You suspect the pipe material is deteriorating or crumbling.
Best Paints and Materials for House Plumbing Pipes
You can’t just slap leftover wall latex on a copper pipe and expect it to look good next year. Choosing the right material is 90% of the battle.
Top Paint Types for Plumbing
Rust-Oleum Specialty Tubing Paint (or High Heat)
This is a favorite for metal pipes. If you are painting pipes that might get warm (like near a water heater), look for “High Heat” spray paint. It can withstand temperatures up to 1200°F, which is overkill for water pipes but ensures durability.
Krylon Fusion for Plastic
If you are painting PVC drains, this is the magic in a can. It is chemically formulated to bond to plastic without the need for a separate primer. It flexes slightly, which helps as the plastic expands.
Epoxy Enamel (Spray or Brush)
For cast iron or rough metal, epoxy provides a hard, shell-like finish that is incredibly resistant to scratches and moisture. It mimics the look of new industrial piping.
Metal Primer (Crucial!)
Unless you are using an “All-in-One” paint, you need a primer.
- Clean Metal Primer: For copper and steel.
- Rusty Metal Primer: If you couldn’t get all the rust off the galvanized pipes.
Choosing Your Colors
The color you choose dictates the “vibe” of the room.
- Matte Black: The current champion of interior design. It hides imperfections, rust, and dirt perfectly. It gives a sharp, “Industrial Loft” appearance.
- Clean White: Best if you want the pipes to disappear against a white ceiling. However, be warned: white shows dust and dirt easily on low-hanging pipes.
- Metallic (Copper/Gold/Silver): Great for restoration. If your copper pipes look splotchy, painting them with metallic copper spray paint makes them look brand-new and expensive.
- Safety Colors: In utility rooms, some homeowners prefer functional painting: Blue for cold lines, Red for hot lines, and Yellow for gas (though gas lines are usually best left alone or painted by pros).
The Tool Kit
Before you start, gather these items so you aren’t running back to the store mid-project:
- Drop cloths: Spray paint travels. Cover everything.
- Painter’s Tape: To protect valves, joints, and the ceiling.
- Degreaser / TSP: To clean the years of grime off the pipes.
- Sandpaper (220 grit): To scuff the surfaces.
- Wire Brush: For removing rust flakes.
- Cardboard: Use a piece of cardboard as a shield behind the pipe while you spray to protect the wall/ceiling.
Step-by-Step DIY Guide: How to Paint House Plumbing Pipes
Ready to transform your space? Follow this step-by-step workflow. We have broken it down to make it manageable.
Assess and Plan
Walk through the area. Identify which pipes are hot, which are cold, and what they are made of. Decide on your color scheme.
- Action: Measure the length of pipes to estimate how many cans of paint you need. (Rule of thumb: 1 spray can covers about 15-20 sq. ft., or roughly 20 linear feet of medium pipe).
Prep the Surface (The Most Important Step)
You cannot paint dirty or glossy pipes. The paint will peel.
- Clean: Mix a solution of TSP (Trisodium Phosphate) or a strong degreaser with water. Scrub the pipes thoroughly. You need to remove oil, grease, and spiderwebs.
- Rinse: Wipe them down with a damp rag to remove the soap residue. Let them dry completely.
- Sand: Take your 220-grit sandpaper or a sanding sponge. Lightly “scuff” the copper or PVC. You aren’t trying to sand it down to nothing; you just want to take the shine off so the primer has something to grab onto.
- Rust Removal: If you see rust on steel pipes, attack it with a wire brush until the flakes are gone.
Tape and Shield
- Valves: Do not paint the handles or the threads of shut-off valves. Wrap them in blue painter’s tape. If you paint them shut, you will have a nightmare on your hands during an emergency.
- Surroundings: Tape plastic sheeting or drop cloths to the ceiling above the pipe and the floor below.
Prime Like a Pro
- If you are using a paint-and-primer-in-one, you can skip this.
- Otherwise, apply a thin coat of metal or plastic primer.
- Technique: If using spray primer, hold the can 8-10 inches away. Do short, sweeping bursts. Do not soak it.
- Wait Time: Let the primer dry for at least 24 hours (or follow the instructions on the can).
Apply the Paint
Now for the fun part!
- Shake it: Shake that can for a full minute.
- First Coat: Apply a very light “tack coat.” It won’t cover everything. That’s okay.
- Angles: Paint is tricky on round objects. Spray from the top, then crouch down and spray from the bottom.
- Second Coat: Wait about 15-20 minutes (check your can’s recoat window). Apply a second coat to get full coverage.
- Third Coat: If necessary, do a third coat. Multiple thin coats are always better than one thick, drippy coat.
Seal and Cure
- Once the final coat is on, carefully remove the tape while the paint is still slightly tacky (this prevents the tape from ripping the dried paint).
- Let it Cure: Paint might feel dry in an hour, but it takes days to fully “cure” (harden). Try not to touch the pipes or hang anything on them for at least 7 days.
Color Ideas and Design Inspiration for Painted Pipes
You have the technical skills now, but what about the artistic vision? Here are a few ways to style your pipes in line with current home trends.
The “Urban Industrial”
This is the most popular look for basements.
- The Palette: Matte Black or Dark Charcoal Grey.
- The Concept: Paint everything black—the ceiling joists, the ductwork, and the pipes. This creates an “infinite ceiling” effect where the ugly details disappear into the darkness, making the ceiling feel higher.
The “Modern Minimalist”
- The Palette: High-Gloss White.
- The Concept: If you have white walls and a white ceiling, painting the pipes glossy white keeps the space bright and airy. The gloss finish makes the pipes easier to dust later.
The “Steampunk Feature”
- The Palette: Metallic Copper, Bronze, or Antique Brass.
- The Concept: Don’t hide the pipes—celebrate them! If you have a single vertical pipe in a room, paint it a rich metallic colour to make it look like vintage machinery.
Fun Hacks for Basements
- Colour Coding: Use primary colours (Red, Blue, Yellow) to make the utility room feel like a distinct “machine room” or something out of the Pompidou Centre in Paris.
- Glow in the Dark: For a fun kid’s playroom in a basement, use glow-in-the-dark clear coats on the pipes to create secret pathways when the lights go out!
Common Mistakes to Avoid When Painting Plumbing Pipes
Even seasoned DIYers can mess this up. Here is a quick troubleshooting guide to help you avoid common traps.
- The “Drip” Disaster:Mistake: Spraying too close or too heavy because you want to finish fast.
- Result: Ugly drips that freeze in place.
- Fix: Sand the drip down after it dries and repaint. Prevention is better: Back up your spray can!
- The “Peeling Plastic” Problem:Mistake: Using standard oil paint on PVC without scuff-sanding.
- Result: The paint flakes off like a sunburn after a month.
- Fix: Always use plastic-specific bonding spray paint (like Krylon Fusion) for PVC.
- Painting Wet Pipes:Mistake: Ignoring condensation.
- Result: The paint creates bubbles filled with water.
- Fix: Wait for a dry day and wipe pipes with a dry cloth immediately before painting.
- Sealing the Valves:Mistake: Painting over the water shut-off wheel.
- Result: You can’t turn your water off in an emergency.
- Fix: Tape those valves! If you already painted them, use a wire brush to gently clean the threads immediately.
Maintenance and Long-Term Protection Tips
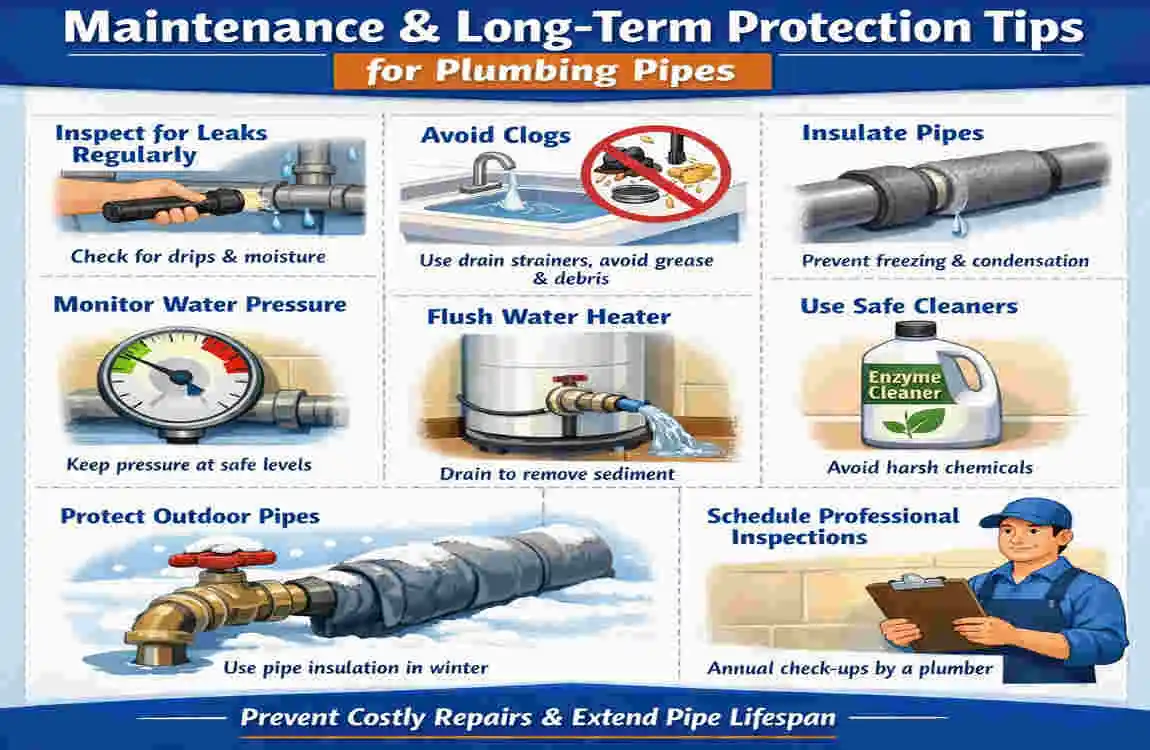
Congratulations! Your pipes look amazing. Now, how do you keep them that way?
Cleaning Painted Pipes
- Dusting: Use a microfiber cloth or a Swiffer duster. The paint makes the surface smoother, so dust should slide right off.
- Washing: If they get dirty, use a mild soap (dish soap) and warm water.
- Avoid: Do not use abrasive scrubbers (such as steel wool) or harsh chemicals (such as bleach) on your painted pipes, as you will strip the finish.
Annual Inspections
Once a year, take a quick look at your work.
- Check for bleed-through: If you see brown spots coming through the paint on metal pipes, rust is returning. Spot-prime that area and touch it up.
- Check for cracks: If you see cracks in the paint on PVC, the pipe has expanded. Just spray a little touch-up paint into the crack to seal it.
Upgrades
If you find that painting didn’t solve the “sweating” issue on your cold water pipes, consider buying foam pipe insulation. You can paint the foam insulation sleeves (using acrylic latex paint) to match your room, offering both insulation and color!
FAQs: Can You Paint House Plumbing Pipes?
Here are the most frequently asked questions we get from homeowners tackling this project.
Can you paint house plumbing pipes safely? Yes. As long as you ventilate the room and use the correct paint for the material (plastic vs. metal), it is safe and effective.
What is the best paint for PVC pipes? Spray paints labeled “bonding to plastic” are best, such as Krylon Fusion or Rust-Oleum Plastic. These bond at a molecular level and flex with the pipe.
Do I need to prime copper pipes before painting? Yes. Copper is non-porous and smooth. Without a metal primer, the paint topcoat will likely scratch off easily.
Can I paint pipes that get hot? Yes, but use “High Heat” enamel or paint designed for radiators/appliances. Standard latex paint may discolor or smell burnt on very hot pipes.
How do I paint the back of a pipe close to the wall? Use the “rag trick” or a curved brush. Or slip a piece of cardboard behind the pipe to protect the wall, then blast the back with spray paint, letting the mist wrap around.
Is it safe to paint gas pipes? Technically yes, but check local codes. In some areas, gas lines must be a specific colour (often black or yellow) for emergency crews to identify them. It is usually best to leave gas lines alone.
How long does the paint last? If prepped correctly, painted pipes can last 5–10 years before needing a significant touch-up.