
Learning how to make an architectural model is a useful skill for students, hobbyists, and future architects. A model turns a flat drawing into something you can see and touch. It helps you understand space, scale, shape, and design simply.
A home architecture model is not just for display. It also helps you check whether a design feels practical and balanced. You can spot problems early, test ideas, and present your concept more clearly. If you are building a school project or a small home design, the process becomes easier when you work step by step.
What Is an Architecture Model?

An architectural model is a small physical copy of a building. It shows the shape of the home, the walls, the roof, doors, windows, and sometimes even the garden.
There are different kinds of models:
- Conceptual models for early ideas
- Presentation models for showing the final design
- Working models for testing structure and layout
Digital tools like SketchUp or AutoCAD can help you plan first. Still, a physical model gives you a more realistic feeling of the design.
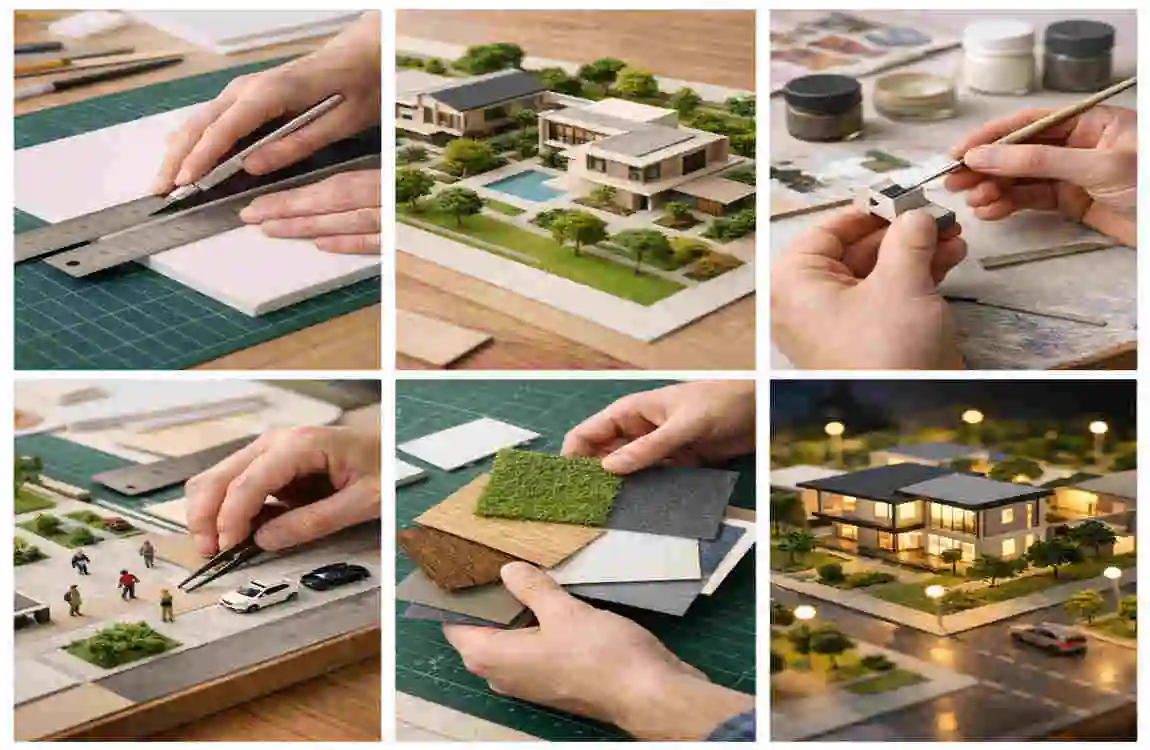
Tools and Materials You Need
Before you begin, gather the right tools. This saves time and makes your work neater.
Tool or Material Purpose
Cardboard Main structure and base
Foam board Strong walls and clean edges
Balsa wood Small details and support
Paper sheets Roofs, windows, and finish work
Glue or tape : Joining parts together
Ruler and pencil Measuring and marking
Cutting knife Cutting shapes accurately
Cutting mat : Protecting your table while cutting
You should also keep simple safety tools nearby, like gloves if needed, and always cut slowly and carefully.
How to plan Your Model
Choose the Home Design
Start with a real house or a design from your imagination. If you are a beginner, pick a simple box-shaped home. This makes cutting and assembly much easier.
Pick the Scale
The scale tells you how small the model will be compared to a real house. Common scales are 1:50 and 1:100. A smaller scale makes the model easier to build, while a larger scale gives you more detail.
Make a Basic Sketch
Draw a rough plan before you cut anything. Mark the walls, roof, doors, and windows. This helps you avoid mistakes later and keeps every part in the correct place.
Step-by-Step: How to Make an Architecture Model
Create the Base
Use a strong board as the base. This gives the whole model support. Mark the edges and the area where the house will stand. A flat and sturdy base is important because it keeps everything stable.
Build the Floor plan
Transfer your sketch onto the base. Light pencil marks are best because they are easy to adjust. Then cut the floor shape and place it carefully on the board. This becomes the foundation of your model.
Construct the Walls
Measure each wall piece before cutting. Try to keep the sides even so they fit together properly. Attach the walls one by one and check the alignment as you go. If the walls lean, the whole model may look uneven.
Add Doors and Windows
This part needs extra care. Cut the openings slowly and cleanly. If you want a more realistic look, you can place transparent plastic or thin paper behind the windows. This gives the model a neat finish.
Make the Roof
You can choose a flat roof or a sloped roof, depending on your design. Before attaching it, check that it sits properly on the walls. A well-fitting roof makes the model look complete and balanced.
Add Small Details
Now you can bring the model to life. Add tiny furniture pieces, trees, paths, fences, or a garden. Keep the details simple at first. Too much detail can make the model look crowded.
Final Assembly
Glue all the parts securely. Press each section gently so it stays in place. After that, clean any rough edges or extra glue marks. Small finishing touches can make a big difference in the final look.
Common Mistakes to Avoid
Wrong Scale
If the scale is off, the model will not match the design. Always measure twice before cutting.
Weak Joints
Using too little glue can make parts fall apart. Use just enough to hold the pieces firmly.
Rushing the Work
Fast work often leads to messy cuts and uneven parts. Take your time and stay patient.
Using the Wrong Material
Thin paper may work for details, but it is not strong enough for walls. Choose materials based on the part you are building.
Simple Tips for Better Results
- Work in layers so the model stays organized
- Use sharp tools for clean edges
- Keep the first design simple
- Double-check measurements
- Plan digitally first if possible
These small habits help you create a cleaner, more professional-looking model.
Why Learning This Skill Matters
Making an architectural model improves spatial thinking, creativity, and attention to detail. It is also useful for school projects, college work, and architectural presentations. When you practice this skill, you learn how real buildings are planned and built.
It also gives you confidence. You start to understand how ideas move from a sketch to a real structure. That is a valuable skill in both design and construction.
FAQ
What materials do I need?
You need cardboard, foam board, glue, a ruler, and a cutting tool.
What is the best scale for a home model?
A common choice is 1:50 or 1:100.
Can beginners make architectural models?
Yes. Beginners should start with simple house shapes.
Do I need software first?
No, but software like SketchUp or AutoCAD can help with planning.
How long does it take?
A simple model may take one to three days, depending on the level of detail.
| What to Do | Materials | |
|---|---|---|
| Choose a house design and decide the scale. | Graph paper, ruler, pencil | |
| Draw the floor plan and wall layout. | Paper, architectural scale | |
| Cut the base board to size. | Foam board, cardboard, chipboard | |
| Make the walls and roof pieces. | Balsa wood, card stock, foam core | |
| Assemble the model carefully. | Glue, tape, cutter | |
| Add windows, doors, and details. | Clear plastic, paint, markers | |
| Finish with landscaping and color. | Grass paper, trees, paint |