
Have you ever walked into a room during the dead of winter, expecting a warm, cozy embrace, only to find it shivering cold? You walk over to your radiator, place your hand near the bottom, and realize it is completely freezing, even though the top is lukewarm. Perhaps you are hearing strange banging or gurgling noises from your pipes, or you have noticed your winter energy bills creeping higher each month. If this sounds familiar, you are not alone, and you likely have sludge buildup in your heating system.
The good news is that you do not always need to call in an expensive professional to fix this common issue. You can often solve it yourself using a tool you already have sitting in your backyard. In this comprehensive guide, we will teach you exactly how to flush a house radiator with a garden hose.
To be clear, we are talking about flushing a traditional house radiator connected to a central heating system, not the radiator sitting under the hood of your car! Using a garden hose is an incredibly practical, low-cost, and highly effective method to clear out the nasty gunk that stops your home from heating properly.
Why You Should Flush a House Radiator
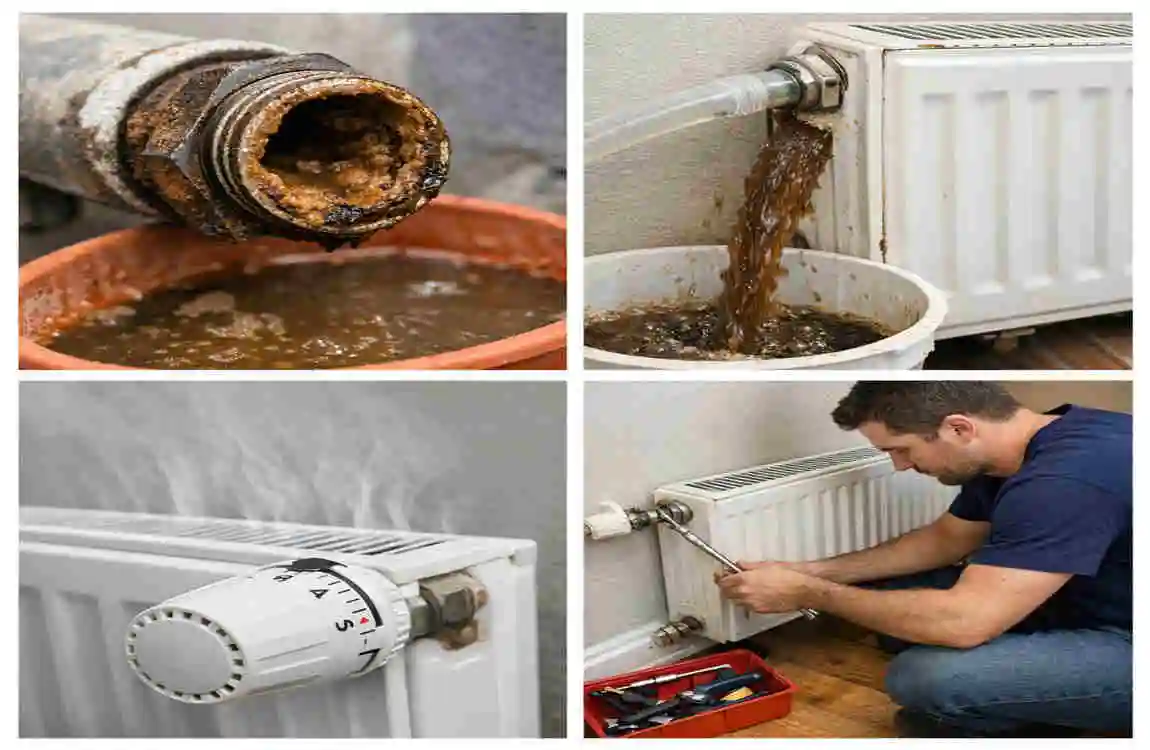
Before we dive into the physical work, it is important to understand what is actually going wrong inside your heating system. Over time, the water circulating through your central heating pipes reacts with the metal inside your radiators. This chemical reaction creates a nasty substance known as radiator sludge.
This sludge is a dark, muddy mixture of magnetite, rust, limescale, and general dirt. Imagine cholesterol slowly blocking your arteries; radiator sludge does the same thing to your heating system. It settles at the bottom of your radiators, forming a thick, solid mass that hot water cannot push through.
How do you know if you have a sludge problem? The signs are usually quite obvious. You will notice the radiator is cold at the bottom and only warm at the top. You might find that the radiator is not heating evenly, or it takes a very long time to warm up compared to others in your house. You might also hear loud banging noises or notice that your boiler pressure keeps fluctuating.
When your system is choked with sludge, it drastically reduces your heating efficiency. Your boiler has to work twice as hard to push water through blocked pipes, which puts immense strain on its components and significantly increases your monthly energy bills. If you want to reduce heating bills and improve radiator efficiency, getting rid of this sludge is non-negotiable.
Now, you might be wondering when a simple DIY flush is enough and when you need to call a professional. If you only have one or two troublesome radiators that have cold spots, a garden hose flush is usually the perfect solution. It is much cheaper than calling a plumber, and it directly targets the problem area to restore performance. However, if your entire heating system is sluggish or you have heavily leaking joints, you might need a full system power flush performed by a professional engineer. But for isolated issues, the garden hose method is your best friend.
Tools and Materials Needed
Preparation is the key to any successful DIY project. You do not want to be halfway through disconnecting a heavy metal unit only to realize you are missing a crucial tool. Gathering everything beforehand will make the entire process smoother and less stressful.
Here is a handy table breaking down exactly what you will need for this job:
Tool / Material: Why You Need It
Garden Hose: You need a standard garden hose with a gentle spray nozzle setting to push the sludge out without damaging internal parts.
Radiator Drain Bucket: A low-profile bucket or shallow drain pan is essential for catching the dirty water when you first open the valves.
Towels and Old Cloths. Radiator water is often black and stains easily. You need plenty of old rags to soak up spills and protect your floors.
Radiator Valve Wrench: An adjustable spanner or a dedicated radiator valve wrench is required to loosen the large nuts connecting the radiator to the pipes.
Radiator Bleed Key: This small tool opens the top valve to release air from the system, allowing water to flow freely.
Safety Gear: Safety gloves and eye protection are highly recommended to protect your skin and eyes from dirty, rusty water.
Screwdriver: A basic flathead or Phillips screwdriver may be needed to remove specific wall brackets or decorative covers.
You might also consider picking up a radiator flush additive or chemical cleaner from your local hardware store. These solutions can help break down stubborn magnetite inside the metal fins. If you choose to use one, pour it in after the initial flush. For many homeowners, plain water from the hose does a fantastic job on its own.
Make sure you wear old clothing! Radiator sludge is notoriously messy and can easily ruin a good pair of jeans. Lay your tools out neatly near the radiator you plan to work on, and let’s get ready to move on to the safety checks.
Safety Precautions and When Not to DIY
Working with plumbing and heating systems requires a healthy dose of respect. Before you grab your wrench, you must prioritize safety. Taking shortcuts here can lead to ruined carpets, severe burns, or costly damage to your central heating setup.
First and foremost, you must shut off the heating system entirely. Go to your thermostat and turn it down, then turn off the boiler at the main switch. Never attempt a DIY radiator flush while the system is actively pumping water.
Once the boiler is off, you must wait. Central heating water can reach scalding temperatures. Give the system at least two hours to cool down completely. You want the metal to be cool to the touch to avoid serious burns when you start draining the water.
Next, inspect the area. Check for any pre-existing leaks, heavy rust, or severe corrosion around the pipes and valves. If the pipework looks incredibly brittle or damaged, stop right there. Trying to force a wrench onto a rotten pipe will snap it, causing a massive flood in your living room. If you see severe damage, it is time to call a heating engineer.
Additionally, think about your physical safety. Radiators are surprisingly heavy, especially double-panel ones. Never try to unhook a radiator if you are standing on a ladder or if you cannot comfortably support its weight. Always ask a friend or family member to help you lift it off the wall.
Consider the time of year, as well. Avoid flushing your system during a freezing winter storm if you can help it. If your boiler is turned off for several hours in sub-zero temperatures, you risk the water freezing in your pipes.
Finally, know when to skip the DIY route. If you have a brand-new, highly complex, pressurized system still under warranty, doing it yourself might void your guarantee. Similarly, if every single radiator in the house is completely cold at the bottom, a single garden-hose flush will not fix the root cause. In those cases, the whole system is choked, and you need a professional power flush.
Step-by-Step: How to Flush a House Radiator with a Garden Hose
Now that we have covered the basics and gathered our tools, it is time to get to the main event. We have broken this process down into easy-to-follow, manageable segments. Take your time, follow each instruction carefully, and do not rush.
Prep the Radiator and Area
Start by choosing the most problematic radiator in your house. Usually, this is the coldest at the bottom or furthest from your boiler.
Once your boiler is off and the system has fully cooled, you need to prep your workspace. The water that comes out of a dirty radiator is dark, greasy, and smells like old metal. It will permanently stain light-colored carpets and can ruin hardwood floors.
Lay down a thick plastic sheet, tarp, or several layers of old towels directly underneath the radiator, paying special attention to the areas right under the two bottom valves. Slide your shallow drain pan or bucket under whichever valve you plan to open first. Having plenty of rags within arm’s reach is crucial for quickly wiping up rogue drips.
Shut Off and Isolate the Radiator
You cannot simply unscrew a radiator while it is still connected to the water supply, or your entire home’s heating system will drain onto your floor! You must isolate it first.
Look at the bottom corners of your radiator. You will see two valves. One is usually a manual control valve or a TRV (Thermostatic Radiator Valve) with numbers on it, which controls the temperature. The other is a lockshield valve, usually covered by a plastic cap.
Turn the TRV clockwise until it is tightly closed (often to the “0” setting). Next, remove the plastic cap from the lockshield valve. Using your adjustable wrench or a pair of pliers, turn the metal spindle underneath completely clockwise until it stops. Keep track of how many turns it takes to close the lockshield valve, as you will need to open it by the exact same amount later to keep your system balanced!
Finally, insert your radiator bleed key into the bleed valve at the top corner of the unit. Turn it counterclockwise slightly to open it. You will hear a little hiss of air. Letting the air escape breaks the internal vacuum, allowing the water to flow out easily when you drain it.
Drain the Radiator
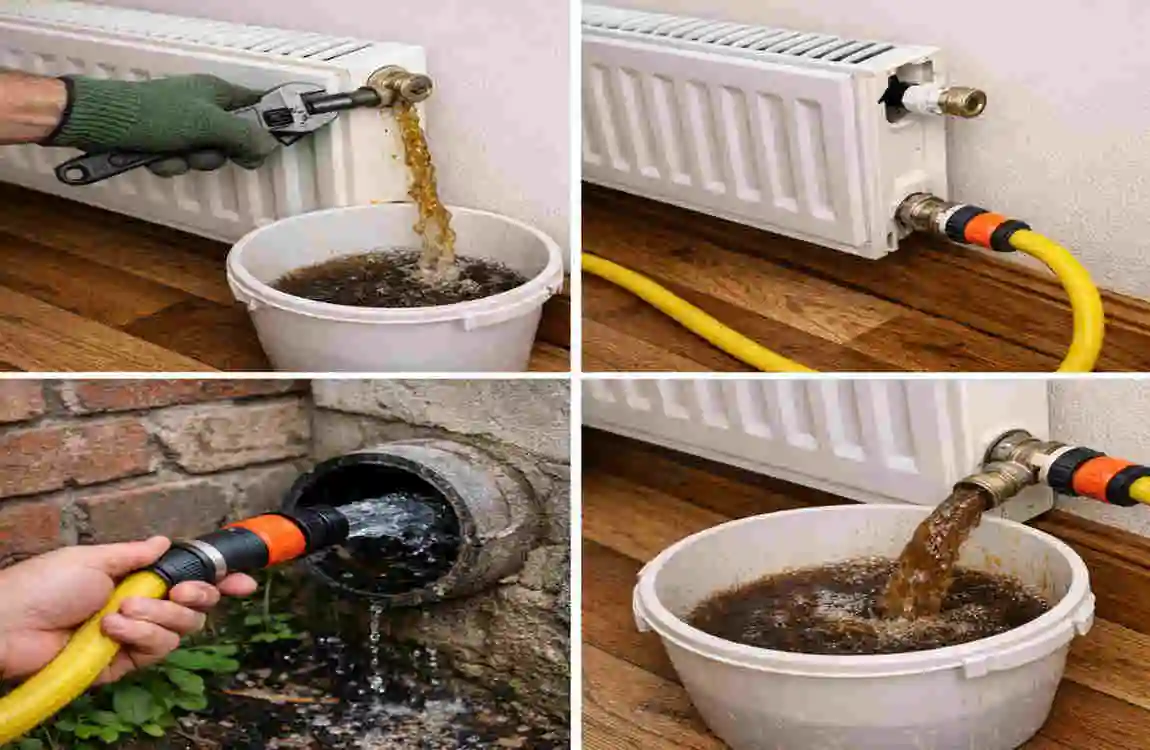
With the bucket positioned underneath, it is time to drain the dirty water. Take your adjustable spanner and grip the large union nut that connects the valve to the radiator itself.
Loosen the nut slowly and carefully by turning it counterclockwise. Do not remove the nut completely! Just crack it open enough so that a steady trickle of water starts flowing into your bucket. If the water stops, make sure your top bleed valve is open enough to let air in.
You will likely see a stream of nasty, black, sludge-laden water. Be patient. Depending on the size of the unit, you may need to close the nut, empty your bucket, and repeat the process several times until the radiator is completely empty. You will know it is fully drained when the water stops flowing entirely.
Remove the Radiator from the Wall
Once the radiator is empty of water, fully disconnect it. Use your wrench to loosen the union nuts on both the TRV and the lockshield valve until they are completely detached from the radiator body.
Now, call your helper! Radiators are heavy, awkward, and usually hold a tiny bit of leftover dirty water inside the bottom lip. Gently lift the unit straight up to clear the wall brackets, then tilt it slightly toward your bucket to catch any remaining black sludge.
Carefully carry the unit outside. Take it to your garden, driveway, or patio where you can safely make a mess without worrying about stains. Rest the radiator on an elevated surface, such as a couple of sturdy bricks or an old wooden pallet, so the water can drain away easily.
Flush the Radiator with the Garden Hose
This is the most important step of the entire process, where you will finally see the magic happen. Understanding how to flush a house radiator with a garden hose effectively is all about water flow and pressure.
Take your garden hose and turn it on to a moderate pressure setting. You do not want a violent, high-pressure jet, as this can damage the internal baffles and fins, but you do need enough force to dislodge the stuck dirt.
Insert the end of the garden hose directly into one of the open valve pipes at the bottom of the unit. To force the water to go through the radiator rather than splashing back in your face, take an old rag or cloth and wrap it tightly around the hose where it enters the opening. This creates a makeshift seal.
Turn the water on. As fresh water rushes into the unit, it churns up all the settled magnetite and rust. Almost immediately, you will see a stream of thick, black, filthy water pour out of the opposite valve opening. It is incredibly satisfying to watch all that efficiency-killing sludge wash away onto your driveway!
Let the water run continuously. At first, it will be opaque and dark, but after a few minutes, it will start to lighten. Keep the hose running until the water coming out of the other side runs completely clear.
Once it is clear, turn off the hose. Now, flip the radiator over or move the hose to the opposite valve opening. Repeating the process from the other direction ensures that any stubborn sludge trapped in the corners is pushed out. Run the water again until it is clear from this side as well.
Pro tip: Use a narrow funnel or a specialized hose nozzle attachment to help direct the water flow deep into the valve, giving you better control and avoiding unnecessary splashing on your clothes.
If you purchased a radiator flush additive, you can pour a little into the top of the unit now, swish it around with some water, and let it sit for a few minutes before giving it one final, thorough rinse.
Rinse, Dry, and Reattach the Radiator
Give the entire unit one final rinse with clean water to ensure all debris and chemical cleaners are entirely gone. Tilt it back and forth to let all the excess water drain completely out of the bottom valves.
Take a moment to inspect the radiator visually. Wipe down the exterior, inspect the threads at the valve openings, and ensure no rust particles are blocking the connection points.
Carry the clean, empty radiator back inside. With your helper, carefully lift it back onto the wall brackets. Line up the valve connections perfectly with your pipework. Hand-tighten the union nuts first to ensure you do not cross-thread them, then use your spanner to secure them tightly. Be firm, but avoid overtightening, as you can easily crack the brass fittings.
Refilling and Bleeding the Radiator
Your radiator is now squeaky clean inside, but it is completely full of air. You need to refill it with water from your heating system before you can turn the boiler back on.
Start by ensuring the top bleed valve is closed. Then, move to your bottom valves. Reopen the TRV by turning it counterclockwise. Next, take your pliers and reopen the lockshield valve by the exact number of turns you counted when you closed it. As you open the valves, you will hear water rushing back into the empty metal chamber.
The water will stop flowing once the trapped air inside pushes back. This is when you need your radiator bleed key. Insert the key into the top bleed valve and turn it slowly. You will hear a loud hissing sound as you bleed air from the radiator.
Keep the key turned until a tiny droplet of water escapes from the valve, indicating the unit is full, and all the air has escaped. Close the bleed valve tightly and wipe away the drip.
Finally, check your boiler. Because you removed a radiator’s worth of water from the system, your boiler pressure has likely dropped. Look at the visible pressure gauge on your boiler unit; it should generally read between 1 and 1.5 bar. If it is too low, use the filling loop (a small silver braided hose under the boiler) to repressurize the heating system and top up boiler pressure. Turn your boiler back on, let the system heat up, and enjoy the beautiful, even heat radiating from the bottom to the top of your unit!
When a Garden Hose Flush Isn’t Enough
While the DIY garden hose method is fantastic for isolating and curing a single problematic unit, it is not a cure-all for every heating woe. Sometimes, the sludge problem is much bigger than a single room.
You need to recognize the signs that a simple flush will not cut it. If you have multiple radiators across the house that are cold at the bottom, if your boiler keeps shutting down due to low pressure, or if you are constantly having to bleed air from the radiators every few days, you are dealing with whole-system sludge.
In these cases, a powerflush radiator system service is required. A powerflush is a professional process where a heating engineer connects a powerful, high-pressure pump directly to your central heating circuit. They push a highly concentrated chemical cleaner through every single pipe and radiator in your home simultaneously, catching all the debris in a large magnetic filter.
You should absolutely call a Gas-Safe or certified professional heating engineer when:
- You are unsure about plumbing and do not feel confident removing heavy wall units.
- You notice severe corrosion, rust holes, or uncontrollable leaks in your pipes.
- The boiler itself is making loud kettling (banging) noises, indicating sludge has reached the heat exchanger.
While a DIY garden-hose flush costs you almost nothing but your time, a professional central heating flush can cost several hundred dollars. However, if your entire system is failing, paying a professional is far cheaper than replacing a broken boiler. Use your best judgment, and never hesitate to call an expert if you feel overwhelmed.
Maintenance Tips to Prevent Sludge Buildup
Now that you have put in the hard work to clean your system, you want to make sure you never have to do it again! Regular maintenance is the key to preventing sludge from returning and keeping your radiators toasty warm all winter long.
Here are the best ways to practice proactive radiator maintenance:
- Add a Radiator Inhibitor: This is the most important step! A radiator inhibitor is a special chemical liquid that you add to your central heating system. It acts like a protective shield, stopping the chemical reactions that cause rust and magnetite. It is essentially a magic potion to prevent radiator sludge. You should top this up every year or two.
- Book an Annual Boiler Service: Have a qualified technician inspect your boiler every single year. They will check the internal components for sludge damage, ensure the pressure is correct, and often do a quick visual check of your system’s overall health.
- Bleed Radiators Regularly: Trapped air in the system introduces oxygen to the water, which accelerates rust. Make it a habit to bleed all your radiators at the start of every winter season to release any trapped air.
- Keep Your Thermostat Balanced: Do not force your boiler to run at its absolute maximum temperature all the time. Setting your boiler to a reasonable, steady temperature reduces the stress on the metal pipes and slows down the degradation process.
- Install a Magnetic Boiler Filter: If you do not already have one, ask a plumber to install one on your return pipe. This clever device catches heavy rust particles before they can enter the boiler, making it incredibly easy for a plumber to clean out during an annual service.
By following these simple steps, you can easily keep radiators at the bottom warm and prolong the life of your entire central heating network.
Common Mistakes Homeowners Make When Flushing Radiators
DIY projects are incredibly rewarding, but they also come with a learning curve. If this is your first time tackling a DIY radiator flush, you want to avoid the common pitfalls that can turn a quick afternoon job into a massive headache.
The most dangerous mistake is failing to let the system cool down before starting. People get impatient, turn off the boiler, and immediately start unscrewing valves. Scalding hot water will spray everywhere, causing severe burns. Always, always wait for the metal to become cool to the touch.
Another frequent error is forgetting to turn off the boiler entirely. If the boiler kicks on while a radiator is disconnected, the system pump will shoot water out of the open pipes directly onto your floors. Double-check that the power is off at the breaker if you have to!
Over-tightening radiator valves is a classic amateur mistake. The brass fittings connecting your pipes are surprisingly soft. If you crank them down with a heavy wrench using all your strength, you will crack the metal or strip the threads. This causes permanent leaks that require a plumber to cut and replace the pipes. Hand-tighten first, then use a wrench to make it snug—do not overdo it.
People also make the mistake of using excessively high water pressure from their hose. Blasting the dirt with a pressure washer setting is a good idea, but the thin metal fins inside the unit can bend or rupture under high force. Keep the garden hose on a moderate, steady flow.
Finally, never skip the drain tray or towels. Trust us, no matter how careful you are, black sludge will drip. Failing to use basic floor protection is the fastest way to ruin your expensive carpets.
FAQs About Flushing a House Radiator with a Garden Hose
To wrap up our comprehensive guide, let’s address some of the most common questions homeowners have when attempting this DIY project.
Q: Can I flush a house radiator with a garden hose if it’s still attached to the wall? While you technically can attach a hose to the drain valve while the unit is still mounted, it is highly unadvised. It is incredibly messy, risks flooding your living room, and it is much less effective because you cannot tilt the unit or flush water from both directions. Full removal is always recommended for a proper, thorough clean.
Q: Is it safe to flush a radiator with a garden hose? Yes, it is perfectly safe as long as you follow the crucial precautions. You must ensure the heating system is turned off, the water has completely cooled, the valves are properly isolated, and you use a moderate (not high-pressure) water flow from the hose.
Q: How often should I flush my radiator with a garden hose? If you maintain your system well and use a chemical inhibitor, you should not have to do this often. Generally, flushing a problematic unit every 2 to 5 years is sufficient, depending on your system’s age and the water hardness in your area.
Q: Will flushing a radiator improve my heating bills? Absolutely. Sludge acts as an insulator at the bottom of the unit, preventing the hot water from radiating heat into the room. By removing the sludge, your boiler does not have to work as hard or run as long to reach your desired room temperature, which directly reduces your energy consumption and lowers your bills.
Q: Can I use hot water from the garden hose to flush the radiator? There is no need to use hot water. In fact, using lukewarm or cold water straight from your outdoor spigot is safer for you to handle and is more than sufficient to break apart and push out the accumulated dirt and rust.
Q: What should I do if water doesn’t drain from the radiator when I open the valve? If you open the bottom nut and nothing comes out, you likely have a vacuum seal. Ensure you have opened the top bleed valve with your bleed key to let air in. If the bleed valve is open and it still will not drain, the sludge might be so thick that it has formed a solid plug. In this case, you may need to gently poke the blockage with a piece of wire or call a plumber for assistance.
Q: Can I flush multiple radiators with a garden hose at once? When doing a DIY flush, it is much easier and safer to tackle one radiator at a time. Trying to remove and clean multiple units simultaneously creates unnecessary chaos, increases the risk of losing track of your valve turns, and makes a much bigger mess. Take your time and go room by room.