
Have you ever walked up your staircase and felt a step wobble beneath your feet? Or maybe you are lying in bed at night, trying to sleep, but all you can hear is the rhythmic, torture-like sound of a dripping tap in the bathroom? If you are nodding your head, you are not alone. These are two of the most annoying yet common problems homeowners face.
Cracked marble stairs or dripping taps can quickly turn your haven into a hazard zone. A loose step is a recipe for a bad fall, and a leaking tap is literally washing your money down the drain. But here is the good news: you don’t always need to call an expensive contractor immediately.
Common Problems: Why Do These Things Break?
Before we dive into the “how-to,” it is really important to understand the “why.” Understanding the root cause of the damage helps you prevent it from happening again.
Marble Stair Issues
Marble is a beautiful, durable stone, but it isn’t invincible. Over time, your “marbal satap” (marble steps) undergo significant wear and tear. The most common issue is cracking. This usually happens due to the house settling—as the foundation shifts slightly over decades, the rigid stone snaps.
Another major culprit is heavy impact. If you have ever dropped a heavy suitcase or a tool on the stairs, you might notice a spiderweb crack or a chip. Furthermore, in humid climates like Lahore during the monsoon season, moisture can seep under the stone. This causes the adhesive or cement underneath to erode, leading to loose, wobbling steps that feel unsafe when you step on them.
Tap Leaks
Taps are mechanical devices with moving parts, and eventually, those parts wear out. The most common reason for a drip is a worn-out washer or O-ring. These are small rubber or silicone rings that create a watertight seal. Over years of twisting the handle on and off, they flatten or crack.
Corrosion is another enemy. Mineral deposits from hard water can accumulate on the valve seat, preventing the tap from closing fully. Sometimes, the issue is simply high water pressure forcing water past the seals.
Diagnosis Table
To help you figure out exactly what is going on, check out this simple comparison table:
ProblemSymptomsCommon Causes
Marble Stair Cracks Visible dark lines, jagged edges, catching socks on stone: foundation shift, heavy impact, ageing stone.
Tap Drips Constant, “drip-drip” from the spout, water pooling at the base: faulty rubber seals, worn O-rings, and mineral buildup.
Loose Steps Movement underfoot, hollow sound when tapped , Weak adhesive, water erosion of cement, poor installation
Stained Marble, Yellowing or dark patches , Water absorption, spills, reaction to acidic cleaners
Tools and Materials: What You Will Need
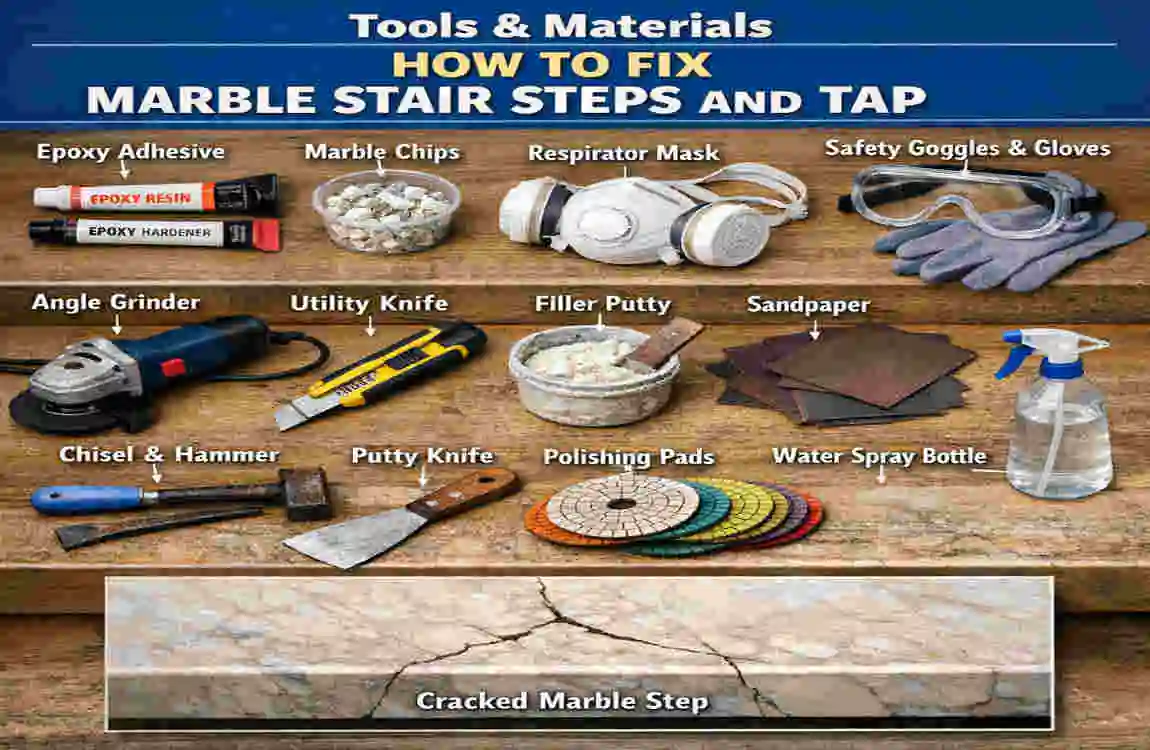
You wouldn’t try to cook a meal without ingredients, and you can’t do repairs without the right tools. The great thing is that many of these tools are multi-purpose and good to have around the luxury house.
Safety First: Before you buy anything, ensure you have safety gear. You need gloves to protect your hands from chemicals and sharp edges, goggles to keep stone chips and water out of your eyes, and a dust mask if you are grinding marble.
For Marble Stairs
To fix your marble, you will need materials that bond strongly and finish smoothly.
- Marble Epoxy or Resin: This is the “glue” that fills cracks. You can get clear or coloured types to match your stone.
- Grout: For filling the spaces between the steps and the wall.
- Putty Knife or Trowel: Used for applying and smoothing the filler.
- Chisel and Hammer: Essential for removing old, loose mortar if a step is loose.
- Sandpaper or Polishing Pads: You need a range of grits (rough to smooth) to make the repair invisible.
- Angle Grinder: (Optional but helpful) For cutting or smoothing rough stone edges.
For Taps
Plumbing requires precision tools to avoid stripping nuts and bolts.
- Adjustable Wrench: The plumber’s best friend.
- Screwdrivers: Both flathead and Phillips head.
- Replacement Washers/Cartridges: Identify your tap type before buying these.
- Plumber’s Tape (Teflon Tape): A thin white tape used to seal threaded pipes.
- Vinegar: A household hero for cleaning off mineral deposits.
Estimated Cost Breakdown (PKR)
Here is a rough idea of what you might spend at a local hardware store in Pakistan:
CategoryItemUseApprox. Cost (PKR)
Marble Repair Epoxy Filler / Resin Filling cracks and chips 500 – 1000
Marble Repair Sandpaper Set Smoothing the surface 200 – 400
Tap Fix Washer/O-Ring Set Stopping drips 200 – 500
Tap Fix Replacement Cartridge For modern mixer taps 300 – 1500
Tools Adjustable Wrench Loosening nuts 800 – 1200
Fixing Marble Stair Steps: A Detailed Walkthrough
Now, let’s get into the meat of the guide. Fixing marble stairs might seem intimidating because stone feels so permanent, but it is manageable if you break it down. Whether you are dealing with a hairline crack or a step that completely wobbles, the process is logical and step-by-step.
Assess the Damage
Before you mix any chemicals, take a close look at your stairs. Walk up and down the staircase slowly. Step on every single tread (the horizontal part) and riser (the vertical part).
If the step moves, it is a structural adhesion issue. If it is solid but has a line running through it, it is a crack. If a corner is missing, it is a chip. Knowing the difference tells you whether you need to glue the stone back down or fill in a cosmetic gap.
Repairing Cracks and Chips
This is the most common fix. Here is how to make that crack disappear.
- Clean the Area Thoroughly: You cannot bond anything to dust or grease. Scrub the crack with soapy water and a stiff brush. If there is oil or wax on the marble, use acetone to strip it. Let it dry completely. Moisture is the enemy of epoxy.
- Prep the Surface: If the crack is very tight, you might actually need to widen it slightly with a Dremel tool or the edge of a scraper. This sounds counterintuitive, but it creates a “V” shape that allows the glue to penetrate deep rather than sit on top.
- Mix Your Filler: Take your marble floor epoxy. If your marble is white, you might need to add a tiny drop of tint (usually sold with the kit) to match the colour. Mix the resin and hardener exactly as directed on the package.
- Apply the Filler: Using your putty knife, push the epoxy into the crack. Don’t just wipe it over; press it in deep to fill the void. Leave it slightly “proud” (mounded above the surface) because it shrinks slightly as it dries.
- Let it cure: Patience is key here. Let it dry for the recommended time (usually 24 hours).
- Smooth it out: Once hard, use your sandpaper. Start with a medium grit (like 120) to knock down the excess glue. Then switch to finer grits (220, 400, 600) to blend it with the surrounding stone.
Regrouting and Tightening Loose Steps
If you are wondering how to fix marble statuary that is wobbling, this section is for you. A loose step is dangerous.
- Remove the Step (If possible): If the step is very loose, try to gently lift it off entirely. Be careful not to break it. If it’s only slightly loose, you might be able to inject adhesive, but removing it is better.
- Clean the Substrate: Look at the concrete underneath. It will be covered in old, dry cement. You need to chip this away using your chisel and hammer. You want a rough, clean surface for the new bond. Do the same to the back of the marble slab.
- Apply Adhesive: Mix up a batch of thin-set mortar or heavy-duty construction adhesive suitable for stone. Apply a thick layer to the concrete base. Use a notched trowel to create ridges in the glue—this ensures better suction.
- Reseat the Step: Place the marble back onto the fresh adhesive. Press down firmly. You might need to wiggle it slightly to get it level. Use a spirit level to make sure it isn’t tilting.
- Grout the Edges: Once the step is solid (wait 24 hours), mix up some grout. Push this into the gaps between the step and the wall or the riser. This locks the step in place and prevents water from getting underneath again.
Polish and Restore Shine
After all that sanding and glueing, your repair spot might look dull compared to the rest of the shiny stairs.
To fix this, you need to polish. If you have a hand polisher, use diamond polishing pads. Keep the surface wet to keep dust down and prevent overheating. Work your way up to very high grits (up to 3000) for that mirror-like finish. Finally, apply a marble sealer. This liquid soaks into the stone’s pores and prevents future stains from tea, coffee, or dirty water.
When to Call the Pros?
While this guide empowers you to do it yourself, sometimes the damage is too serious. If the concrete staircase structure under the marble is crumbling, or if you have a massive crack running through multiple steps, this indicates a foundation issue. In these cases, it is safer to call professional repair services, especially in areas like Lahore, where structural settling is common.
Fixing Tap Leaks: A Quick DIY Guide
Now that the stairs are solid, let’s silence that dripping tap. Fixing a tap is one of the most useful skills a homeowner can have. It stops water waste and saves you the annoyance of the sound.
Identify Your Tap Type
Most taps in Pakistan fall into two categories:
- Compression Taps: These are the traditional taps with a handle you turn several times to get water. They use a rubber washer.
- Cartridge/Mixer Taps: These are modern, single-lever taps (often used in kitchens or showers) that you lift and turn. They use a plastic cartridge.
Step-by-Step Repair
Important: Before doing anything, look under the sink and turn off the isolation valve. If there isn’t one, turn off the main water supply to your house. Open the tap to drain the remaining water.
Fixing a Compression Tap The “Washer” Swap
- Remove the Handle: Look for a small screw on the handle. It is often hidden under a small plastic cap that says “H” or “C”. Pop the cap off with a knife, unscrew the screw, and pull the handle off.
- Expose the Valve: You will see a nut holding the valve in place. Use your adjustable wrench to unscrew this.
- Check the Washer: Once you pull the valve stem out, look at the bottom. You will see a small black rubber ring held on by a screw or nut. This is the culprit. It will likely look flat or chewed up.
- Replace and Reassemble: Remove the old washer. Take it to the hardware store to get the perfect size (they cost peanuts). Screw the new one on. Put the valve back in the tap body, tighten the nut, and put the handle back on. Turn the water on—the drip should be gone!
Fixing a Modern Cartridge Tap
- Access the Cartridge: Just like the other tap, find the screw (usually under a small cap on the lever or behind the handle). Remove the handle.
- Remove the Locking Nut: There will be a large brass or plastic nut holding the cartridge down. Unscrew this with your wrench.
- Swap the Cartridge: Pull the plastic cartridge straight up. It might be stiff due to mineral buildup. Take this cartridge to the store to get an identical replacement.
- Install: Drop the new cartridge in (it usually has feet that fit into holes, so it only goes in one way). Tighten the locking nut. Reattach the handle.
Quick Fix Reference Table
Tap TypeProblemSolution SummaryEst. Time
Traditional (Twist) Constant Drip Replace Rubber Washer 15 Mins
Traditional (Twist) Leaking from the handle body. Tighten the packing nut or replace the O-ring. 20 Mins
Mixer (Lever) Drip or stiff movement Replace internal cartridge 20 Mins
Any Tap Low Flow Clean aerator (mesh at spout) with vinegar for 10 Mins
Lahore Tip: In many local hardware markets, you can find universal cartridges for around PKR 300-500. Always bring your old part with you to ensure a perfect fit.
Prevention Tips
To keep your taps running smoothly, clean the aerators (the small mesh screens at the end of the spouts) regularly. Soaking them in vinegar removes calcium deposits. Also, try not to close taps too tightly; over-tightening crushes the washer and shortens its lifespan.
Safety and Prevention Tips
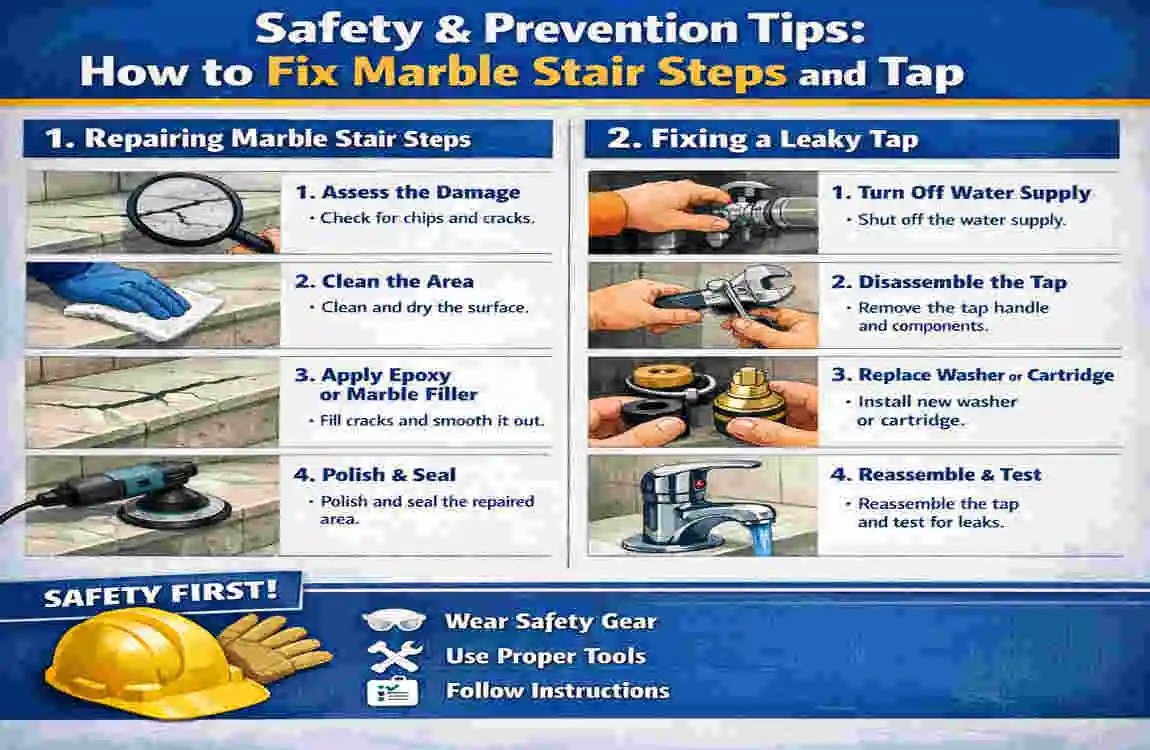
Doing it yourself is rewarding, but safety is non-negotiable.
- Ventilation: When using marble epoxy or strong cleaners, open the windows. The fumes can be strong and cause headaches.
- Heavy Lifting: Marble is deceptively heavy. If you are lifting a full step, lift with your knees, not your back.
- Preventing Slips: While fixing the stairs, block off the area so family members don’t accidentally step on wet glue or loose stones.
Long-Term Maintenance: To prevent future “marble stain” issues, avoid using acidic cleaners (like harsh toilet cleaners) on marble. Acid eats away the calcium in the stone, making it porous and weak. Use a pH-neutral cleaner. For taps, if you have very hard water, consider installing a water softener to protect your plumbing valves.
Frequently Asked Questions FAQs
Here are some common questions we hear from homeowners trying to tackle these repairs.
Q: How can I fix marble statuary and tap at home without professional tools? A: You can do basic repairs with simple household tools. For marble cracks, a simple epoxy kit is enough. For taps, a standard wrench and screwdriver set will handle 90% of leaks. You don’t need industrial equipment for minor repairs.
Q: Can I fix marble stairs myself if the stone is broken in half? A: Yes, if the break is clean. You can use a strong stone epoxy to glue the two halves together. Clamp them tight while it dries. However, if the stone has shattered into many small pieces, it is usually better to replace the whole step.
Q: What is the cost to repair tap leaks in Lahore? A: If you do it yourself, it costs less than PKR 500 for parts. If you hire a plumber, they might charge a service fee plus the repair cost, often totalling PKR 1500 to PKR 3000, depending on the complexity.
Q: Why does my tap keep dripping even after I replaced the washer? A: The “seat” (the brass part the washer pushes against) might be damaged or rough. You may need a tool called a “reseating tool” to grind it smooth, or the O-ring on the stem might also need replacing.
Q: How long does marble epoxy take to dry? A: It usually sets in 10 to 20 minutes but takes about 24 hours to cure and reach maximum strength fully. Don’t walk on the step until the next day.