
If you’re planning a metal roof for your home, you’ve probably heard the phrase “screw pattern for house metal roofing.” But what does it really mean? In simple terms, a screw pattern refers to the layout and spacing of fasteners (screws) that hold metal panels in place on your roof. It includes how and where you position screws along the length and width of each panel, at overlaps, and especially at critical spots like the edges and ridges.
Why is this so important? Using the right screw pattern for house metal roofing is crucial for several reasons. A well-designed pattern prevents leaks, resists wind uplift, allows for thermal movement of the metal, and ensures your roof lasts as long as it should.
Why the Right Screw Pattern Matters for Your Home
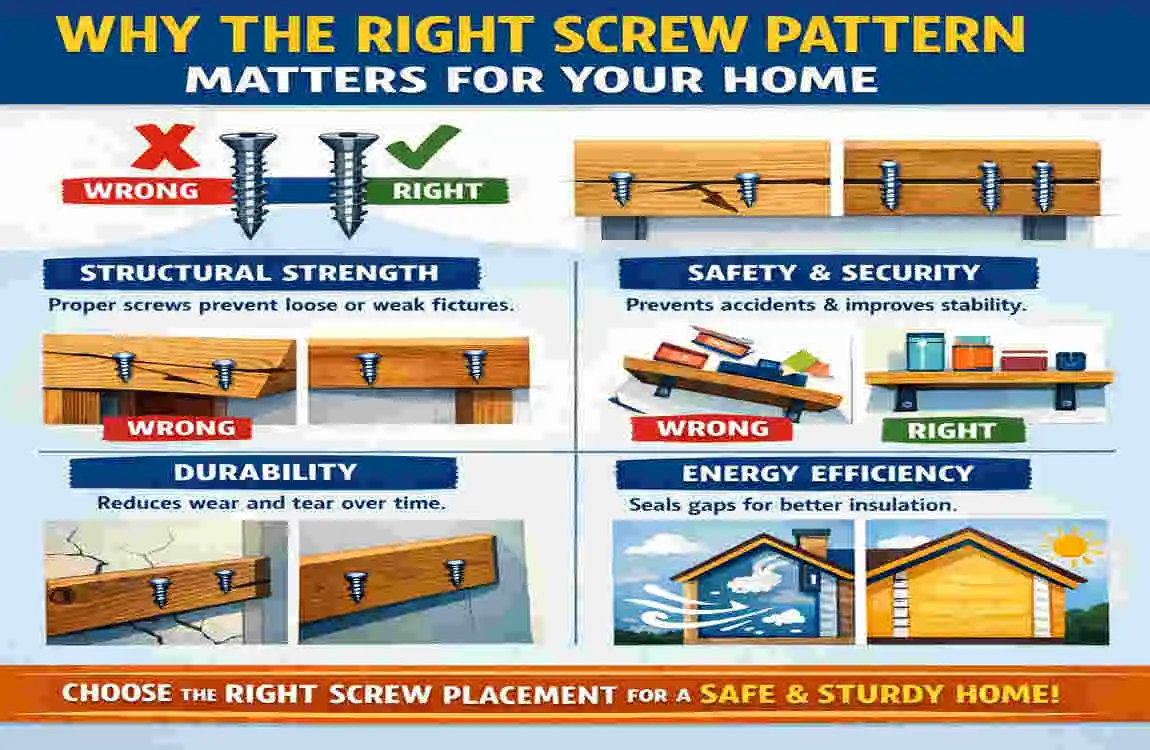
Structural Stability
A properly executed screw pattern for house metal roofing isn’t just about looks—it’s about keeping your roof where it belongs. When screws are spaced correctly and follow a thoughtful pattern, they help distribute wind and snow loads evenly across the roof deck or supporting purlins. This balance prevents stress points and reduces the risk of panels flexing or even flying off during storms.
Water-Tightness
Water is a roof’s greatest enemy. If you misplace or underspace screws, you create vulnerable spots where rain can sneak through, especially at panel crests or valleys. That’s why a precise screw pattern for house metal roofing is essential: it ensures each panel is securely fastened and that every potential leak path is blocked.
Longevity and Warranty Protection
Manufacturers often provide detailed instructions on screw patterns. Ignoring these specs can void your warranty! If installers take shortcuts or rely on personal “rules of thumb,” you might end up with a roof that fails early—and no warranty to back you up. Protect your investment by getting the screw pattern right from the start.
Types of Metal Roofing Panels and Their Fastener Needs
Metal roofs come in several popular styles, and each has unique fastener requirements. Let’s break down the most common types:
Corrugated Panels
Corrugated panels are the wavy, classic-style sheets you see on many homes and barns. These usually require screws placed at the crests (the high points) or, in some cases, every other valley. The pattern ensures panels are held down securely without squishing the metal.
R-Panel and 7-2/10 Panel
R-panels and 7-2/10 panels have a more squared-off profile. They often use a valley-based or alternating-rib screw pattern. This means screws are placed in the flat parts or valleys, sometimes alternating between ribs to balance strength and watertightness.
Standing-Seam Systems
Standing-seam roofs are the sleek, modern-looking panels with raised seams that hide the fasteners. These use hidden clips instead of exposed screws. The “screw pattern” here is all about clip placement beneath the seams—very different from traditional panels.
In summary:
- Corrugated: Screws at crests or every other valley
- R-panel/7-panel: Alternating-rib or valley patterns
- Standing-seam: Hidden clips, not visible screws
Common Screw Patterns for Exposed-Fastener Metal Roofs
Standard Field Pattern
The field area (the main body of each panel) usually follows a standard layout: screws every 24 inches along the ribs or flat sections, aligned with the structural supports underneath. This pattern holds the panels flat and secure without over-fastening.
Straight-Line vs. Staggered Layouts
- Straight-line: Screws are aligned in neat, vertical or horizontal rows. This looks tidy and is common in low-wind regions.
- Staggered: Screws are offset from one row to the next. This pattern offers better resistance to wind uplift, making it ideal for storm-prone areas.
Diagonal or Offset Patterns
In some regions—especially where roofs have a very low pitch—diagonal or offset screw patterns are recommended. This can help shed water more efficiently and provide extra hold where pooling or wind-driven rain is a concern.
Edge, Lap, and Ridge Screw Patterns
Edge Rows
Edges are the most vulnerable to wind uplift. That’s why screw spacing is tighter along eaves, rakes, ridges, and hips—usually every 12 to 16 inches. A snug edge row prevents panels from peeling up in a storm.
Lap Patterns
Where two panels overlap (side-laps or end-laps), extra screws are placed to lock them together. This stops panels from flapping or letting water in during high winds.
Ridge and Hip Cap Patterns
Ridge caps (the top peak of your roof) and hip caps (where two slopes meet) also need special attention. Screws are often placed at each rib or every 12–18 inches, depending on your panel style. This ensures these critical points remain watertight and secure.
How Roof Pitch Affects Your Screw Pattern for House Metal Roofing
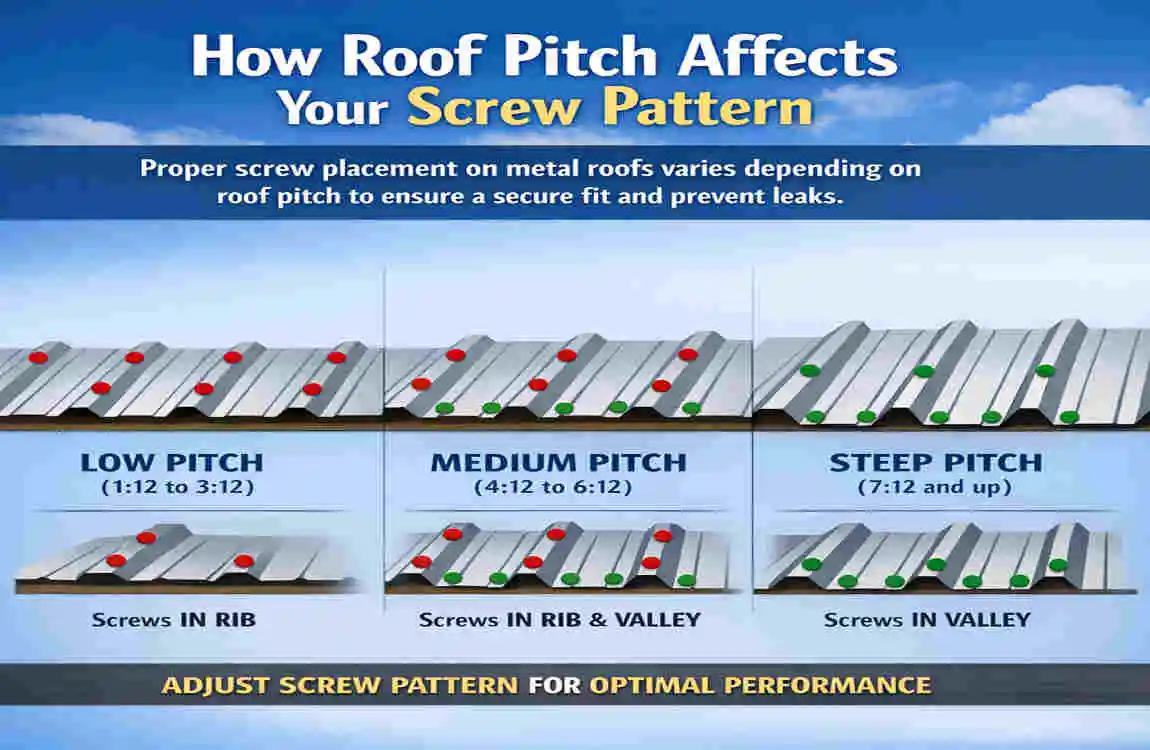
Low-Pitch Roofs
Low-pitch (nearly flat) roofs are more prone to water pooling and wind-driven rain. For these, a tighter screw pattern is essential—closer spacing keeps panels down and prevents leaks.
High-Pitch Roofs
Steeper roofs shed water quickly so that field screw spacing can be slightly more relaxed. However, edges and ridges still require tight patterns to counteract wind uplift.
In both cases, Edges, laps, and ridges are always reinforced with closer screw spacing.
Screw Spacing by Panel Type and Width
To make things clear, here’s a handy table summarizing typical screw spacing for the most common residential metal roof panels:
Panel Type Field Spacing Edge/Ridge/Lap Spacing Notes
Corrugated 12–24″ at crests 12–16″ Some use every-other valley
R-Panel 12–18″ per rib 12″ Tighter at laps and edges
7-2/10-Panel 12–24″ along ribs 12″ Manufacturer-specific
Standing Seam Clips 12–24″ per seam , Edge screws 12–16″ , Fasteners hidden beneath the seam
Always check your panel manufacturer’s instructions before finalizing your screw pattern for house metal roofing. Instructions may vary depending on panel width, thickness, and local code requirements.
Choosing the Right Screws and Washers
Not all screws are created equal! Here’s what you need to know:
Screw Types
- Self-drilling screws (#10 or #12) are standard for most residential metal roofs.
- Neoprene-sealed washers are a must—they create a water-tight seal and cushion the metal.
Screw Length
- Into wood deck: 1–1.5 inches
- Into purlins (metal supports): 1.5–2.5 inches
The exact length depends on the thickness of your substrate. Too short, and the screw won’t hold. Too long, and you risk poking through the underside.
Washer Function
Washers should sit snugly against the panel but not be crushed. They keep water out and prevent overtightening, which can distort the metal and cause leaks.
Step-By-Step: Laying Out a Screw Pattern on Your Roof
Ready to get hands-on? Here’s a practical workflow for laying out the perfect screw pattern for house metal roofing:
- Review Panel and Fastener Specs:
- Read your panel manufacturer’s guide and local building codes.
- Snap Chalk Lines:
- Mark where each row of screws will go. Use a chalk line for straight, even placement.
- Start at the Eave:
- Begin at the bottom edge of your roof and work upward, increasing screw density at edges, laps, and ridges.
- Use the Right Tools:
- A calibrated clutch-driver helps you avoid stripping screws or crushing washers.
- Double-Check Spacing:
- Measure twice, screw once! Consistent spacing is key to a professional result.
Local Building Codes and Climate Considerations
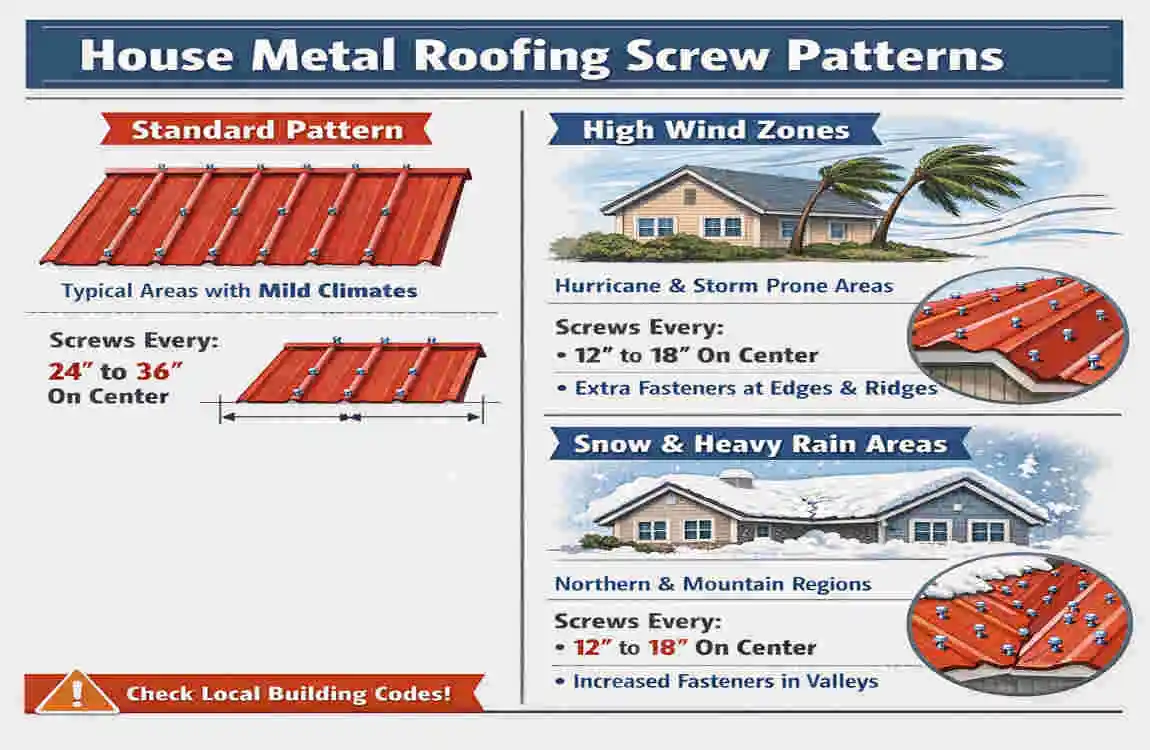
No two regions are the same. That’s why “standard” screw patterns often need adjustments based on your local climate and building codes.
High-Wind and Coastal Areas
If you live near the coast or in hurricane-prone regions, building codes may require much tighter screw spacing, especially at edges and corners. Reinforced patterns help your roof withstand powerful storms.
Snow and Seismic Zones
In snowy or earthquake-prone areas, extra fasteners ensure your roof stays put under heavy loads or vibration.
Pro Tip
Even if you’re a DIY enthusiast, consult a local metal-roofing contractor or engineer. They’ll help verify that your screw pattern for house metal roofing complies with all codes and best practices.
Common Mistakes to Avoid in Screw Patterns
Even professionals make mistakes! Here are some to watch out for:
- Screwing into insulation or old shingles: Always anchor screws into solid decking or purlins—never just soft material.
- Ignoring manufacturer patterns: Never rely on memory or “industry standards.” Each panel and region is unique.
- Over-spacing at edges or under-spacing in the field: This can lead to stress, leaks, or even blown-off panels.
The consequences? Leaks, structural failure, denied warranties, and costly repairs. Avoid shortcuts and follow the guide!
Hidden-Fastener Systems: Standing Seam and Clip Patterns
Not all metal roofs have visible screws. Standing-seam roofs use hidden clips to attach panels to the roof deck.
How the Pattern Works
- Clip Spacing: Usually every 12–24 inches along the seam, depending on panel width and wind zone.
- Edge Closure Fasteners: Additional screws secure the roof at the perimeter.
Why It’s Different
These systems allow for thermal expansion and contraction. Proper clip spacing prevents panels from buckling or pulling loose over time.
Retrofitting Over Shingles: Adjusting Screw Patterns
Planning to install metal roofing over existing shingles? Here’s what to keep in mind:
- Solid Deck vs. Purlin-Only: Always aim to screw into a solid deck or properly spaced purlins—not just into the shingle layer.
- Match Spacing to Structure: Adjust your screw pattern to align with the underlying supports, not just the visible shingle rows.
- Why It Matters: Improper screw patterns over shingles can cause the deck to flex, leading to leaks and early failure.
Calculating Screw Quantity for Your Roof Project

Wondering how many screws you’ll need? Here’s a simple method:
- Measure your panels: For standard 3 ft x 36 ft panels with a 24-inch pattern, you’ll typically need about 80–100 screws per panel.
- Add extras: Always buy 10–15% more than your estimate to cover mistakes, waste, and rework.
Quick Reference Table:
Panel Size Field Pattern (24″)Screws/Panel
3′ x 36′ 24″ centers 80–100
Visual Examples and Best-Practice Layouts
While we can’t include diagrams here, imagine these layouts:
- Low-Pitch Corrugated Roof:
- Screws at every crest, spacing tight at eaves, and overlapped joints.
- Medium-Pitch R-Panel Roof:
- Alternating-rib screws in the field, extra screws at edges.
- Standing-Seam Roof:
- Clips hidden under each seam, spaced every 12–24 inches, with edge fasteners at ridges and eaves.
Friendly FAQs on Screw Patterns
Q: What is the ideal screw pattern for house metal roofing?
A: The best pattern matches your panel’s profile, the layout of roof supports, and local wind/snow codes. Always tighten spacing at edges and laps, and consult your panel manufacturer’s guide.
Q: Should screws be placed on the crest or in the valley?
A: It depends on your panel type. Some require screws at the crest, others in the valley. Always follow your manufacturer’s instructions.
Q: Can I use a generic screw pattern for all metal roofs?
A: No—each roof and panel system needs a tailored screw pattern for house metal roofing to ensure durability and warranty protection.