
That tiny sound is enough to send a shiver down any homeowner’s spine. You rush to the living room, only to find a dark, spreading stain on your ceiling and a steady stream of water splashing into a puddle on your expensive rug. If this scenario sounds familiar, you aren’t alone. Did you know that nearly 80% of residential leaks start on flat or low-slope roofs? Because water doesn’t run off as quickly as on a pitched roof, flat roofs are notoriously prone to pooling and eventual failure.
Why Flat Roofs Leak and Need Patching
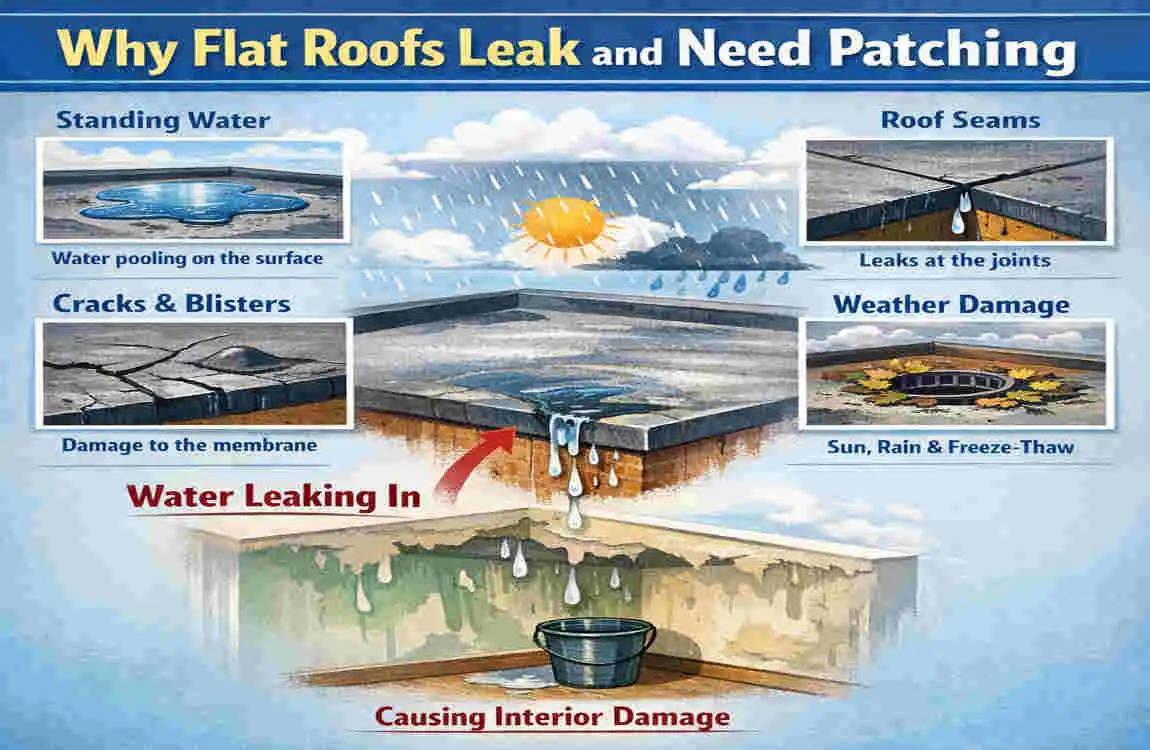
Before we dive into the “how-to,” it is crucial to understand the “why.” Flat roofs are unique beasts. Unlike steep shingles, which rely on gravity to do most of the work, a flat roof (which actually has a very slight pitch) relies on watertight seals. When those seals fail, water finds a way in.
Common Causes of Flat Roof Leaks
The biggest enemy of a flat roof is pooled water. If your roof has poor drainage, water can sit in “ponds” for days after a rainstorm. Over time, standing water can degrade roofing materials, leading to rot and leaks.
Another major culprit is the natural movement of your house. Houses expand and contract with temperature changes. This can cause cracks in seams, especially where the roofing material meets the flashing (the metal edges) or chimneys. If you have an older roof, you might also see “blisters”—bubbles of trapped air or moisture that expand under the sun’s heat until they pop, leaving a hole.
We also have to consider aging materials. Whether you have an EPDM (rubber), TPO (thermoplastic), or a traditional built-up roof (tar and gravel), the sun’s UV rays eventually make the material brittle. Once it becomes brittle, it cracks, and water rushes in.
Signs Your Flat Roof Needs a Patch
How do you know it’s time for flat roof leak repair?
- Water Stains: Brown rings on your interior ceiling.
- Bubbling Paint: Inside your house or on the exterior fascia boards.
- Slow Drains: If your roof gutters are clogged, the water is backing up.
- Visible Damage: If you climb up and see cracks, tears, or separated seams.
Risks of Ignoring Leaks
You might be tempted to put a bucket under the leak and ignore it, but please don’t. The risks of ignoring a leak go far beyond a wet floor. Structural damage is a real threat; water can rot wood beams, leading to roof collapse in severe cases.
Furthermore, moisture breeds mold. Mold growth can start within 24 to 48 hours of a leak. This poses serious health risks, including respiratory issues and allergies. A quick patch today prevents a toxic mold remediation bill tomorrow.
Quick Assessment Checklist
Before you buy materials, go up and look (safely!):
- Look for “alligatoring” (cracks that resemble reptilian skin).
- Check the seams—are they lifting?
- Inspect the flashing around vents and skylights.
- Look for nails that have popped up through the material.
Tools and Materials for Patching a Flat Roof
You wouldn’t try to fix a car engine with a butter knife, and you shouldn’t try DIY flat roof patchwork without the right gear. Having the correct tools makes the job faster, safer, and much more effective.
Essential Tools List
Head to your garage or local hardware store and gather these items:
- Utility Knife: For cutting away old, damaged roofing and sizing your patch.
- Roof Patch Kit: Specific to your roof type (we will get to that in a second).
- Roller: A heavy steel or silicone roller is vital for pressing the patch down to ensure a watertight seal.
- Caulk Gun: For applying sealant or roofing cement.
- Trowel: Helpful for spreading mastic or tar.
- Stiff Bristle Broom: To scrub the area clean.
- Rags and Solvents: For cleaning the repair area.
Best Materials by Roof Type
This is the most critical part. You cannot use just any patch on any roof. Using the wrong chemical can actually eat a hole through your roof! Here is a quick breakdown to help you choose the right flat roof patching materials:
Roof Type, Recommended Patch Material, Cost Estimate
EPDM (Rubber) EPDM Rubber patch + Primer + Lap Sealant $20 – $50
TPO (White Plastic) TPO Pressure Sensitive Tape + TPO Primer $30 – $60
Built-up / Modified Bitumen Asphalt Roofing Cement + Reinforcing Fabric Mesh $15 – $40
Where to Buy
You can find most of these materials at big-box stores like Home Depot or Lowe’s. For specific EPDM or TPO products, you might find a better variety on Amazon or at a specialized roofing supply warehouse in your city.
Pro Tip: If you are dealing with a leak while it is currently raining, look for “Wet Patch” or “Emergency Roof Patch” roofing cement. These are chemically designed to stick even underwater, offering a great temporary solution until things dry out.
Safety Precautions Before Patching
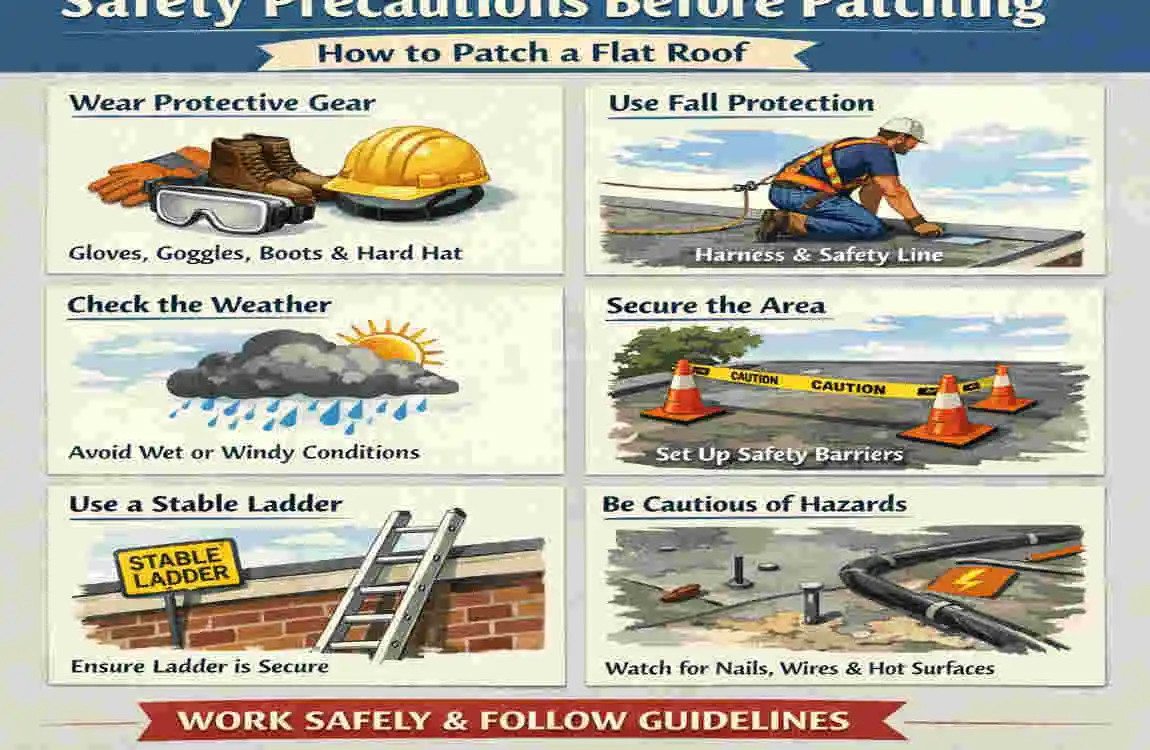
I cannot stress this enough: No leak is worth an injury. Roof work is inherently dangerous, even on a flat roof. Before you climb that ladder, take a moment to ensure you do so safely.
Step-by-Step Safety Prep
Check the Weather: Ideally, you want a dry, mild day. Trying to patch a roof in high winds or a thunderstorm is a recipe for disaster. Wet roofs are slippery roofs. Unless it is a dire emergency, wait for the rain to stop.
Secure Your Ladder: Make sure your ladder is on solid, level ground. Follow the 4-to-1 rule: for every 4 feet of height, the base of the ladder should be 1 foot away from the wall. Have a friend hold the ladder at the bottom.
Use Fall Protection: If you are working near the edge, you need to be careful. Falls from roofs account for one-third of all construction-related fatalities. Wear non-slip boots with good traction. If your roof is high, consider renting a safety harness.
Legal Note: Be aware of your limits. If your roof is exceptionally high (over 10 feet) or if you feel uncomfortable at any point, stop. There is no shame in calling a pro. DIY is great, but safety comes first.
Step-by-Step Guide: How to Patch a Flat Roof
Alright, you have your tools, you know your material, and you are safe. Let’s get to work. This section will guide you through the process of patching a flat roof in detail.
Preparing the Damaged Area
You cannot simply slap a patch over a dirty roof and expect it to hold. Preparation is 90% of the success.
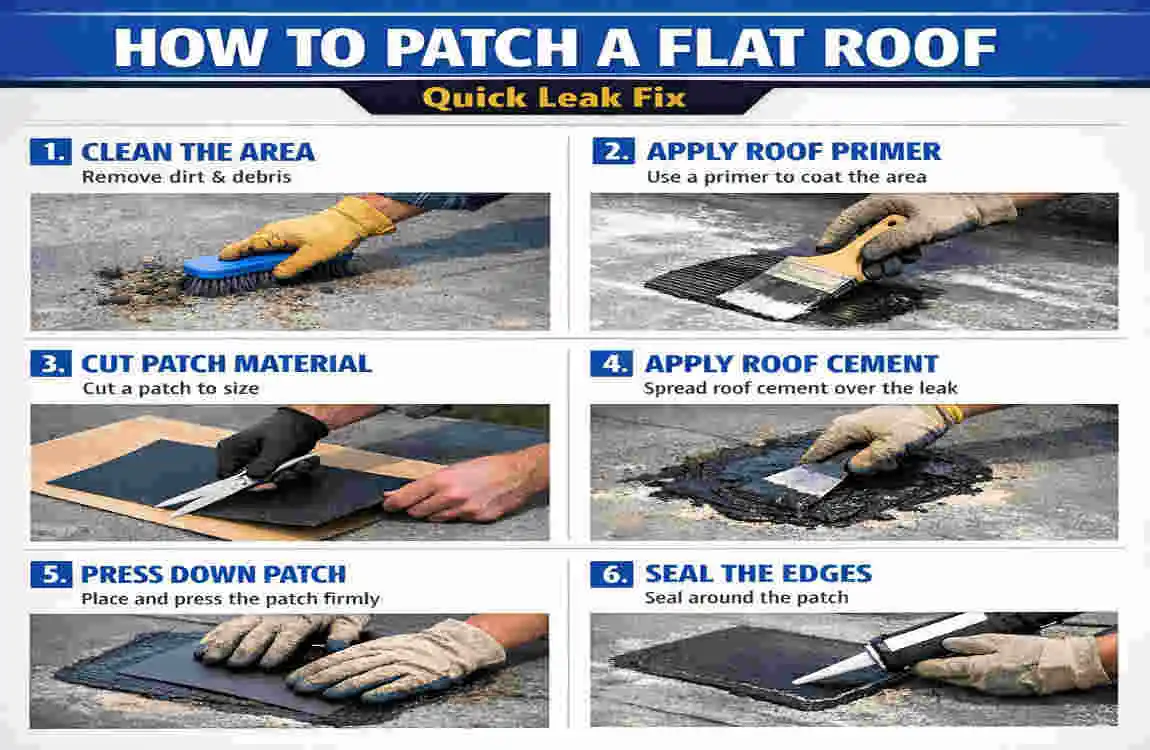
Inspect and Clean First: Locate the leak. Sometimes the leak inside isn’t directly below the hole on the roof, as water travels. Look for the defect we discussed earlier. Once found, remove any debris, leaves, or gravel from the area.
If there is standing water, use a pump or a sponge to dry it out completely. Use your stiff broom to sweep away dirt. If you have a built-up roof with gravel, carefully scrape the gravel away from the repair area to expose the underlying surface.
Clean with Solvent. For EPDM or TPO roofs, you must clean the area with a specifically recommended cleaner (often included in the kit) or a mild detergent. Grease and oil prevent adhesives from sticking. Wipe it down until the rag comes up clean.
Cut Out the Bad Section: If you have a blister (a bubble), use your utility knife to slice it open. It might be full of water—let it dry out. If the material is torn and flapping, cut away the loose parts. You want a flat, stable surface for your patch.
Applying the Patch for Quick Leak Fixes
This process varies slightly depending on your material, but the general principles of flat roof leak repair remain similar. Here is a universal approach, with notes for specific types.
Apply Primer or Adhesive. For rubber (EPDM) and plastic (TPO) roofs, you usually need to apply a primer first. Use a scrub pad to apply the primer to the area surrounding the cut or hole. Wait for it to become “tacky” to the touch (usually 5-10 minutes). Do not skip this! The primer acts like double-sided tape at a chemical level.
For asphalt/tar roofs, your “primer” is often a thin layer of roofing cement applied with a trowel.
Position the Patch Measure your patch. You want it to extend at least 2 to 3 inches beyond the damage on all sides.
- Peel-and-Stick: Many modern kits come with a peel-and-stick backing. Carefully peel off the film and lay the patch down over the hole. Do not stretch the patch; let it lie naturally.
- Cement Method: If using asphalt cement, lay a piece of fiberglass mesh into the wet cement you just troweled on. This mesh acts like rebar in concrete—it strengthens the repair.
Roll and Seal This is where the magic happens. Take your roller and press down hard on the patch. Roll from the center outward to push out any air bubbles. You want 100% contact between the patch and the roof.
The Three-Course Method (For Asphalt/Bitumen) If you are fixing a tar roof, use the “Three-Course Method” for a permanent fix:
- Apply a layer of roofing cement.
- Embed the fabric mesh.
- Apply a final top layer of roofing cement to cover the mesh fully.
Seal the Edges For EPDM/TPO patches, run a bead of “lap sealant” around the very edge of your new patch. This prevents water from seeping in and peeling the edge over time.
Finishing and Testing the Patch
You have applied the patch—great job! But you aren’t done yet.
Allow for Cure Time. Most adhesives and cements need time to cure. While some are instant, others take 24 hours to set fully. Avoid walking on the patch during this time. If you moved gravel, wait until the patch is dry before gently raking the gravel back over the area to protect it from the sun.
The Water Test Once the patch has cured (give it a day or two if possible), perform a “water test.” Take a garden hose and run water over the repair area. Do not use a pressure washer! Just simulate a gentle rain. Have someone stay inside the house to watch for leaks.
Common Mistakes to Avoid
- Poor Adhesion: This usually happens because the area wasn’t cleaned well enough.
- Ignoring Ponding: If you patch a hole but leave a massive depression where water pools, the patch will eventually fail under the weight of the water. You may need to use a “roof leveler” compound to fill low spots before patching.
Temporary vs. Permanent Flat Roof Patches
It is important to manage your expectations. Are you doing an emergency roof patch or a long-term repair?
Type Estimated Duration Best For
Temporary Patch 1 – 3 Months Mid-storm emergencies; waiting for a contractor; winter fixes.
Permanent Patch 5 – 10 Years Small punctures; open seams; maintenance on otherwise healthy roofs.
When Temporary Patches Fail, temporary patches (like troweling on wet-patch cement without mesh) will eventually crack as the roof expands and contracts. If you use a temporary fix, mark your calendar to go back and do it properly with mesh and fabric when the weather improves.
Cost Breakdown and Savings Tips
Let’s talk money. Why should you do this yourself?
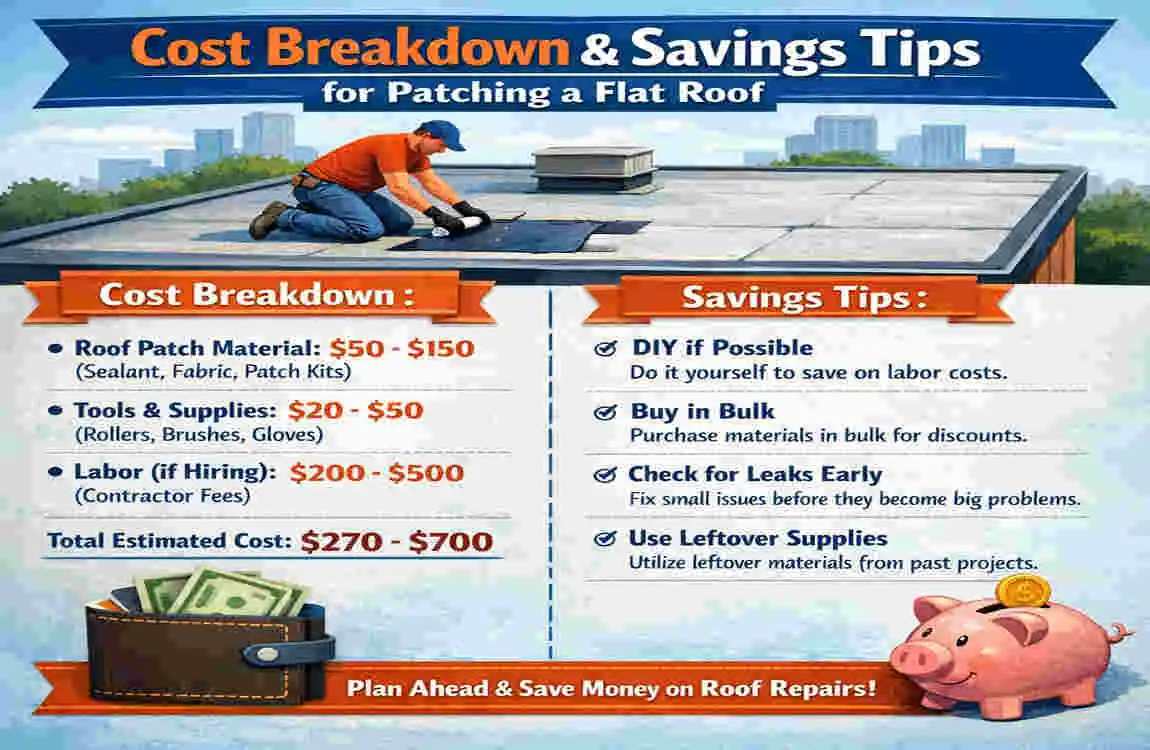
The DIY Advantage: A typical DIY flat roof patch project costs between $50 and $200, depending on the materials you buy and whether you need to purchase tools.
The Professional Cost: If you call a pro, the minimum service call fee is often around $300-$500 to show up. For a repair, you could be looking at $500 to $2,000. By doing it yourself, you are keeping that cash in your pocket.
Savings Tips
- Bulk Buying: If you have a large roof, buying a 5-gallon bucket of coating is cheaper per ounce than a tube of caulk.
- Seasonal Deals: Look for roofing materials in the off-season (late autumn) when stores are clearing inventory.
- Maintenance: The cheapest repair is the one you don’t have to make. Regular maintenance saves thousands.
When to Call a Professional Roofer
I am a huge advocate for DIY, but sometimes you need to call in the cavalry. Here is when you should put down the tools and pick up the phone.
Red Flags
- Large Areas: If the damage exceeds 10 square feet, a simple patch won’t suffice. You might need a section replacement.
- Structural Issues: If the roof feels “spongy” or soft when you walk on it, the wood decking underneath is rotted. This is a major structural repair.
- Widespread Failure: If you see leaks in 5 different places, your roof has likely reached the end of its life and needs a full replacement.
Local Pros: If you are in a specific area, like Lahore or London, local climate matters. Local pros in your area will know if you need specific heat-resistant materials or extra waterproofing for monsoon seasons. Don’t hesitate to get a quote—estimates are usually free.
Maintenance to Prevent Future Flat Roof Leaks
You fixed the leak! Now, let’s make sure it doesn’t happen again.
Seasonal Checklist
- Clear Drains Quarterly: This is the #1 rule for flat roofs. Keep scuppers, gutters, and drains clear of leaves. If water can’t get off the roof, it will get into the house.
- Annual Inspections: Walk your roof (safely) once a year. Look for those blisters and cracks we talked about. Catching them early means a $20 patch instead of a $2,000 repair.
- Trim Trees: Overhanging branches scratch the roof membrane and drop debris. Keep them trimmed back.
Long-Term Care: Consider applying a flat roof coating (such as silicone or acrylic) every 5-7 years. This acts like sunscreen for your roof, reflecting UV rays and adding a seamless waterproof layer over the whole thing.
FAQs: How to Patch a Flat Roof
Here are some common questions homeowners ask about quick house leak fixes.
Can I patch a flat roof in the rain? Technically, yes, but only with specific “wet-patch” or “underwater” mastics. Standard adhesives will not stick to wet surfaces. It is a temporary emergency fix only. Ideally, wait 24 hours for the roof to dry.
How long does a flat roof patch last? A well-applied professional-grade patch with proper primer and mesh can last as long as the roof itself—often 10 years or more. A quick “slap-on” patch might only last a season.
What is the best sealant for flat roof leaks? It depends on the roof material. For EPDM, use rubber-specific lap sealant. For asphalt, use flashing cement. Silicone coatings are excellent for general sealing across various roof types.
Can I use Flex Seal on a flat roof? Spray sealants are okay for very tiny pinholes or temporary emergency stops, but they are not a permanent solution for flat roof seams or large cracks. They tend to peel up after prolonged sun exposure.