
Imagine standing in your driveway, looking up at your home, and seeing a stunning, durable roof that you installed with your own two hands. Picture the satisfaction of knowing that not only have you shielded your family from harsh weather, but you have also saved thousands of dollars in labor costs. It sounds like a dream, right? But the reality is that learning how to roof tile your house is a completely accessible project for the determined DIY enthusiast.
Roof tiling isn’t some mystical art reserved only for professionals with decades of experience. While it requires sweat, careful planning, and a healthy respect for heights, it is a skill you can master. In fact, statistics suggest that nearly 80% of homeowners who tackle major DIY renovations report a deep sense of satisfaction and increased attachment to their homes. By taking on the challenge to roof tile your house, you aren’t just slapping on some shingles; you are investing in a roofing system that can last anywhere from 20 to 50 years.
Why Learn How to Roof Tile Your House? Key Benefits and Savings

You might be asking yourself, “Is this really worth the effort?” It is a fair question. Roofing is hard work. However, when you break down the benefits, the answer becomes a resounding yes. Learning how to roof tile offers advantages that go far beyond just pride of ownership.
Massive Cost Efficiency
Let’s talk numbers because that is usually the biggest motivator. When you hire a professional, you are paying for their time, insurance, overhead, and profit margin. Professional installation rates can range from $10 to $20 per square foot. In contrast, doing it yourself means you pay only for the materials. The cost of DIY roof tiling generally ranges from $3 to $7 per square foot. On a standard 2,000-square-foot roof, that difference can amount to tens of thousands of dollars in savings.
Incredible Customization
When you control the project, you control the look. You aren’t limited to the few samples a contractor might have in their truck. You can scour suppliers for the perfect eco-friendly clay, durable concrete, or sleek metal tiles that match your vision. You can mix colors to create a custom blend or choose a specific profile that enhances your home’s architectural style.
Long-Term Protection
Roof tiles are the heavyweights of the roofing world. Unlike standard asphalt shingles that might curl or crack after 15 years, well-installed tiles are built to last.
- Wind Resistance: Many tiles are rated to withstand winds up to 110 mph.
- Fire Safety: Concrete and clay tiles carry Class A fire ratings, the highest available.
- UV Resistance: They don’t degrade quickly under the beating sun, which is vital if you live in a hot climate.
Boosting Home Value
According to data from real estate professionals, a new tile roof is a major selling point. It signals to buyers that the home is well-maintained and protected. Installing a tile roof can increase your home’s resale value by 5% to 10%. It is an upgrade that pays you back not just in protection, but in equity.
Types of Roof Tiles: Choosing the Best for Your Home
Before you buy a single nail, you need to decide what you are putting on your roof. Not all tiles are created equal, and the “best” tile depends on your budget, your home’s structure, and your local climate. When you are learning how to roof tile, choosing a material that is friendly to DIY installation is key.
Here is a breakdown to help you compare your options:
Tile TypeMaterialDurabilityCost per Sq FtBest For
Clay Natural baked clay 50+ years $5 – $15 Spanish/Mediterranean styles; holds color well.
Concrete Sand, cement, water 30 – 50 years $3 – $8 The best all-rounder for DIY budgets; tough and versatile.
Metal Steel or aluminum 40 – 70 years $6 – $12 Modern homes; lightweight and easier to handle.
Slate Natural stone 75+ years $10 – $20 Premium longevity; very heavy and difficult for beginners.
Selecting the Right Tile for You
Assess the Weight: This is the most critical step. Clay and concrete tiles are heavy. You need to ensure your roof structure (trusses and decking) can support the weight. If you are switching from asphalt shingles to concrete tiles, you may need a structural engineer to sign off on it.
Consider the Climate: If you live in an area with heavy monsoons, like Lahore or parts of the Pacific Northwest, concrete tiles are excellent at shedding water. If you are in a coastal area, clay is resistant to salt air corrosion.
Roof Pitch: Tiles generally require a minimum slope (usually 3:12 or 4:12) to shed water effectively. If your roof is flatter than that, you will need special underlayment or a different material altogether.
Essential Tools and Materials for How to Roof Tile a House
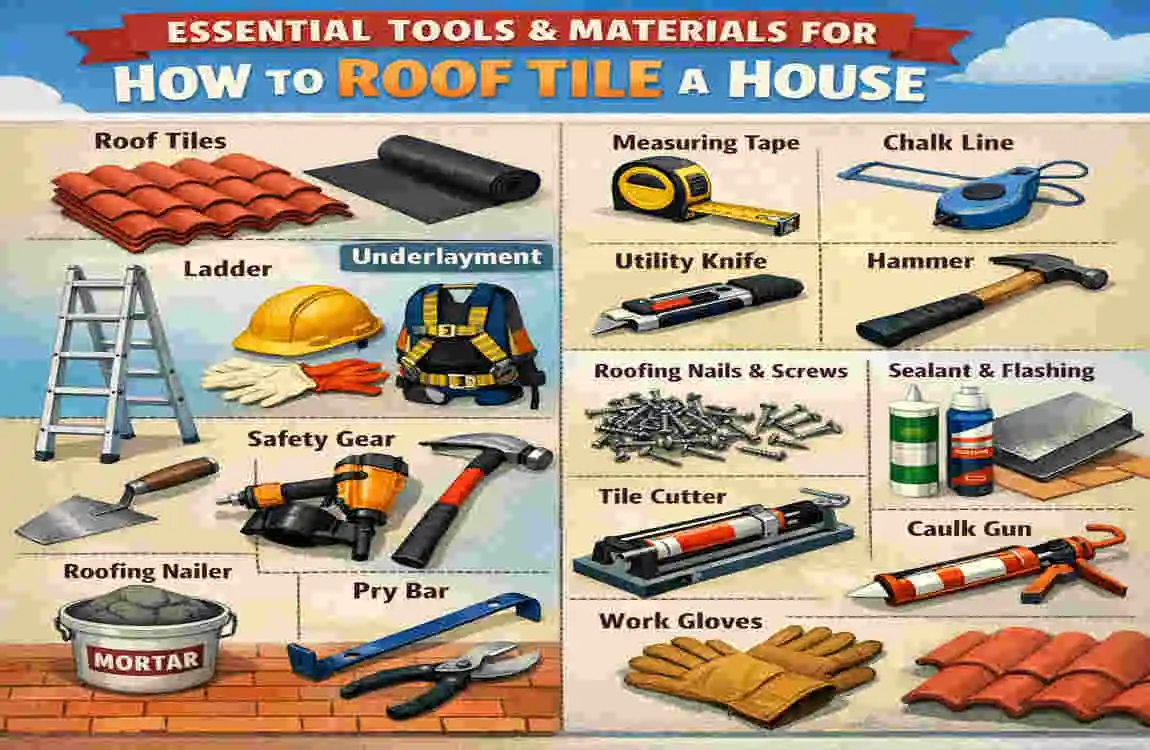
You cannot build a house without a hammer, and you certainly cannot tile a roof without the right gear. having the correct tools makes the roof tiling process safer and much faster. Here is your shopping list to get started.
Must-Have Tools
- Chalk Line: This is your roadmap. You will use this to snap straight lines across the roof, keeping your rows straight.
- Roofing Hammer: A specialized hammer used for nailing and cutting shingles or tiles.
- Tin Snips: Essential for cutting your metal flashing.
- Extension Ladder: Ensure it is tall enough to extend at least 3 feet past the roofline.
- Underlayment Roller: Helps smooth out the waterproof barrier.
- Wet Saw or Angle Grinder: You will need this to cut the tough concrete or clay tiles to fit around vents and edges.
- Safety Harness and Anchors: Non-negotiable. This keeps you alive.
Required Materials
- Roof Tiles: careful calculation is needed here. Always buy 10% more than you think you need to account for breakage and cuts.
- Underlayment: The waterproof layer that sits beneath the tiles. Don’t skimp here; it’s your last line of defense against leaks.
- Battens: Wood strips that the tiles hook onto (if your specific tile system requires them).
- Flashing: Metal sheets used to seal joints, valleys, and vents.
- Ridge Caps: Special rounded tiles for the very top of the roof.
- Nails and Sealant: corrosion-resistant roofing nails and high-quality outdoor sealant.
Safety Gear
- Heavy-Duty Gloves: Tiles are rough and can cut your hands.
- Safety Goggles: Essential when cutting tiles to protect your eyes from dust and shards.
- Non-Slip Boots: You need footwear with excellent grip to walk on sloped surfaces.
Preparing Your Roof: Step-by-Step Guide Before Tiling
Preparation is the unglamorous part of the job that determines whether your project succeeds or fails. You cannot simply start laying tiles on top of an old, rotting roof. To successfully roof a house with tiles, you need a solid foundation.
Inspect and Repair the Decking
Once the old roofing is off, look at the wooden sheathing (decking) underneath. Is it soft? Is it rotting? Any damaged wood must be replaced. Ensure your truss spacing is correct (usually 24 inches on centre) to support the tile weight. If the wood looks dark or crumbles when you poke it with a screwdriver, cut it out and replace it.
Remove Old Roofing Safely
You need a clean slate. Rent a dumpster and park it close to the house. Use a roofing shovel to pry up old shingles and nails. Be careful: this creates a lot of debris. Make sure the area around the house is tarped off to catch falling nails so you don’t step on them later.
install the Ice and Water Shield
This is a self-sealing membrane that goes on the eaves (the bottom edge of the roof) and in the valleys (where two roof slopes meet). These are the areas most prone to leaks. If you live in a snowy area, this prevents ice dams. If you are in a rainy climate, it stops wind-driven rain from creeping under the tiles.
Lay the Underlayment
Roll out your roofing felt or synthetic underlayment horizontally, starting at the bottom and working up. You want to overlap each row by at least 6 inches. Think of it like fish scales; water should run over the lap, not into it. Use your cap nails to secure it. Warning: Skipping this step or doing it poorly is the #1 cause of leaks, leading to a 30% failure rate in DIY roofs.
Check the Pitch
Before you start hauling tiles up the ladder, double-check your roof’s pitch. Most tiles require a slope of at least 3:12. If your roof is flatter, water won’t drain fast enough, and it will pool under the tiles.
How to Roof Tile: Simple DIY Steps for Beginners
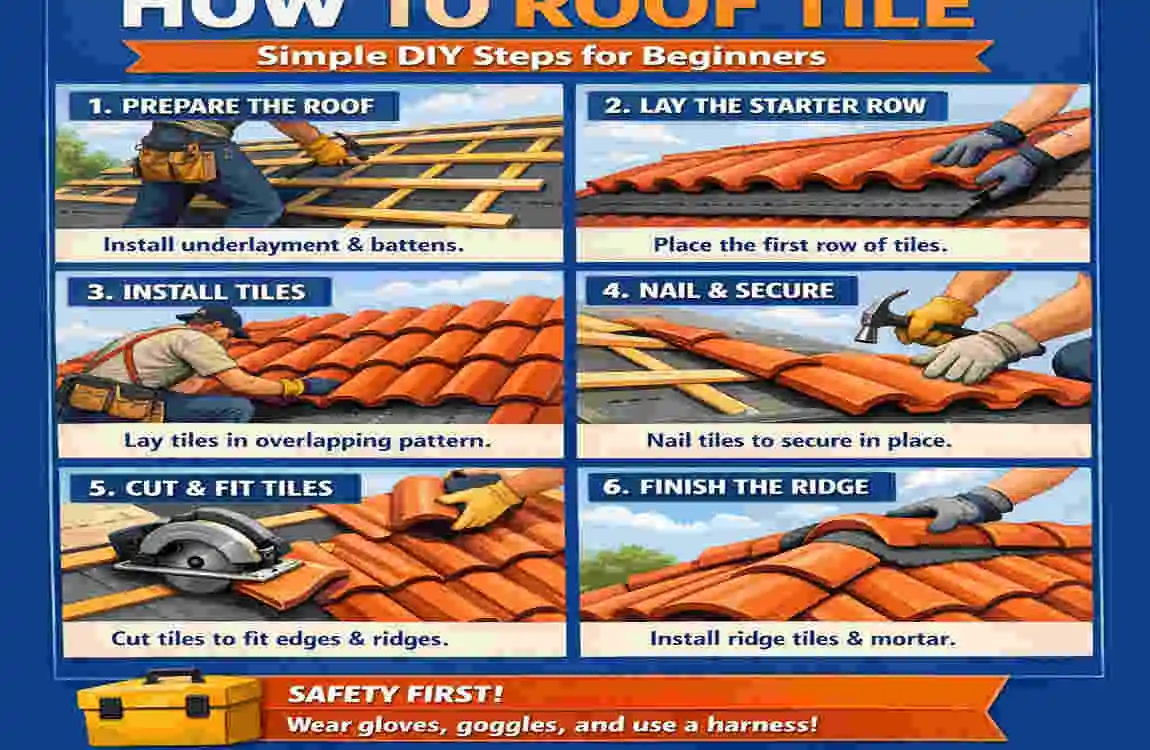
Now we arrive at the main event. You have your materials, your roof is prepped, and you are ready to go. Here is your master guide to roofing tiles, step by step. Take your time, breathe, and focus on one row at a time.
Installing the Starter Course
The first row of tiles isn’t actually the first row you see. It’s called the starter course, and it provides the lift and seal for the first visible row.
- Lay a strip of underlayment or a special metal starter strip along the eave.
- Depending on the tile type, you might install a “bird stop” (a metal or foam strip) to keep critters out of the curve of the tiles.
- Install the first tiles. For some styles, you nail the first row upside down, but for most modern concrete tiles, you use a specific starter clip or nail them directly to the batten allowing for a 2 to 4-inch overhang at the eave. This ensures water runs into the gutter, not down your fascia board.
Laying the First Row
This is the most important row on the roof. If this is crooked, every other row will be crooked.
- Measure up from the eave and snap a horizontal chalk line to mark the top of the first row.
- Place your first tile on the corner.
- Secure it using two nails per tile (or the recommended clips). Do not hammer the nail flush. You want to leave a tiny gap (about the thickness of a dime) between the nail head and the tile. This allows the tile to expand and contract with the heat without cracking.
- Apply a dab of roofing sealant under the nail heads for extra security.
Working Your Way Up (Subsequent Rows)
Now you get into a rhythm.
- Offset the patterns: You generally don’t want the vertical lines of the tiles to line up perfectly straight up the roof. You want to stagger them, usually by half a tile width, as bricks are laid. This is called “bonding” and it helps keep water out.
- Interlock securely: Most concrete and clay tiles have a channel along one side that locks into the neighbour tile. Make sure they fit snugly.
- Cover the nails: As you lay the next row above, the bottom of those tiles should cover the nails of the row below. This protects the fasteners from the rain.
Cutting for Edges and Valleys
Eventually, you will hit a vent pipe, a chimney, or the edge of the roof (the rake).
- Measure the space you need to fill.
- Take the tile to the ground or a stable cutting station on the roof.
- Use your wet saw to cut the tile to shape.
- Pro Tip: When cutting tiles for a valley (where two slopes meet), leave an open channel in the middle to allow water and debris to flow down. Don’t jam the tiles together in the valley.
- Install metal flashing around chimneys and vents before tiling. Ideally, the flashing weaves into the tile rows.
Capping the Ridge and Hips
You have reached the top! Now you need to seal the peak.
- Install a wood or metal ridge runner along the peak.
- Place “ridge tape” or weather blocking material over the runner.
- Lay the ridge cap tiles (the curved ones) over the peak.
- These are usually nailed into the ridge runner and overlapped.
- Use a high-quality mortar or flexible roof adhesive to seal the edges of the ridge tiles where they meet the field tiles. This prevents wind from lifting them off the ground.
Final Checks and Cleanup
Before you climb down for the last time:
- Walk the roof (carefully) and check for any loose or cracked tiles.
- Ensure all cut pieces are secure.
- Clean out the gutters—they are likely full of tile dust and granules.
- Sweep the roof surface to remove debris.
Common Mistakes to Avoid When Learning How to Roof Tile
Even smart DIYers make mistakes. Here are the pitfalls that can ruin your hard work:
- Over-nailing: If you hammer the nail too hard, you create stress points. The tile will crack the first time the temperature drops.
- Ignoring the Pitch: If you try to put tiles on a flat patio roof without special waterproofing, it will leak.
- Poor Overlaps: If your underlayment doesn’t overlap enough (remember, 6 inches!), water can wick upwards via capillary action.
- Walking Incorrectly: Never walk on the “bridge” (the curve) of a tile. Always step on the bottom third of the tile where the row beneath it supports it.
Safety Tips and Best Practices for DIY Roof Tiling
We cannot stress this enough: Safety comes first in roofing tile projects. No amount of money saved is worth an injury.
Secure Your Ladder: Follow the 4-to-1 rule. For every 4 feet of height, the base of the ladder should be 1 foot away from the wall. Tie the ladder to the roof so it doesn’t slide sideways.
Wear Your Harness: A safety harness tied to a secure anchor point on the ridge is mandatory. If you slip, this equipment catches you. It might feel bulky, but it saves lives.
Watch the Weather: Never tile in the rain. A wet roof is a skating rink. Also, avoid high winds (anything over 15 mph) as carrying large surface-area tiles turns you into a sailboat.
Protect Your Health: Roof tiles are heavy (8-10 lbs each). Lift with your legs, not your back. If you are working in a hot climate, such as the summer heat in Punjab or Arizona, hydration is critical. Take breaks in the shade. The roof temperature can be 20 degrees hotter than the air temperature.
Cost Breakdown: How Much to Roof Tile Your House DIY

Let’s look at the bottom line. Here is a realistic estimate for a 1,000-square-foot roof project.
ItemCost Estimate
Roof Tiles (1,000 sq ft) $3,000 – $7,000
Underlayment & Flashing $300 – $600
Nails, Sealant, lumber $100 – $200
Tool Rental/Purchase $200 – $400
Total DIY Cost $3,600 – $8,200
Professional Cost $9,000 – $18,000
The Savings: By doing this yourself, you can save roughly $5,000 to $10,000. That is a massive return on investment (ROI). Plus, because tiles are energy efficient (thermal mass helps hold heat in winter and reject it in summer), you will likely see lower energy bills, helping you recoup costs in just 3-5 years.
Maintaining Your New Roof Tiles for Decades of Protection
You built it, now take care of it. A tile roof is low-maintenance, not no-maintenance.
- Annual Inspections: once a year, grab your binoculars and look for slipped or cracked tiles from the ground.
- Moss Removal: If you see green moss growing, spray it with a moss killer or a bleach-and-water solution. Moss holds moisture against the tile, which can cause damage over time.
- Check Flashings: The metal around your chimney is usually the first thing to fail. Check the sealant around these areas every 5 years.
- Gutter Cleaning: Keep those gutters clear so water flows away from your roof, not back up under the tiles.
FAQs: How to Roof Tile Your House
Can beginners really learn how to roof tile? Yes, absolutely. If you are comfortable with heights and can follow instructions, the mechanics of tiling are straightforward. The key is preparation and patience. It is physical work, but it isn’t rocket science.
How long does it take to roof a house with tile DIY? For a standard-sized home, working with a partner, expect it to take 1 to 2 weeks. This allows for prep, flashing, and tiling. Don’t rush; accuracy is better than speed.
What if my roof pitch is low? If your pitch is below 3:12, tiles are risky. You may need to use a double layer of specialised underlayment or mechanical fasteners designed for low-slope roofs. Consult a local supplier for advice specific to your roof.
Are roof tiles DIY-friendly in places like Pakistan? Yes. In regions like Pakistan, concrete roof tiles are abundant, affordable, and widely used. The availability of materials makes it a very practical DIY option, though you should be mindful of the extreme heat during installation.