
It’s a quiet Tuesday evening. You’ve just walked into the bathroom to brush your teeth, and suddenly, whoosh! A pipe under the sink bursts, or maybe the toilet decides to overflow, sending water cascading across the tile floor. Panic sets in. The sound of rushing water is deafening, and every second that passes means more water damage. Do you know exactly what to do?
But here is the good news: You don’t have to be a professional plumber to handle this. Whether it’s an emergency bathroom water shutoff situation or you plan to replace a leaky faucet this weekend, knowing how to control the water flow is a homeowner superpower.
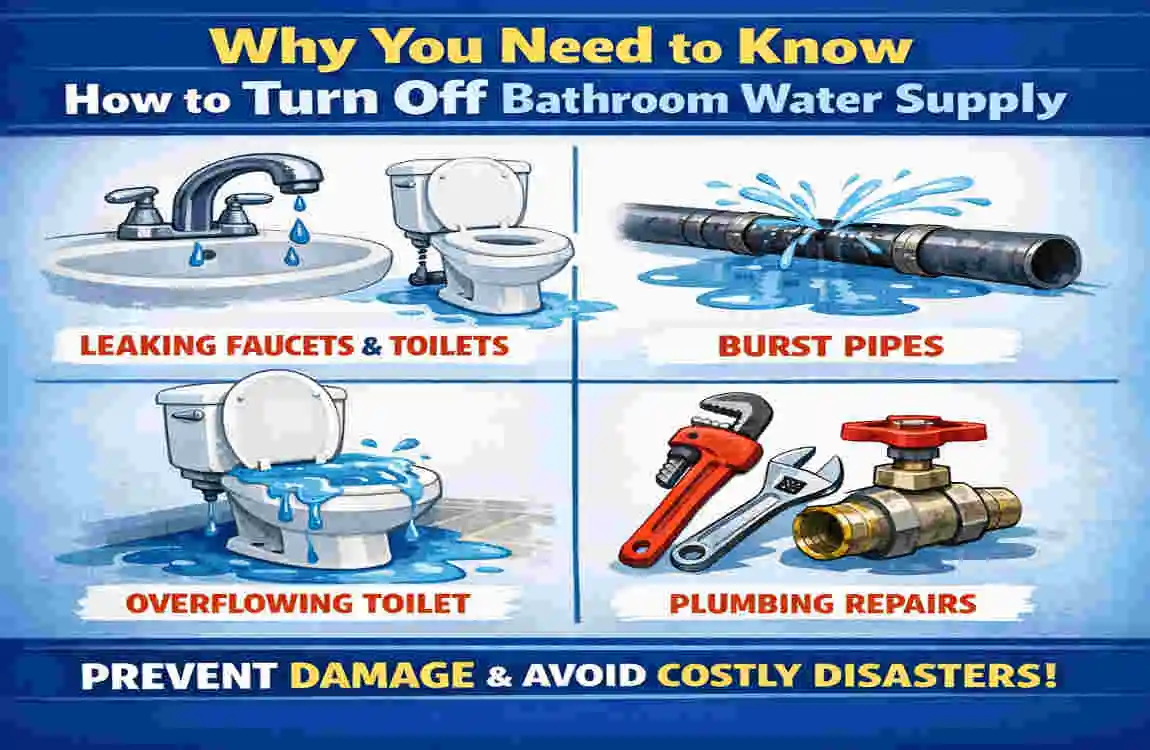
Why You Need to Know How to Turn Off Bathroom Water Supply
You might be thinking, “I’ll just call a plumber if something goes wrong.” While professional help is invaluable, plumbers can’t teleport to your bathroom the second a pipe bursts. Understanding how to turn off bathroom water supply is a critical life skill for anyone living in a house or apartment.
First and foremost, the urgency is real. Water spreads fast. A supply line that fails can pump gallons of water into your home in minutes. This water doesn’t just wet the floor; it seeps into the subflooring, wicks up into the drywall, and drips into ceilings below. Knowing how to perform an emergency bathroom water shutoff is like applying a tourniquet to a wound, stopping the bleeding before it becomes fatal to your home’s structure.
Here are a few scenarios where this knowledge is non-negotiable:
- Emergency Leaks: A burst pipe or a snapped supply line is the most obvious reason.
- Routine Maintenance: You cannot replace a faucet, fix a running toilet, or swap out a showerhead cartridge without first cutting the water.
- Renovations: Remodeling a bathroom requires the water to be off for extended periods.
- Vacation Prep: Many homeowners shut off water to specific zones before long trips to prevent coming home to a flood.
Risks of Ignoring This Skill: If you wait until an emergency to look for the valve, you risk:
- Massive Structural Damage: Warped wood, ruined carpets, and crumbled drywall.
- Mould Growth: Mould can begin growing within 24 to 48 hours of water exposure.
- Electrical Hazards: Water and electricity do not mix; flooding can compromise wiring.
- Sky-High Bills: Not just for repairs, but for the wasted water itself.
Tools and Safety Precautions Before Shutting Off Water
Before you dive under the sink or behind the toilet, let’s make sure you are prepared. While many modern valves can be turned by hand, older plumbing can be stubborn. Having the right tools within arm’s reach can make the difference between a quick fix and a stripped valve.
Essential Tools Checklist:
- Adjustable Wrench: Crucial for stubborn valves that won’t turn by hand.
- Locking Pliers: Good for gripping rounded-off handles (use with caution).
- Flashlight or Headlamp: Under-sink cabinets are notoriously dark places.
- Bucket or Basin: To catch residual water trapped in the lines.
- Old Towels or Rags: To mop up minor spills and provide a cushion for your knees.
- Penetrating Oil (like WD-40): A lifesaver for valves that are seized up with mineral deposits.
Safety First! Water is generally safe to handle, but when it sprays near outlets or when you are working in tight spaces, accidents can happen. Always prioritize your personal safety. If there is standing water near electrical outlets, do not step in it. Go to your circuit breaker panel and immediately cut power to that room.
Here is a quick safety reference guide before you start twisting valves:
Safety Precaution Why It Matters
Wear Protective Gloves Old valves can be rusty or sharp; protects against scrapes.
Cut Electricity Essential if water has pooled on the floor or near sockets.
Clear the Area : Remove cleaning supplies and clutter to ensure clear access.
Test Water Temperature If a hot water line bursts, the water can be scalding.
Don’t Force It Over-torquing a stuck valve can snap the pipe, making things worse.
Locating the Bathroom Water Supply Valve: A Room-by-Room Guide
The first step in learning how to turn off bathroom water supply is actually finding the device that controls it. These are called “fixture shutoff valves” or “stop valves.” In most modern homes, every sink, toilet, and bidet should have its own dedicated valve. Showers and tubs, however, are a bit trickier.
The goal here is to isolate the problem. If the sink is leaking, you don’t want to have to shut off water to the whole house (though that is a valid backup plan). You just want to shut off the bathroom water supply valve at the source.
Let’s break this down by the specific fixture, so you know exactly where to look.
How to Find the Water Supply Valve Under the Bathroom Sink
For bathroom sinks, the valves are almost always located directly underneath the sink, usually inside the vanity cabinet.
- Open the Cabinet Doors: You will likely need a flashlight here.
- Look Up and Back: Follow the pipes coming down from the faucet tailpiece.
- Identify the Pipes: You should see two pipes—one for hot water and one for cold water.
- Spot the Valves: At the point where these pipes meet the wall or the floor, there should be a handle. It is usually an oval-shaped football handle (often chrome) or a wheel handle.
If you have a pedestal sink (one with no cabinet), look behind the pedestal leg. The plumbing is sometimes hidden inside the hollow leg or exposed right behind it near the wall.
Locating the Shutoff for Toilets and Showers
For Toilets: Finding the toilet shutoff is usually the easiest task.
- Look at the wall behind the toilet.
- Located near the floor, usually on the left-hand side (as you face the toilet), you will see a small valve.
- A flexible tube (supply line) will run from this valve up to the bottom of the toilet tank.
For Showers and Bathtubs: This is where things get complicated. Showers rarely have exposed shutoff valves right in the shower stall.
- Access Panels: Look on the other side of the wall from the shower. Is there a closet or a hallway? You might see a plastic or wooden panel. If you remove this panel, you can access the plumbing inside the wall.
- Basement/Ceiling: If your bathroom is on the second floor, the shutoff valves might be installed in the ceiling of the room below (often hidden by drop ceiling tiles) or in the basement directly underneath the bathroom.
Step-by-Step: How to Turn Off Bathroom Water Supply at the Sink
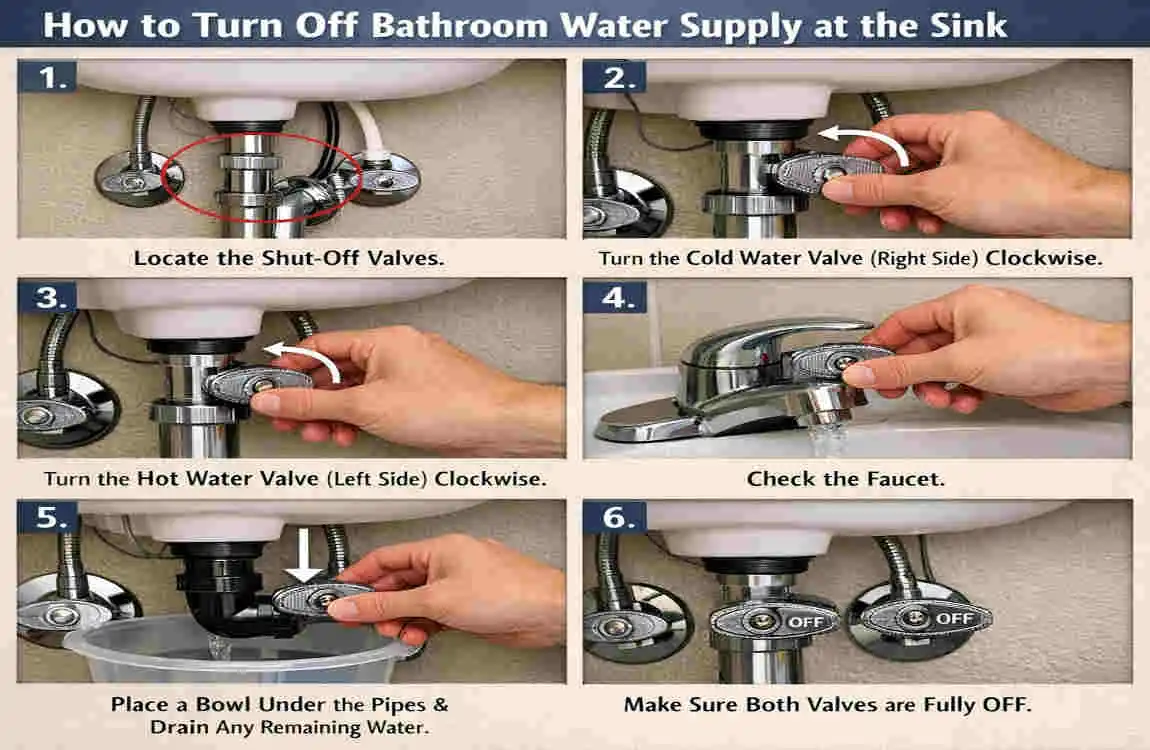
Now that you have located the valves, let’s get to the practical part. Here is your detailed guide on how to turn off bathroom water supply specifically for your sink. This process typically takes about 2-5 minutes.
Prepare Your Workspace Open the vanity doors wide. Remove the bottles of shampoo, toilet paper rolls, and cleaning sprays. You need room to maneuver your hands and fit a wrench if necessary. Place a towel on the floor to catch drips.
Identify Hot and Cold Standard plumbing code usually dictates that Hot is on the Left and Cold is on the Right. However, this isn’t guaranteed. You can feel the pipes (carefully) to verify whether the water has been running. You will typically see two valves. If you are fixing the faucet, you need to shut both off.
Determine the Valve Type
- Compression Valve (Multi-turn): These usually have round or oval handles. They operate like a hose spigot.
- Quarter-Turn Ball Valve: These have a lever handle. These are newer and more reliable.
Turn the Valve
- For Round Handles: Use the “Righty-Tighty” rule. Turn the handle clockwise (to the right). You may need to turn it several full rotations until it stops. Tighten it until it feels snug, but do not crank it with all your strength.
- For Lever Handles: Turn the lever so it is perpendicular to the pipe (90 degrees). When the handle is cut off, the water is off.
Verify the Water is Off This is a crucial step! Stand up and turn on the faucet handles.
- If the water flow slows to a trickle and then stops completely, you have successfully turned off the water to the bathroom sink.
- Open the faucet fully to drain the remaining pressure from the lines. Leave the faucet open while you work.
Reopening the Valve When your repair is done, turn the valves counter-clockwise (lefty-loosey). Do this slowly. Sending a sudden surge of high-pressure water into an empty faucet can damage the internal seals.
How to Shut Off Water Supply to Your Toilet
A running or overflowing toilet is a homeowner’s nightmare. Thankfully, the mechanism to turn off water to bathroom toilet is straightforward and usually very accessible.
Locate the Valve As mentioned earlier, look to the bottom left of the toilet tank against the wall. It is usually a small, football-shaped knob.
Turn Clockwise Grasp the handle firmly. Turn it clockwise (right).
- Tip: These valves often sit in one position for years so that they might feel “frozen.” If it resists, try wiggling it slightly back and forth to break the mineral seal before turning it fully closed.
Check the Flush Once the valve is tight, flush the toilet.
- The water in the tank should empty into the bowl.
- Crucial Sign: The tank should not refill. You should not hear water running. If the tank stays empty and silence reigns, you have done it correctly.
Dealing with Flexible Hoses Be careful not to twist the flexible metal or plastic supply line running from the valve to the tank. If the valve is stiff, hold the pipe steady with one hand (or a wrench) while turning the handle with the other to prevent the pipe from twisting and bursting.
Turning Off Water to Bathroom Shower or Tub
Learning how to turn off bathroom water supply for a shower is often the most frustrating part of the process because the valves are rarely visible. If you have a dripping showerhead or a diverter valve that won’t work, you need to cut the water.
Search for Isolation Valves If you are lucky, your home builder installed “integral stops” or isolation valves.
- Remove the Escutcheon: the metal plate behind your shower handle. You may need a screwdriver to remove the handle and the plate.
- Look Inside the Wall: Use a flashlight to examine the brass valve body inside the wall.
- Screw Stops: On some models, you will see two flathead screw slots on the sides of the valve body. These are shutoffs!
- Turn the Screws: Using a flathead screwdriver, turn these screws clockwise until they stop. This kills the water to the shower without affecting the rest of the house.
The Access Panel Route If you don’t have integral stops, go to the room behind the shower or the closet. If there is an access panel, pop it open. inside, you should see hot and cold pipes rising to the shower mixer. There may be wheel-handled valves there. Turn them clockwise to shut off shower water supply.
What If There’s No Local Bathroom Shutoff Valve?
Sometimes, you look under the sink or behind the toilet and find… nothing. Or the valve is so old and corroded that you are afraid to touch it. In older homes, individual fixture valves were not always required by code.
Don’t panic. You can still stop the water; you have to think bigger. You need to perform a whole-house shutoff.
Find the Main Water Shutoff Valve This is the master switch for your entire home.
- Basement: Usually on the front wall of the house (facing the street), near the water meter.
- Crawl Space: Where the water line enters through the foundation.
- Garage: often near the water heater or on a perimeter wall.
- Outside: In warmer climates, it might be in a plastic or concrete box buried in the ground near the street (look for a lid labeled “Water”).
Turn it Off
- Gate Valve (Wheel): Turn it clockwise until fully closed. Be aware that old gate valves can sometimes break in the “closed” position, so handle with care.
- Ball Valve (Lever): Turn the lever to a perpendicular position to the pipe.
Drain the System Once the main water is off, go to the lowest faucet in your house (like a basement sink or an outside spigot) and open it. Then go to the highest faucet (the upstairs bathroom) and open it. This drains the water out of the pipes so it doesn’t dribble out while you are working on your bathroom repair.
Troubleshooting Common Problems When Turning Off Bathroom Water
Even the best-laid plans can go wrong. Here are common issues homeowners face when trying to figure out how to turn off bathroom water supply and how to fix them.
- The Valve is Stuck:
- The Issue: You try to turn the handle, but it won’t budge.
- The Fix: Do not use brute force! You might snap the stem. Spray the valve stem with penetrating oil (WD-40 or PB Blaster) and wait 15 minutes. Tap it gently with a wrench handle. Try to tighten it slightly (clockwise) before loosening it. This back-and-forth motion often breaks the rust seal.
- The Valve Leaks After Shutting Off:
- The Issue: You closed the valve, but water is leaking from the handle stem.
- The Fix: This usually means the “packing nut” is loose. With an adjustable wrench, slightly tighten the nut that sits directly behind the handle. Just a 1/8th turn is often enough to stop the drip.
- Water Still Flows After Shutoff:
- The Issue: You turned the valve all the way off, but the faucet is still dripping.
- The Fix: The internal rubber washer in the shutoff valve is likely disintegrated. You have two choices: rely on the main house shutoff for now, or replace the fixture shutoff valve entirely (which requires the main water to be off).
- Handle Breaks Off:
- The Issue: The metal handle is so corroded it crumbles in your hand.
- The Fix: Use a pair of locking pliers (Vise-Grips) to clamp onto the remaining metal stem and turn it. This is a temporary fix; replace the valve soon.
When to Call a Professional Plumber for Water Shutoff Issues
While we are big fans of DIY, knowing when to fold ’em is important. Plumbing mistakes can be incredibly expensive. If you encounter the following, it is time to call in the pros to handle your bathroom water shutoff needs.
Red Flags:
- Crumbling Pipes: If the pipes leading to the valve look green, flaky, or heavily rusted, touching them might cause them to crumble. A plumber can safely replace the section of pipe.
- Multi-Unit Buildings: If you live in a condo or apartment and cannot find a local valve, do not try to shut off the building’s main water yourself. You could shut off water to your neighbours or trigger fire alarm systems. Call building maintenance.
- Lead Pipes: In very old homes, you might encounter lead pipes. These are soft and easily damaged. Leave these to specialists.
- Main Valve Failure: If your main house shutoff valve is stuck or broken, call the water company or a plumber immediately. Do not force the street-side valve, as you could be liable for damages.
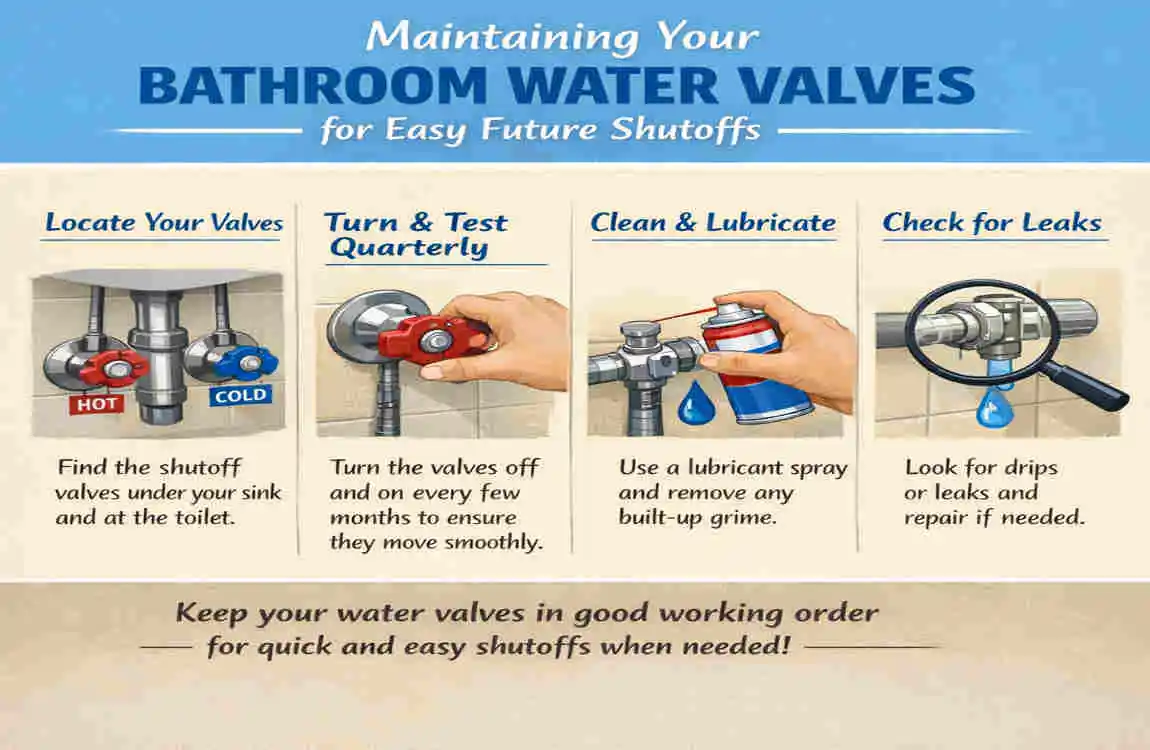
Maintaining Your Bathroom Water Valves for Easy Future Shutoffs
Now that you have successfully navigated turning off the bathroom water supply, let’s make it easier next time. Valves are like muscles; if you don’t use them, they seize up.
Your DIY Maintenance Routine:
- The “Exercise” Rule: Once or twice a year, go around to every sink and toilet. Close the valve and reopen it. This prevents mineral buildup (scale) from freezing the internal mechanism in place.
- Visual Inspection: Look for green or white crusty buildup around the valve stems. This indicates a slow leak. Catching it early allows you to tighten the packing nut before it becomes a flood.
- Upgrade to Quarter-Turn Valves: If you ever have plumbing work done, ask the plumber to replace old multi-turn compression valves with quarter-turn ball valves. They are less likely to leak, easier to turn, and last longer.
Frequently Asked Questions (FAQs) About How to Turn Off Bathroom Water Supply
Q: How do I turn off the bathroom water supply without a valve? A: If there is no local valve under the sink or toilet, you must locate the main water shutoff valve for your entire home. This is usually found in the basement, garage, or utility closet where the water line enters the house.
Q: Which way do you turn the water valve to shut it off? A: Remember the saying “Righty-Tighty, Lefty-Loosey.” Turn the handle clockwise (to the right) to shut off the water. If it is a lever handle, turn it until it is perpendicular to the pipe.
Q: Is it safe to shut off water to one bathroom only? A: Yes, absolutely. That is the purpose of fixture supply valves. It allows you to use the rest of the house’s plumbing while isolating one problematic sink or toilet.
Q: How long can I leave the bathroom water supply off? A: You can leave it off indefinitely. However, if you leave it off for months, the rubber seals in the faucet might dry out. If you are leaving it off for a long time (like a vacation home), ensure the pipes are drained to prevent freezing in winter.
Q: What do I do if the water valve is stuck? A: Do not force it. Apply a penetrating oil, such as WD-40, wait 15 minutes, and try again. If it is still stuck, use the main house shutoff instead to avoid breaking the plumbing.