
Imagine this: It is a warm Saturday afternoon. You have a cold drink in your hand, a good book in the other, and you are sitting in your backyard. But instead of squinting against the harsh glare of the sun or scurrying inside when a drizzle starts, you are perfectly comfortable. You are sitting under your brand-new, handcrafted pergola.
Learning how to build a pergola with a roof is one of the most rewarding home improvement projects you can take on. It is not just about adding some wood and nails to your yard; it is about creating a sanctuary. Whether you want a spot for family BBQs, a quiet place to meditate, or a stylish area to entertain friends, a pergola with a roof changes the entire vibe of your home.
What Is a Pergola with a Roof and Why Build One
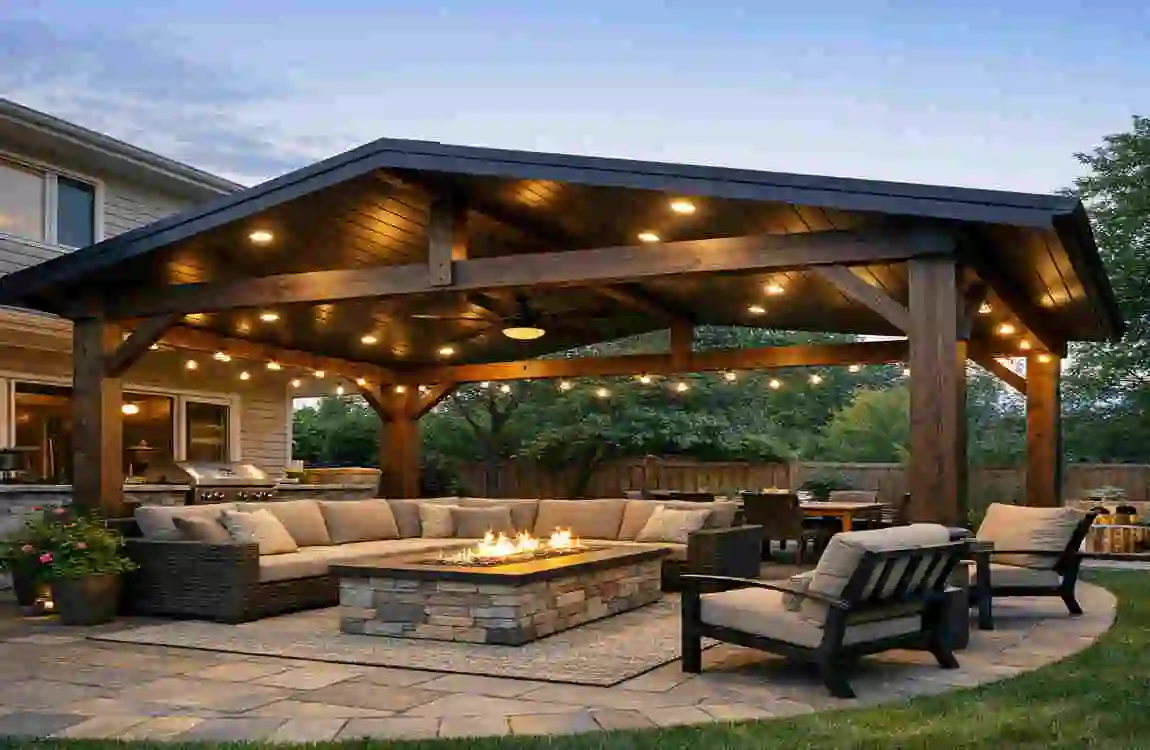
Before we pick up a hammer, let’s talk about what we are actually building. A traditional pergola is an open-sided structure with a roof made of cross-beams or a lattice. It’s beautiful, but it doesn’t offer much protection from a sudden rainstorm. By adding a solid or retractable roof, you turn that decorative structure into a functional, all-weather “outdoor room.”
Understanding the Different Types
There are two main ways to set up your pergola. You can build an attached pergola, which uses one side of your house for support. This is great because it feels like a direct extension of your indoor living space. On the other hand, a freestanding pergola can be placed anywhere—maybe near a pool or in a quiet corner of the garden.
When it comes to the roof itself, you have plenty of pergola roof ideas. You might choose polycarbonate panels that let light in while keeping rain out, or a classic corrugated metal roof for that rustic farmhouse look. Some people even prefer retractable fabric covers so they can see the stars at night but enjoy shade during the day.
The Real Benefits of the Roof
Why go through the extra effort of adding a roof? The biggest reason is UV protection. We all love the sun, but spending five hours under direct rays isn’t great for your skin or your furniture. A roof also keeps your outdoor rugs and cushions dry, helping them last much longer.
According to recent housing reports, over 80% of homeowners now prioritize outdoor living areas when looking for a new home. By following a DIY pergola with a roof plan, you are making your home stand out in a crowded market. It is the perfect blend of aesthetic appeal and practical utility.
Planning Your Pergola Build: Essential Steps
You might be tempted to run to the hardware store right now, but wait! A little bit of planning saves a lot of headaches later. If you don’t plan, you might end up with a pergola that is too small for your table or, worse, one that violates local laws.
Assess Your Space and Needs
First, take a long look at your backyard. Where does the sun hit at 2:00 PM? That is likely where you want your shade. Measure your space carefully. For a small bistro set, a 10×10 ft pergola is plenty. However, if you plan to host large family dinners, aim for at least 12 ft by 16 ft.
Don’t forget to check your local zoning and building codes. Some neighborhoods have strict rules about how high a structure can be or how close it can be to the property line. You might need a permit. It is much better to spend an hour at the city office now than to be told to tear down your hard work later because you missed a permit.
Budget Breakdown
How much does it cost to build a pergola with a roof? A DIY project typically ranges from $2,000 to $10,000. The most significant variable is the material.
- Pressure-treated wood is the most budget-friendly.
- Cedar is more expensive but naturally resists rot and looks stunning.
- Vinyl or Aluminum costs the most upfront but requires almost zero maintenance.
Remember to set aside about 20% of your budget for tools and unexpected hardware needs. Using a cost guide for a pergola with a roof helps you stay on track so you don’t run out of funds halfway through the build.
Tools and Materials Needed to Build a Pergola with a Roof
To build something that lasts decades, you need the right “ingredients.” You don’t need a professional workshop, but you do need some reliable power tools.
Essential Tools for the Job
If you don’t own these, consider renting them from a local home center to save money.
- Circular Saw: For cutting those thick posts and beams to the correct length.
- Power Drill/Driver: You will be driving many long screws; a high-quality drill is a lifesaver.
- Post Hole Digger: Essential for getting deep enough into the ground.
- Level: This is your best friend. If your posts aren’t level, the whole structure will look crooked.
- Ladder: You’ll need a sturdy one to reach the top rafters safely.
- Safety Gear: Always wear gloves and goggles. Wood chips and heavy beams are no joke!
Materials List with Costs
For a standard 12×12 pergola, here is a general idea of what you will need. Keep in mind that prices fluctuate based on your location.
MaterialQuantityEst. CostPurpose
6×6 Posts 4 $300 The main vertical supports
2×10 Beams 4 $250 Horizontal supports for the home roof
2×8 Rafters 10-12 $400 The “skeleton” of the roof
Roof Panels 150-200 sq ft $500 – $800 Polycarbonate or Metal
Concrete Mix 10-15 bags $100. Securing the posts in the ground
Hardware Box of screws/bolts $150 Lag screws and joist hangers
When buying your wood, look for straight boards. Avoid anything with large cracks or “bows” (curves), as these will make the construction much harder.
Step-by-Step Guide: How to Build a Pergola with a Roof
Now we get to the exciting part! This is where your vision starts to take physical shape. Follow these steps closely, and don’t be afraid to ask a friend for help—lifting heavy beams is much easier with two pairs of hands.
Mark and Prepare the Foundation
Everything starts with the ground. Use stakes and string lines to mark exactly where your four corners will be. To make sure your layout is a perfect rectangle, use the 3-4-5 rule. Measure 3 feet on one side, 4 feet on the adjacent side, and the diagonal between those points should be exactly 5 feet. If it is, your corner is square!
Once marked, use your post hole digger to dig holes at least 3 feet deep. This depth is essential to get below the “frost line,” so your pergola doesn’t shift when the ground freezes and thaws.
Set the Posts
Place your 6×6 posts into the holes. This is a critical moment. Use your level to make sure each post is perfectly vertical (plumb) on all sides. Use temporary wooden braces to hold them in place.
Mix your concrete and pour it into the holes around the posts. Let the concrete cure for 24 to 48 hours before you try to attach anything to it. If you rush this, the roof’s weight could cause the posts to lean.
install Beams and Rafters
Once the posts are solid, it is time to add the “shoulders” of the pergola. These are the main beams. You will typically bolt two 2×10 beams to the tops of the posts, sandwiching the posts in between. Use heavy-duty lag screws for this—you want a connection that can withstand high winds.
Next, lay your 2×8 rafters across the beams. Space them about 12 to 16 inches apart. This spacing provides a great look and plenty of support for your roof panels. Use hurricane ties or joist hangers to secure each rafter to the beams.
install Pergola Roof Panels
This step turns your pergola from a “sun trap” into a “shade haven.” If you are using polycarbonate panels, they usually overlap by one “wave” to prevent leaks.
Finishing Touches and Safety Checks
Your structure is up, but you aren’t done yet! Take some sandpaper and smooth out any rough edges, especially on the posts where people might lean. Apply a high-quality stain or sealant to protect the wood from the elements.
Lastly, do a safety walk-around. Shake the posts—they should feel rock solid. Check all your bolts one last time. Now, you can add the “fun” stuff: string lights, hanging plants, or even some outdoor curtains for extra privacy.
Pergola Roof Ideas and Customization Options
Once the basic structure is finished, you can really let your personality shine. There are so many ways to customize a pergola with a roof to match your home’s style.
Material Choices for Style
If you want a modern minimalist look, consider using black metal roofing or tinted glass panels. For a rustic or tropical feel, you might use bamboo mats under a transparent roof or heavy cedar beams with decorative “tails” cut into the ends of the rafters.
Eco-Friendly Additions
Are you looking to go green? You can actually install solar panels on top of your pergola roof. They can power your backyard lights or even help charge your phone while you relax. Another cool idea is a living green roof, where you grow hardy plants like succulents on top of the structure. This provides incredible natural insulation and looks like something out of a fairy tale.
Common Mistakes to Avoid When Building a Pergola with a Roof
Even experienced DIYers make mistakes. Here are the big ones you should watch out for:
- Skipping the Permit: I mentioned this before, but it bears repeating. In some areas, building without a permit can result in a $1,000 fine or a legal order to remove the structure.
- Using the Wrong Wood: Don’t use indoor lumber. If the wood isn’t “ground contact” rated or naturally rot-resistant like cedar, it will rot within two years.
- Ignoring Drainage: If your roof is perfectly flat, water will sit on top. This leads to mold, leaks, and eventually, structural failure. Always build in a slight pitch.
- Underestimating the Wind: A pergola roof acts like a giant sail. If your posts aren’t deep enough or your hardware is too weak, a strong storm could literally lift your pergola into the neighbor’s yard.
Maintenance Tips for Your Pergola with Roof
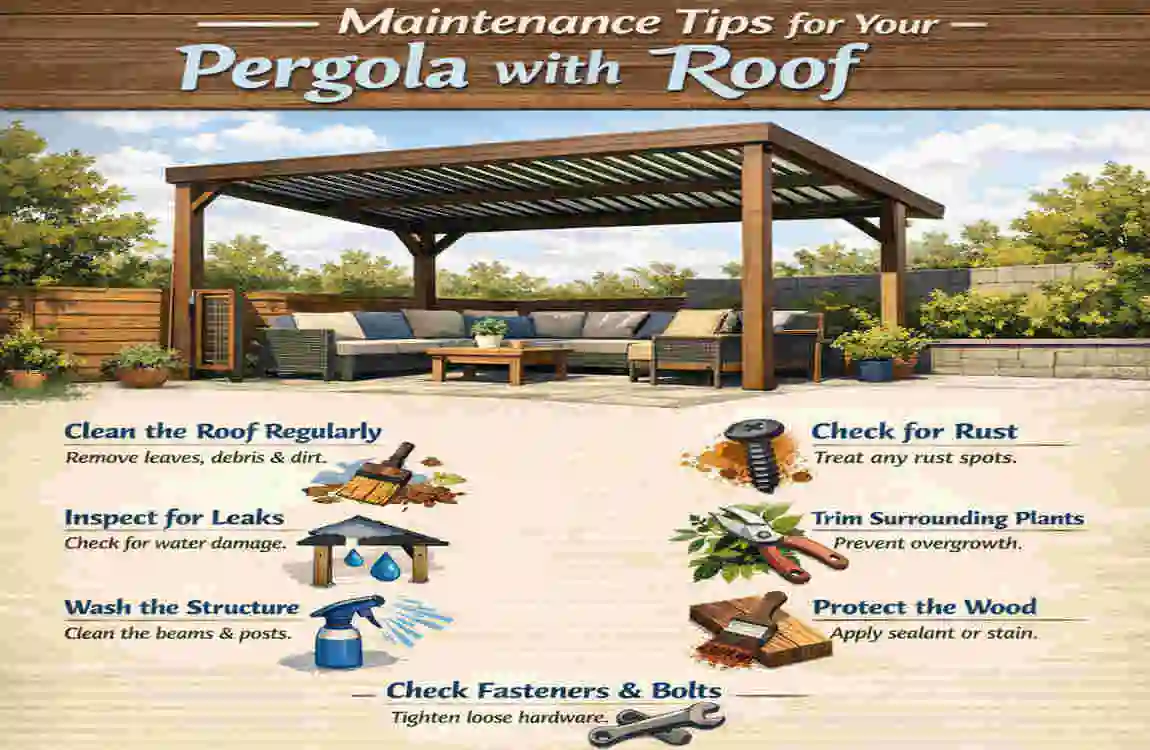
You’ve put in the hard work; now you need to protect your investment. A little maintenance goes a long way.
Annual Inspection: Every spring, take 10 minutes to inspect the hardware. Tighten any bolts that have wiggled loose over the winter. Cleaning: Use a soft brush and mild soap to clean your roof panels. If you have gutters attached to your pergola, make sure they are clear of leaves. Resealing: If you used wood, you should reapply a sealer or stain every 2 to 3 years. This keeps the wood from turning grey and prevents it from cracking in the sun.
Cost-Saving Hacks and DIY vs. Professional
Is it better to do it yourself or hire a pro? If you hire a contractor, you might pay $5,000 in labor alone. By doing it yourself, you save that money, but it will likely take you two or three weekends to finish.
How to Save Money
- Group Buys: Talk to a neighbor. If you both want pergolas, you might get a discount on lumber by buying in bulk.
- Salvaged Materials: Sometimes you can find heavy-duty hardware or even roofing panels at “re-store” shops for a fraction of the price.
- Keep it Simple: Fancy decorative cuts on the end of every rafter look great, but they take a lot of time and require more expensive tools. A clean, straight-line design is often just as beautiful and much cheaper to build.
Frequently Asked Questions
How long does it take to build a pergola with a roof?
For a beginner with a helper, expect it to take about two full weekends. The first weekend is for planning, digging, and setting posts. The second weekend is for the beams, rafters, and the roof itself.
Is a permit always required?
Not always, but usually. Most cities require a permit for any structure over a certain height (often 8 feet) or any structure attached to the house. Always call your local building department first.
What is the best material for a pergola roof?
It depends on your goal. For maximum shade, metal is best. For natural light without the rain, polycarbonate is the winner. For flexibility, a retractable fabric canopy is the way to go.
Can I build a pergola on an existing deck?
Yes, but you must ensure the deck’s framing can handle the extra weight. You can’t just screw the posts into the deck boards; they must be bolted directly to the deck’s joists or support posts.