
waking up to the sound of dripping water echoing through your home, only to find a mysterious puddle forming in your basement. If this scene feels familiar, you might be facing a stack in-house plumbing issue—a hidden but crucial part of your home’s drainage system.
If your stack plumbing fails, you could be facing more than just puddles: foul odors, slow drains, or even structural damage. But the good news? With a little know-how, most stack issues—from leaks to venting problems—can be diagnosed and fixed by a handy homeowner without calling a plumber for every drip.
What Is Stack In-House Plumbing? Anatomy and Key Components
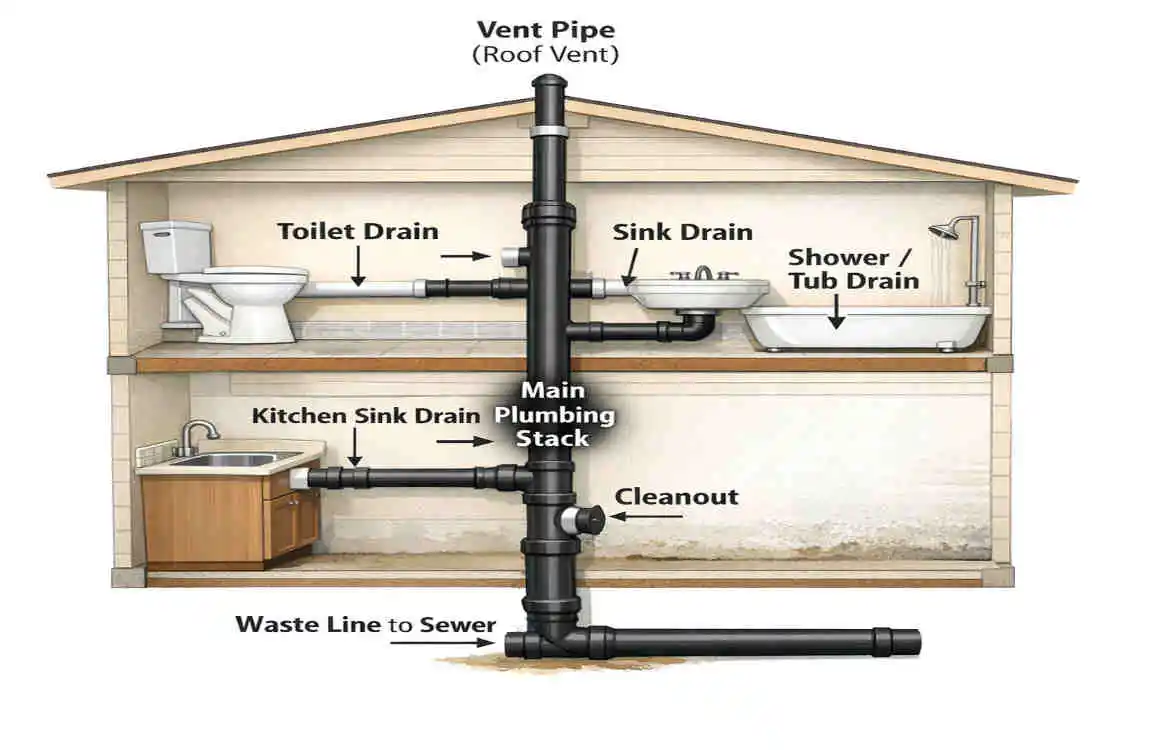
To truly master in-house plumbing, it helps to break down the system into its most important parts. This section explains the basics of the drain-waste-vent (DWV) system and how its components work together to keep your home dry, odor-free, and safe.
The Core Parts of a Stack Plumbing System
At the heart of every house’s drainage system is a tall, vertical pipe called the main stack. This pipe runs from your basement (or crawl space) up through your roof, connecting to every sink, tub, and toilet along the way. But the stack itself is just one piece of the puzzle.
Here’s a quick overview of the main components:
ComponentFunctionCommon Issues
Main Stack Pipe Carries waste vertically. Leaks, clogs
Vent Stack allows air flow for drainage. Blockages, poor pressure
P-Trap prevents sewer gases from drying out, leaks
Cleanout Access for snaking Corrosion, stuck caps
Main Stack Pipe
Think of this as the superhighway for wastewater. It’s where everything you flush or drain eventually ends up, traveling down to the sewer or septic system.
Vent Stack
The vent stack is a separate section, usually running alongside or above the main stack. Its job? To let fresh air in and equalize pressure, so water flows smoothly, and sewer gases don’t sneak into your home.
P-Trap
This is the curved section of pipe under each sink, tub, or floor drain. It holds a small amount of water at all times, forming a seal that blocks unpleasant odors.
Cleanouts
Strategically placed along the stack, cleanouts provide access points for plumbing snakes or inspection cameras. They’re your best friend when tackling clogs.
Why Stack Plumbing Matters
A healthy in-house plumbing system means clean, efficient drainage. Neglect it, and you risk:
- Slow drains
- Gurgling noises
- Backups in multiple fixtures
- Musty or sewer smells
Common Stack In-House Plumbing Problems: Signs and Symptoms
Spotting a problem early can save you thousands in repair bills. Here’s how to recognize stack in-house plumbing leaks and venting issues before they spiral out of control.
Top Warning Signs to Watch For
- Slow Drains or Gurgling Sounds: If water drains sluggishly or you hear “glug-glug” noises, your stack vent may be blocked.
- Foul Odors: Bad smells coming from sinks or tubs could indicate a broken P-trap or a venting problem, allowing sewer gases to escape.
- Water Backups: When multiple fixtures (say, your toilet and shower) back up at once, it usually signals a main stack clog.
- Visible Leaks or Wet Spots: Dampness or stains on walls, ceilings, or floors near vertical pipes suggest a leak in the stack.
Diagnostic Checklist Table
Symptom Likely Stack Issue Urgency Level
Gurgling toilets, Vent blockage , High
Multi-floor backups , Main stack clog , Emergency
Sewer smells Vent stack failure Medium
Wet ceiling spots , Stack pipe leak , High
Slow sink drains , Partial blockage , Medium
Early Detection: Protect Your Home
Stack in-house plumbing leaks don’t just waste water—they can damage your foundation, ruin drywall, and invite mold. Here’s a quick list of things you might notice:
- Bubbling paint or peeling wallpaper near pipe routes
- Unexplained increases in your water bill
- Persistent drain flies (a sign of standing water in pipes)
- Water pooling in the basement, especially after rain
When to DIY and When to Call a Pro
- DIY: Minor leaks, tightening joints, clearing obvious blockages
- Call a Pro: Structural water damage, persistent sewer smells, multiple floor backups, or if you suspect gas exposure.
How to Diagnose Stack In-House Plumbing Leaks Step-by-Step
Ready to roll up your sleeves? Diagnosing in-house plumbing leaks in the stack isn’t as intimidating as it sounds. With a few basic tools and a careful eye, you can often find the source in under 30 minutes.
Tools You’ll Need
- Flashlight (for tight, dark spaces)
- Moisture meter (optional but helpful)
- Inspection mirror
- Plumbing snake or auger
- Incense stick (for smoke testing)
- Pipe camera (basic models are affordable)
- Gloves and safety glasses
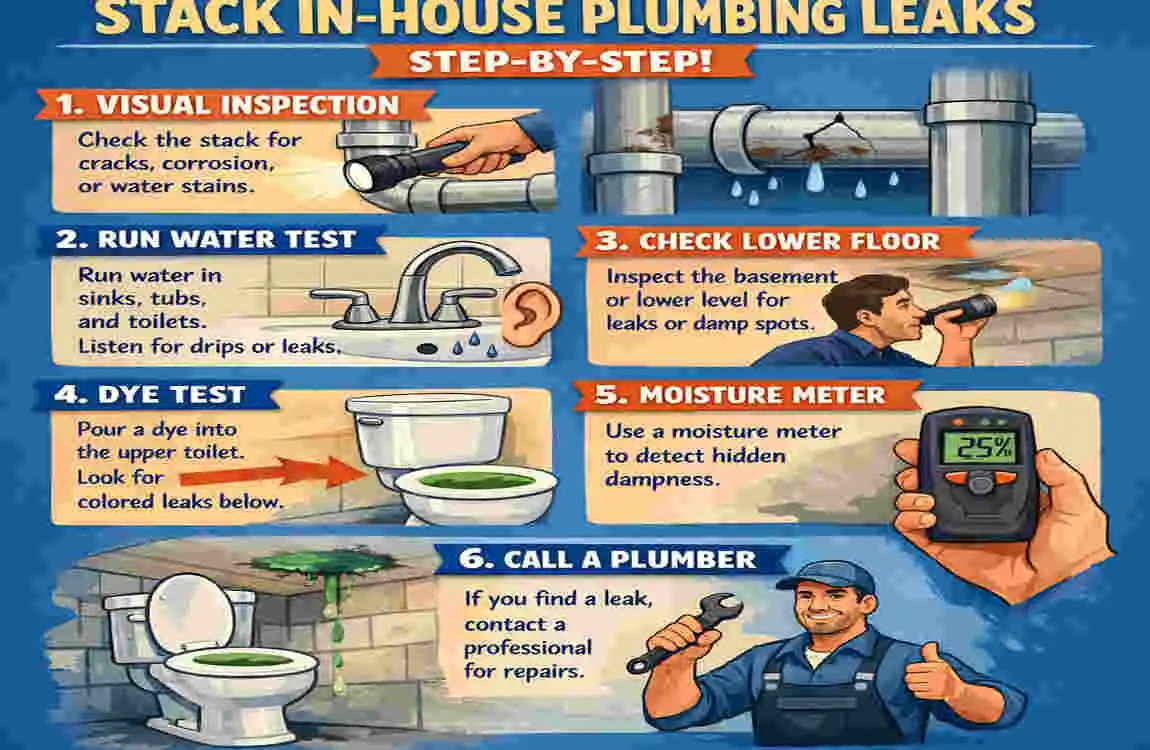
Step-by-Step Diagnosis
Visual Inspection
Start by following the stack from the basement up, looking for:
- Drips or beads of water on the pipe
- Corroded spots or greenish stains (especially on copper or cast iron)
- Loose or misaligned joints
Pressure Test
Run water in all fixtures connected to the stack—showers, sinks, toilets. Watch for:
- Water emerging from joints or cracks
- Drips appear only when water is running
- Listen for “hissing” sounds, which could indicate escaping air or gas
Smoke Test (Easy DIY Method)
Light an incense stick and hold it near any suspect joints or fittings with the water running.
- If the smoke is drawn into the pipe, the vent is working.
- If it blows outward or swirls oddly, there may be a leak or negative pressure.
Probe with a Plumbing Snake
If you suspect a clog or blockage, gently feed a plumbing snake into the cleanout or directly into the stack. Resistance or debris on the snake indicates a partial or full blockage.
Safety Tips
- Always wear gloves and safety glasses.
- Shut off the main water supply before opening any pipes.
- Avoid using electrical tools near standing water.
Example: Diagnosing a Leak in 30 Minutes
- Step 1: Notice water stains on your basement ceiling.
- Step 2: Use a flashlight to find moisture at the stack joint above.
- Step 3: Run water upstairs—drips increase.
- Step 4: Tighten the joint; if the leak stops, problem solved!
Diagnosing Venting Problems in Stack In-House Plumbing
A properly vented stack is essential for smooth drainage. If venting fails, your plumbing can become sluggish, noisy, or downright smelly.
The Role of Venting in Stack Plumbing
Venting lets air into your plumbing system, balancing pressure so water flows freely, and traps keep sewer gases out. Without good venting, drains gurgle, run slowly, and traps can dry out—letting smells in.
Signs of Venting Trouble
- Slow drainage even after clearing clogs
- Gurgling or bubbling sounds in sinks or toilets
- Sewer gas odors, especially after rain or wind
- Traps losing water (“siphoning”)
Step-by-Step Vent Diagnosis
Roof Vent Check
Climb up safely (use a sturdy ladder and spotter) to inspect the vent pipe protruding from your roof.
- Look for: Bird nests, leaves, or debris blocking the opening
- Winter Tip: In colder climates, check for ice blockages
Fixture Trap Test
- Fill a sink or tub with water, then drain it quickly.
- Watch nearby fixtures for bubbling or water movement—if you see it, the vent may not be working.
DIY Manometer Test
A manometer measures air pressure in pipes. You can make a basic version by attaching clear tubing to a partially filled water bottle:
- Place one end near a vent opening, the other at a drain.
- If the water level changes when fixtures are used, you may have negative pressure from a vent blockage.
Common Causes of Stack Venting Issues
- Birds or rodents nesting in the roof vents
- Debris from storms or falling leaves
- Crushed vent pipes during renovations
- Ice buildup (especially in winter climates like Lahore’s chilly months)
In-House Plumbing Stack Venting Issues and Fixes
Most minor venting issues can be cleared with a plumbing snake or by removing blockages at the roof vent. For persistent problems, installing an Air Admittance Valve (AAV) can be a smart solution—more on that below.
Easy DIY Repairs for Stack In-House Plumbing Leaks

Let’s get hands-on! Many stack in-house plumbing leaks can be fixed with simple tools and a bit of patience.
Beginner-Friendly Fixes
- Tighten Fittings or Replace Washers: Most leaks occur at joints. Use a wrench to snug up loose fittings or replace old washers with new ones (usually under $10).
- Seal Minor Leaks with Epoxy Putty: For small cracks or pinhole leaks, knead epoxy putty and press it over the leak. It hardens in minutes and provides a watertight seal.
Intermediate Repairs
- Re-glue PVC Joints: If a plastic stack joint is leaking, carefully cut out the damaged section, clean the ends, and glue in a new piece with PVC cement.
Tools and Materials Checklist
- Adjustable wrench
- Pipe wrench
- Epoxy putty
- Replacement washers
- PVC pipe and cement (for plastic stacks)
- Rags and cleaning supplies
Step-by-Step DIY Leak Repair
- Turn off the water supply to the affected area.
- Dry the pipe thoroughly before starting repairs.
- Tighten all accessible joints using appropriate wrenches.
- Inspect for cracks—if found, clean the spot and apply epoxy putty.
- For PVC: Cut out the damaged section, dry-fit the new pipe, apply PVC cement, and snap together.
Warning: Never ignore gas odors or major water stains—these require a pro!
DIY Fixes for Stack In-House Plumbing Venting Problems
Venting issues can often be fixed with a few basic steps. Here’s how to restore smooth airflow:
Clear Roof Vents
- Safety First: Use a sturdy ladder, wear non-slip shoes, and have someone hold the ladder.
- Remove debris (leaves, nests, ice) from the vent opening using gloves or a small hand tool.
Install Air Admittance Valves (AAVs)
- AAVs are mechanical vents that let air in but block sewer gases. They’re ideal for hard-to-vent spaces (like under sinks or in basements).
- Installation: Cut into the vent line, fit the valve, and secure according to the instructions.
Snake Vent Lines
- Feed a plumbing snake down the vent pipe from the roof or up from a cleanout to remove stubborn clogs, such as hair or grease.
Prevention Tips
- Annual vent checks: Make it a habit to inspect and clear vents every year.
- Monsoon-Proofing in Pakistan: Before the rainy season, make sure roof vents are clear and extend above the expected water line to avoid flooding.
Prevention and Maintenance Tips for Stack In-House Plumbing
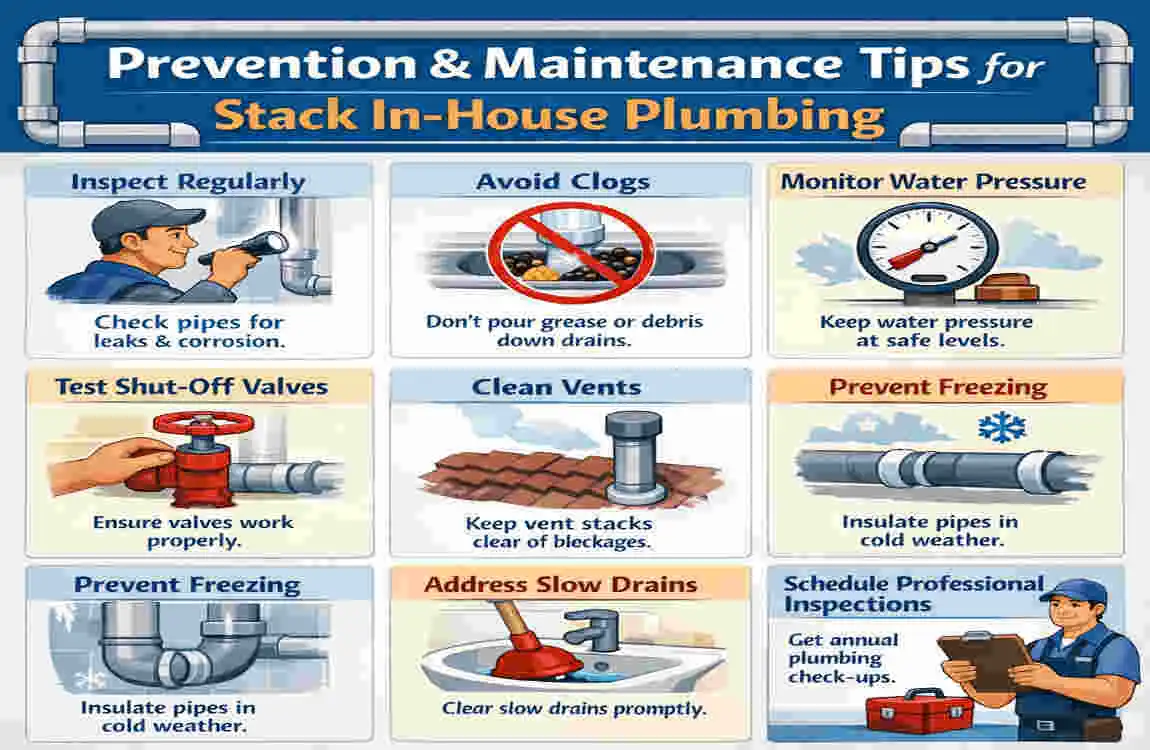
Keeping your stack in-house plumbing healthy is all about routine care. Here are quick tips that pay off big in the long run:
- Monthly cleanouts: Open cleanouts and flush with water or an enzyme cleaner.
- Don’t flush non-biodegradable items: These can clog the stack or vent.
- Winterize vents: In cold climates, insulate exposed pipes and check for ice dams.
- Upgrade to ABS or PVC: Modern plastic pipes are less prone to corrosion and leaks.
When to Call a Professional Plumber for Stack Issues
Some problems are too risky for DIY. Call a licensed plumber if you notice:
- Structural damage (cracked foundations, sagging floors)
- Gas or strong sewer odors
- Code violations (plumbing not up to local standards)
Cost estimate: Expect to pay $200–$1000 for stack repairs, depending on severity and location.
FAQs
What causes stack in-house plumbing leaks?
Corrosion, loose joints, and physical damage are the most common culprits. Over time, seals wear out, and pipes can crack.
Can I fix venting problems myself?
Yes, many minor vent clogs or blockages can be cleared with basic tools. Just be sure to follow safety guidelines when working on the roof.
How much does stack repair cost?
DIY repairs can cost as little as $50, while professional services may range from $500 to $ 1,000 or more.
What tools do I need for stack plumbing repairs?
A wrench, plumbing snake, epoxy putty, and basic safety gear are usually enough for most simple repairs.
Is it safe to ignore a slow drain?
No. Slow drains can indicate a deeper clog or vent issue. Address them early to avoid bigger headaches.
How often should I clean my stack vents?
At least once a year, and always before the monsoon or winter seasons.
Can I upgrade my old stack to PVC myself?
While it is possible for experienced DIYers, replacing the main stack is best left to professionals to ensure it meets code and functions safely.