
It is a busy Monday morning. You hop into the shower to start your day, but within two minutes, you realize the water isn’t draining. Instead, you are standing in a pool of soapy water that is slowly creeping up past your ankles. Or maybe you are in the kitchen, trying to rinse off a plate, and the sink gurgles ominously before spitting water back up at you.
Most of us panic when this happens. We immediately picture calling a plumber and getting slapped with a hefty bill, or we rush to the store to buy harsh chemical cleaners that smell terrible and can actually damage our pipes in the long run. But what if I told you there is a better way?
The truth is, understanding how to clean plumbing pipes at home doesn’t require a professional license or expensive tools. Most of the time, the solution is sitting right in your kitchen pantry. Whether it’s hair buildup, grease, soap scum, or hard water minerals, you can tackle these issues yourself.
Why Clogs Happen and When to DIY vs. Call a Pro
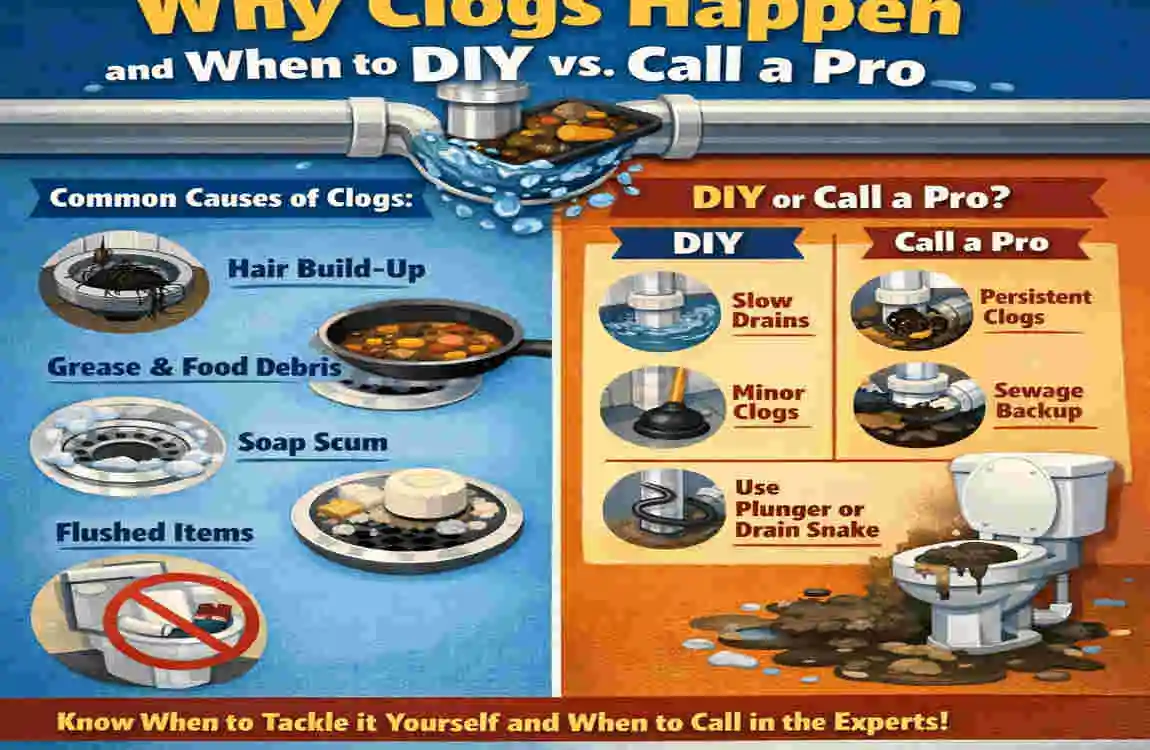
Before we dive into the solutions, it is really helpful to understand the problem. Why do our pipes get clogged in the first place? It isn’t just bad luck. It is usually a result of what we put down the drain over time.
The Usual Suspects
Think about your plumbing system like the arteries of your home. Over time, “plaque” builds up. Here are the most common culprits:
- Grease and Fat: These are the number one enemies in the kitchen. When you pour hot grease down the sink, it is in liquid form. But as soon as it hits the cool pipes, it solidifies into a sticky mess that catches everything else passing by.
- Hair: In the bathroom, hair is the main offender. It knots up, forming a net that catches soap scum and skin flakes.
- Soap Scum: Believe it or not, soap itself creates clogs. Traditional bar soaps contain fats that re-solidify in your pipes.
- Food Debris: Even with a garbage disposal, chunks of food, coffee grounds, and eggshells can accumulate in the P-trap (that U-shaped pipe under your sink).
- Hard Water Buildup: If you live in an area with hard water, minerals like calcium build up inside the pipes, narrowing the opening over time—just like a clogged artery.
Did you know that U.S. households flush billions of gallons of water each year to clear clogs? It is a massive waste of resources.
When Can You Handle It Yourself?
Learning how to clean plumbing pipes at home is perfect for minor to moderate issues.
- DIY is great when the water drains slowly, there is a minor gurgling sound, or the clog is in one specific fixture (like just the bathroom sink).
- Call a Pro when: You have sewage backing up into the tub, multiple drains are clogged at the same time (suggesting a main sewer line issue), or you smell strong, foul gas odors that won’t go away.
The Benefits of DIY
Why should you get your hands dirty?
- Cost Savings: A plumber visit can cost between $50 and $100 just for the call-out fee. Doing it yourself costs pennies.
- Speed: You don’t have to wait for an appointment window. You can fix it now.
- Pipe Health: The natural methods we will discuss are gentle. Harsh commercial drain cleaners generate heat and can melt plastic pipes or corrode old metal ones.
Tools You Will Need
You don’t need a fancy van full of equipment. Here is your starter kit:
- A good plunger (Cup style for sinks, flange style for toilets).
- Rubber gloves (Hygiene first!).
- A bucket (To catch water).
- Baking soda & Vinegar.
- A wire coat hanger.
- Dish soap.
Now that we are prepared, let’s get into the tricks!
7 Simple DIY Tricks to Clean Plumbing Pipes at Home
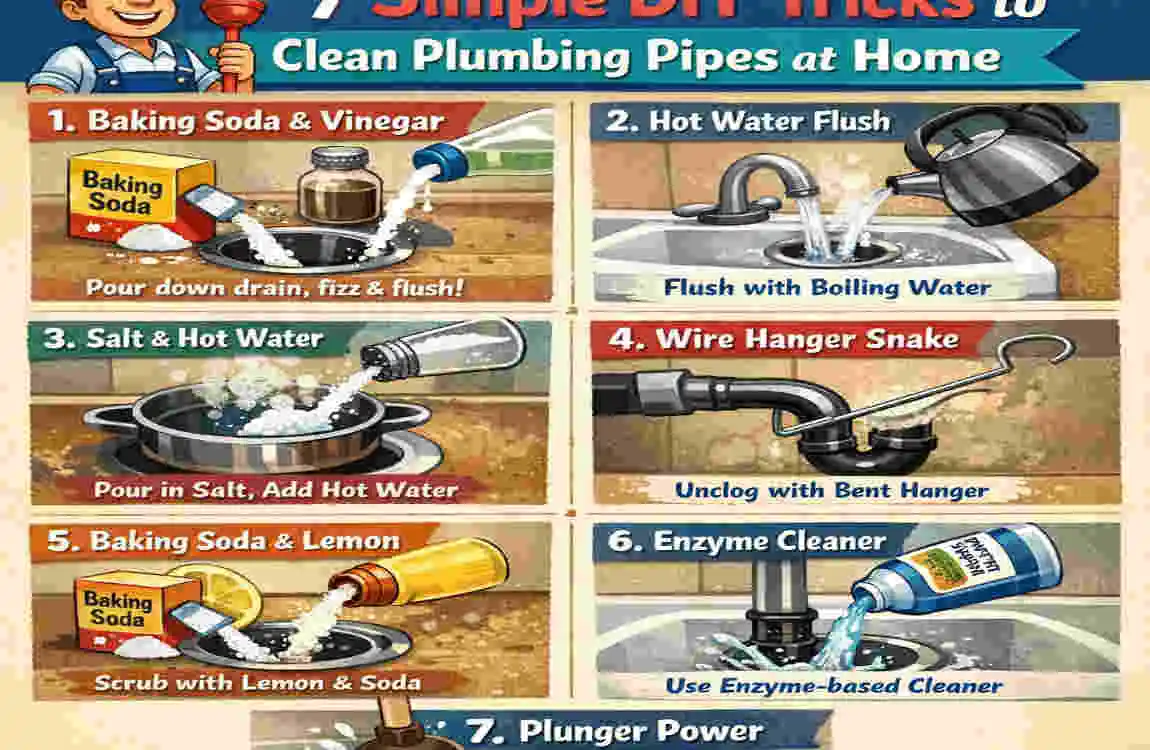
Here are seven methods ranging from gentle maintenance to heavy-duty clog busting. Try them in order, starting with the least invasive.
The Baking Soda and Vinegar Volcano
This is the absolute classic. If you ever made a model volcano in elementary school science class, you know exactly how this works. It is one of the most popular ways to clean plumbing pipes at home because it is safe, non-toxic, and surprisingly effective.
Why It Works
This isn’t magic; it’s chemistry. Baking soda is a base, and vinegar is an acid. When you mix them, a chemical reaction occurs that releases carbon dioxide gas. This creates a fizzing, foaming action. Inside your pipes, this expanding foam helps scrub the pipe walls and break down the “glue” that holds the clog together—usually grease and soap scum.
Materials Needed:
- ½ cup of Baking Soda.
- 1 cup of White Vinegar.
- A kettle of Hot Water.
- A funnel (optional, but helps keep things tidy).
- A rag or drain plug.
Step-by-Step Guide:
- Prep the Drain: Remove any visible debris from the drain opening. If there is standing water, sponge it out so the mixture can get deep into the pipe.
- Pour the Baking Soda: Using your funnel, pour the ½ cup of baking soda directly down the drain. Try to get as much of it down the pipe as possible, rather than letting it sit on the rim.
- The Main Event: Pour the 1 cup of vinegar down the drain. You will hear an immediate fizzing sound.
- Seal It Up: This is the “Pro Tip” part. Immediately cover the drain with a plug or an old rag. You want the gas and foam to expand downward into the clog, not upward into your sink.
- The Waiting Game: Let the mixture sit and fizz for 15 to 30 minutes. Have a coffee while science does the work for you.
- The Flush: While waiting, boil a kettle of water. Once the time is up, remove the rag and pour the boiling water carefully down the drain to flush away the loosened gunk.
Results: This method clears about 80% of minor clogs caused by soft buildup. It is fantastic for kitchen sinks that deal with grease.
Variation: If you are treating a shower drain that smells bad, add a few drops of essential oil (such as tea tree or lemon) to the vinegar for a fresh scent.
The Boiling Water Blast
Sometimes, the simplest solution is the best one. Before you mix any ingredients, you might need a thermal shock to the system. This trick is specifically designed to tackle grease and soap buildup.
Why It Works
Think about what happens to butter or bacon fat when you put it in a hot pan—it melts instantly. The same logic applies to your pipes. Over time, grease coats the inside of your plumbing like hardened wax. Boiling water turns that solid blockage back into a liquid, allowing gravity to wash it away.
Materials Needed:
- A large pot or kettle.
- Water.
- Oven mitts (Safety first!).
Step-by-Step Guide:
- Boil the Water: Fill your biggest pot or kettle and bring it to a rolling boil on the stove. You want as much heat as possible.
- Pour in Stages: Do not dump it all at once. Pour about one-third of the hot water directly down the drain.
- Wait a Moment: Let that hot water sit for a few seconds to begin warming up the pipe and softening the outer layer of the clog.
- Finish the Pour: Pour the remaining water in a steady stream. The force of the water combined with the heat helps push the blockage through.
- Follow Up: I usually like to follow this with a squirt of dish soap and a little more warm water to ensure the grease stays slippery as it moves down the line.
Important Safety Warnings
There is a catch here. You need to know what kind of pipes you have.
- Metal Pipes: Boiling water is perfectly safe.
- PVC (Plastic) Pipes: Be careful. Standard PVC is rated for heat, but boiling water (212°F) can sometimes soften the joints or warp cheaper plastic pipes if used excessively. If you have plastic pipes, let the water cool for a minute so it is hot, but not boiling (around 140°F is safe).
Pro Tip: This trick works best in the kitchen. Avoid using this on a toilet clog, as the heat can crack the porcelain bowl!
Plunger Power-Up
If the chemical reactions and heat didn’t work, it is time to use some physics. The plunger is the unsung hero of home maintenance. However, most people use it incorrectly. Learning how to clean plumbing pipes at home involves mastering the “plunge.”
Why It Works
Plunging isn’t just about pushing the clog down. It is about creating a vacuum. You are using air (or water) pressure to force the clog back and forth, loosening it until it breaks apart or moves into a wider pipe where it can flow away.
Materials Needed:
- A Cup Plunger (flat bottom) for sinks/tubs.
- Petroleum Jelly (optional, for a better seal).
- A rag.
Step-by-Step Guide:
- Seal the Overflow: This is the step everyone forgets! Sinks and tubs have an “overflow” hole (that little hole near the rim). If you don’t cover this with a wet rag, the air you pump with the plunger will escape through that hole, reducing your pressure to zero. Block it tight.
- Create a Seal: Apply a little petroleum jelly to the rim of the plunger cup if you are having trouble getting suction. Place the plunger over the drain.
- Add Water: There needs to be enough water in the sink to cover the cup of the plunger. You cannot plunge effectively with just air. If the sink is dry, add water.
- The Action: Plunge vertically. Do not plunge at an angle. Push down gently to get the air out, then pull up and push down vigorously.
- Rhythm: Do this quickly for about 15 to 20 seconds. It’s a workout! Ideally, you want to disturb the clog on the “up” pull as much as the “down” push.
- Check: Pull the plunger off quickly (you should hear a “pop”). If the water drains, you win. If not, repeat the process.
Common Mistake: Using a toilet plunger (with the flange extending out) on a flat sink drain. It won’t seal properly. Make sure you have the right tool for the job.
Baking Soda, Salt, and Vinegar Mix
When the simple volcano doesn’t work, we need to add an abrasive element. This is where salt comes into play. Think of this mixture as a “scrub” for the inside of your pipes.
Why It Works
Salt creates friction. When you mix it with baking soda and vinegar, the salt remains somewhat granular for a while. As the mixture moves through the clog, the salt acts like sandpaper, scraping away softer sludge and hair buildup that the liquid alone might glide over.
Materials Needed:
- ½ cup Baking Soda.
- ½ cup Table Salt (or coarse sea salt).
- 1 cup Vinegar.
- Hot water.
Step-by-Step Guide:
- Mix the Powders: In a small bowl, mix the baking soda and salt until well blended.
- Pour and Insert: Pour this dry mixture down the drain. If it sits on top, use a toothpick or your fingers (gloved!) to poke it down into the pipe.
- Add the Liquid: Pour in the vinegar. It will foam furiously, even more than before.
- The Long Wait: This method requires patience. Because we are relying on the salt to eat away at the grime, you should let this sit for at least one hour. If you can, leave it overnight. This gives the mixture time to dissolve the organic matter holding the clog together.
- The Final Flush: In the morning (or after an hour), flush with a large pot of hot tap water.
Eco-Angle: This is a fantastic “Zero Waste” method. You are using zero harsh chemicals, no store-bought plastic bottles, and ingredients you likely already have.
Enzyme Cleaners from Your Kitchen
If you have a garbage disposal, you know it can get stinky and slow. Sometimes the “clog” isn’t a solid block, but a buildup of organic slime that slows down water flow and smells terrible.
Why It Works
Enzymes are biological molecules that catalyze the breakdown of organic waste. Instead of buying expensive enzyme cleaners, you can use the natural enzymes and oils found in citrus fruits. The acidity helps cut through grease, and the peels’ physical texture helps scrub the disposal blades and pipes.
Materials Needed:
- Lemon or Orange Peels.
- Ice Cubes.
- Coarse Salt.
Step-by-Step Guide:
- Prepare the “Bombs”: Cut your citrus peels into small, manageable chunks.
- The Ice Hack: Drop a handful of ice cubes down the disposal along with a handful of salt.
- Run It: Turn on the cold water (always cold for disposals, as it solidifies grease so it can be chopped up) and run the disposal.
- Add the Peels: While it is running, feed the citrus peels one by one.
- The Grind: The ice and salt will scour the blades and the sides of the disposal unit. The citrus peels will be ground up, releasing citric acid and fresh-smelling oils that clean the pipe walls.
The Wire Hanger (or Drain Snake) Hack
Sometimes, chemistry isn’t enough. If you have a massive hairball stuck three feet down the pipe, no amount of vinegar will dissolve it quickly. You need to remove it physically. This is often the most effective wayeaning plumbing pipes at in thethroom drhy It Works
This is mechanical removal. You are simply hooking the debris and pulling it out. It is gross, it is messy, but it is incredibly satisfying when the water finally rushes down.
Materials Needed:
- A Wire Coat Hanger.
- Pliers (to bend the wire).
- Rubber Gloves (Mandatory!).
- A plastic bag for the debris.
- Alternative: A plastic “zip-it” drain tool (cheap plastic strip with barbs).
Step-by-Step Guide:
- Construct Your Tool: Untwist the coat hanger, so you have one long, straight wire. Use your pliers to create a small hook at one end. Make the hook small enough to fit through the drain holes, but curved enough to grab hair.
- Insertion: Push the wire hook down the drain. Be gentle! You don’t want to push the clog further down.
- The Fishing Expedition: Move the wire around. twist it, turn it, and probe for resistance. When you feel something soft and spongy, you have found the hairball.
- The Retrieval: Hook the clump and slowly pull it up. It will likely be a grey, slimy mess. Put it directly into your plastic bag.
- Repeat this several times until you get a clean wire.
- Flush: Run hot water to clear out any small, loose bits you disturbed.
Visualizing the Success: You will be shocked at what comes out. It often looks like a small animal! But once that physical barrier is gone, your drain will run like new.
Prevention Paste with Dish Soap and Hot Water
The best way to clean a clog is to prevent it from happening. This trick is a maintenance routine that acts as a lubricant for your plumbing system.
Why It Works
Dish soap is formulated to break down grease and lift it off surfaces. By regularly coating your pipes with a soapy mixture, you prevent sticky substances from adhering to the pipe walls in the first place.
Materials Needed:
- Liquid Dish Soap (a good grease-fighting brand).
- A large pot of boiling water.
Step-by-Step Guide:
- Soap It Up: Squirt a generous amount of dish soap (about ½ cup) down the drain.
- Let It Slide: Let the soap sit for about 15 to 20 minutes. It will slowly trickle down, coating the trap and the pipe.
- The Flush: Pour the boiling water down rapidly.
Frequency: Do this once every two weeks. It is a fantastic habit to get into, especially for the kitchen sink after you have done a lot of cooking. It keeps the pipes slick and clean.
Troubleshooting Stubborn Clogs and Prevention Tips
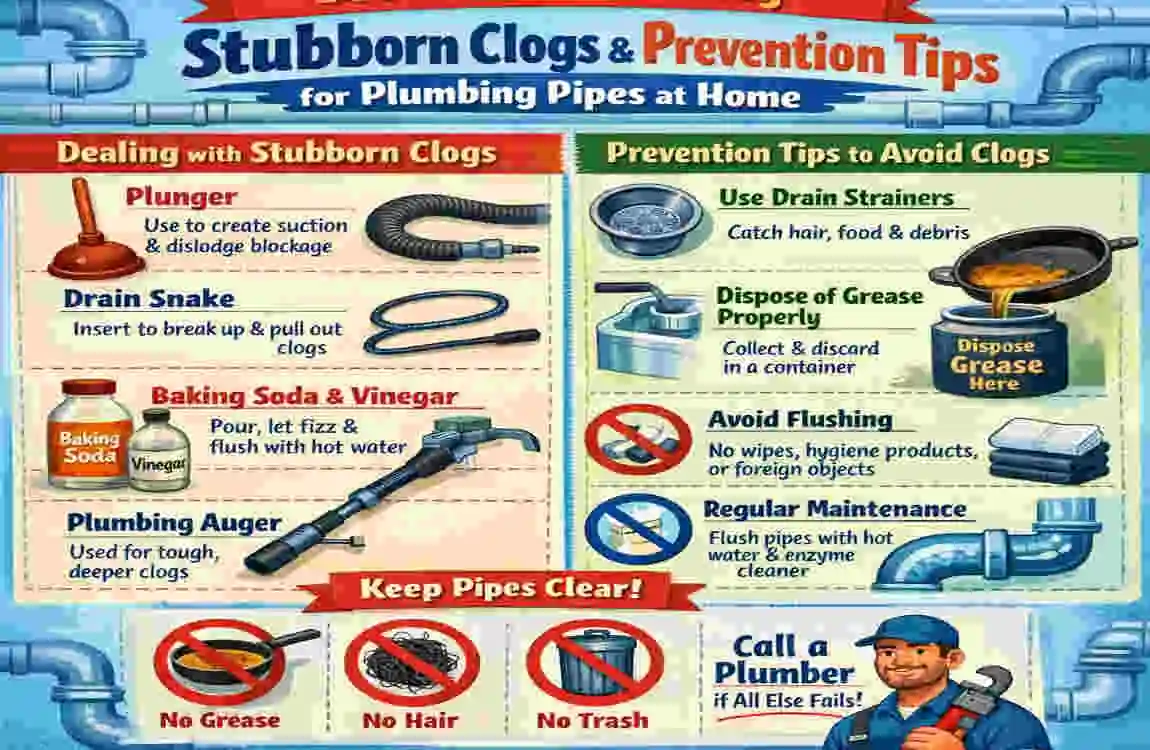
So, you have tried the volcano, you have boiled the water, and you have even gone fishing with a hanger, but the drain is still slow. What now?
When DIY Tricks Fail
If these methods don’t work, you might be dealing with a deep clog or a mineral blockage.
- Wet/Dry Vac: If you have a shop vac, set it to “liquid” mode. Place the hose over the drain (create a seal with a wet rag) and turn it on. It acts like a super-powered plunger that sucks the clog out instead of pushing it down.
- Natural Enzymatic Gels: There are store-bought cleaners that are not harsh acids. Look for “bio-cleaners” or bacteria-based gels. These take 24 hours to work but are safe for pipes.
- The P-Trap Cleanout: Look under your sink. That U-shaped pipe usually has slip nuts you can loosen by hand. Put a bucket underneath, unscrew the trap, and physically clean it out. This is where 90% of sink clogs live.
Long-Term Prevention
The secret to cleaning plumbing pipes at home is actually about preventing mess.
- Drain Screens: Buy mesh screens for every drain in your house. They cost about $2 each and catch hair and food before it enters the pipe. This is the single best investment you can make.
- The “No-Flush” List: Never flush wipes (even “flushable” ones), feminine hygiene products, or paper towels. They do not dissolve like toilet paper.
- Grease Management: Keep a jar under the sink for bacon grease and oil. Never pour it down the drain. Wipe greasy pans with a paper towel before washing them.
A Note for Hard Water Areas (Like Lahore)
If you live in a region with hard water, like Lahore or many parts of the US, mineral scale is a real issue. The baking soda and vinegar trick (Trick 1) helps, but you may need to do it more often. The acid in the vinegar helps dissolve the calcium carbonate scale that narrows your pipes.
Cost Comparison: DIY vs. Pro
Is it worth the effort? Let’s look at the numbers.
Method Estimated Cost Time Required Effectiveness
DIY Tricks (Baking Soda, etc.) Less than $5 15 – 60 Minutes 80-90% for minor clogs
Commercial Chemical Gel $10 – $20 30 Minutes High (but risks pipe damage)
Professional Plumber $100 – $300+ 1 – 4 Hours (inc. wait time) 100% Guaranteed
The DIY route is essentially free and works for the vast majority of day-to-day issues.
Frequently Asked Questions
Here are some common questions I get asked about keeping drains clear.
Q: How often should I clean my plumbing pipes at home? A: Ideally, perform a maintenance clean (like the Boiling Water or Dish Soap trick) once a month. This prevents buildup from hardening.
Q: Are these methods safe for septic systems? A: Yes! In fact, baking soda and vinegar are much better for septic tanks than chemical cleaners. Harsh chemicals can kill the healthy bacteria your septic tank needs to break down waste. DIY natural methods are septic-safe.
Q: Can I use these tricks on plastic (PVC) pipes? A: Yes, with one caution. Avoid pouring boiling water into PVC pipes. Let the water cool slightly to around 140°F. Baking soda and vinegar are perfectly safe for plastic.
Q: What is the best trick specifically for hair clogs?A: The wire hanger (Trick 6) or a plastic “zip-it” tool is the best. Chemicals have a hard time dissolving hair quickly. Physically pulling it out is the most effective way.