
Ever stared at your home’s plumbing blueprint and wondered what those vertical lines mean? You are looking at a maze of symbols, lines, and numbers that seem like a secret language only professionals speak. It can be intimidating, especially when you are trying to plan a renovation or fix a nagging leak that won’t go away.
If you’re asking, “What is a riser diagram for home plumbing?” you’re not alone—this essential tool simplifies complex systems into something manageable. It is the roadmap to the veins and arteries of your house. Whether you are a new homeowner trying to understand your property or a DIY enthusiast ready to tackle a bathroom remodel, understanding this diagram is your first step toward success.
What Is a Riser Diagram in Home Plumbing? (Core Definition)
Let’s start with the absolute basics. When we talk about plumbing plans, most people imagine a floor plan—a view from above looking down, showing where the toilet sits relative to the bathtub. While that is useful for layout, it doesn’t tell the whole story.
Defining the Concept
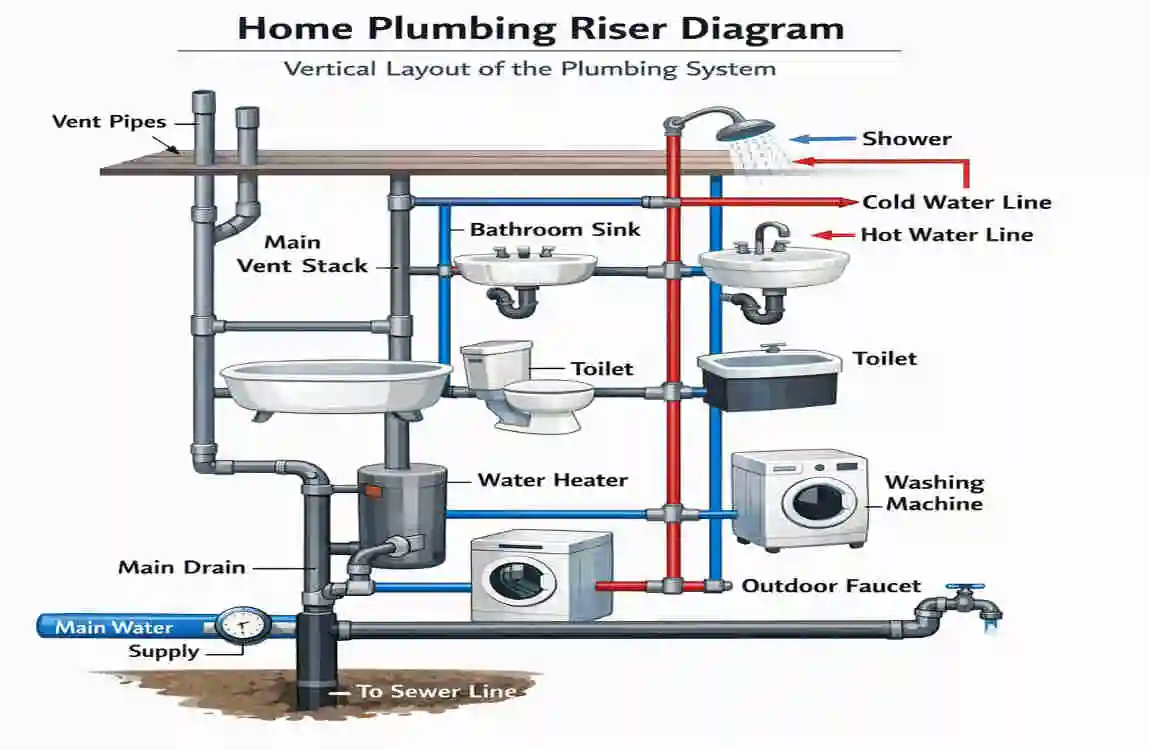
Precisely defined, a riser diagram in home plumbing is a 2D schematic that shows the vertical pipe runs (known as risers) from the basement or foundation up to the highest floors of the building. It maps out the entire journey of your water supply, drainage systems, waste lines, vents, and fixtures.
Think of it this way: if a floor plan is a map of a city looking down from a satellite, a riser diagram is like looking at a skyscraper from the street level. It shows you the elevation. It shows you how water travels up against gravity and how waste travels down with gravity.
Differentiating from plan Views
It is crucial to understand the difference between a riser diagram and an isometric or plan view.
- Plan View: This is the “bird’s-eye view.” It is great for seeing that the sink is next to the window, but it is terrible for understanding how the pipes get to that sink from the floor below.
- Isometric View: This is a 3D-style drawing used by engineers that shows length, width, and depth. It is highly detailed but can be confusing for a layperson.
- Riser Diagram: This focuses almost exclusively on height and elevation. It flattens the plumbing system into a single plane to clearly show the relationship between floors.
Key Components at a Glance
When you look at a riser diagram plumbing chart, you are seeing a specific set of components interacting with one another.
- Risers: These are the main vertical stacks that carry water up or waste down.
- Branches: These are the horizontal pipes that “branch” off the main riser to feed specific rooms.
- Fixtures: These represent your end-user points—sinks, toilets, showers, and washing machines.
- Valves: These are the control points that allow you to shut off water to specific areas.
A Brief History
The evolution of these diagrams is fascinating. Decades ago, plumbers and architects relied on hand-drawn sketches on graph paper. These were often rough, grease-stained papers passed around a job site. Today, we have moved toward sophisticated CAD (Computer-Aided Design) software that creates hyper-accurate digital blueprints. However, whether it is a pencil sketch or a digital printout, the purpose remains the same: to visualise the vertical flow of water.
Why Riser Diagrams Matter in Residential Plumbing Systems

You might be thinking, “I’m not a plumber, so why should I care?” The truth is, understanding a riser diagram in home plumbing can be the difference between a minor repair bill and a catastrophic expense.
Simplifying Troubleshooting
Imagine you have a drop in water pressure in your second-floor shower. Without a diagram, you are guessing. Is there a clog in the showerhead? Is it in the pipe in the wall? Is it in the main line in the basement?
A riser diagram helps you trace the flow path. You can see exactly which pipe feeds that shower and what other fixtures share that same line. If the sink next to the shower also has low pressure, and they share the same riser, you know the issue is further down the line. It turns a guessing game into a logical process of elimination.
Essential for Building Codes
If you are building a new home or adding an extension, you cannot ignore building codes. Whether you are following the International Plumbing Code (IPC) or local regulations, inspectors require detailed plans. A home plumbing riser diagram is often a mandatory part of the permit application process. It proves to the city that your venting is adequate, your pipe sizes are correct, and your waste lines have the proper slope.
Benefits for the Homeowner
- Saves Money: If you call a plumber and hand them a riser diagram, you have just saved them an hour of investigative work. That is an hour of labour you don’t have to pay for.
- Aids DIY Projects: Planning to move a washing machine upstairs? The diagram tells you if the existing vents can handle the load or if you need to install new ones.
- Safety: It shows you exactly where the shutoff valves are located in case of an emergency leak.
Case Study: A Renovation in Lahore
Let’s look at a real-world example to bring this home. Consider a family in a multi-story home in Lahore, Pakistan. They wanted to renovate the main bathroom on the second floor. The contractor initially planned to tear open the floors to find the waste lines, a process that was going to cost thousands of rupees and take weeks.
However, the homeowner dug up the original riser diagram and residential plumbing files from when the house was built. The diagram revealed that a secondary waste stack ran inside a wall in the adjacent hallway, not under the floor. By using this information, they accessed the pipes through the wall instead of destroying the expensive marble flooring. This simple piece of paper saved them significant construction costs and kept the project on schedule.
Key Components of a Home Plumbing Riser Diagram Explained
To truly answer “what is a riser diagram home plumbing,” we need to dissect the anatomy of the drawing itself. These diagrams use a standardised set of symbols and lines.
Here is a breakdown of the essential elements you will encounter:
ComponentDescriptionSymbol Example
Water Supply Risers: These are the vertical lines carrying fresh water from the municipal meter or well to the upper floors. Usually, a Solid line indicates hot water, while a Dashed line indicates cold water.
DWV Stacks stand for Drain, Waste, and Vent. These utilise gravity to move waste down and allow air in to prevent vacuums—thick solid lines for waste, often with Wavy lines extending upward for vents.
Fixtures & Branches: The end-points where you use water. This includes sinks, tubs, toilets, and hose bibs—simple Icons (e.g., a circle for a sink, a square for a tub).
Valves & Shutoffs: Critical isolation points that allow you to stop water flow for maintenance without shutting off the whole house. Often depicted as Bowtie or Triangle symbols.
Meters & Preventers: The entry point of water into the home and safety devices that stop dirty water from flowing back into the clean supply. A Meter icon or a box with specific lettering (e.g., BFP for Backflow Preventer).
Diving Deeper into Materials
The diagram also indicates the type of material used, which is vital for repairs.
- PVC (Polyvinyl Chloride): Common for waste lines. It is white plastic and very durable.
- Copper: The gold standard for water supply lines. It resists corrosion but is expensive.
- PEX (Cross-linked Polyethylene): Flexible red and blue plastic tubing that is becoming the standard for modern homes because it is easy to install.
Understanding Sizing
A good component of a riser diagram home plumbing chart will also label the size of the pipes. You will typically see notations like “3/4” or “1/2” next to the lines.
- Main Risers: Usually larger (3/4 inch or 1 inch) to maintain water pressure as it travels up.
- Branches: Usually smaller (1/2 inch) as they feed individual fixtures like a bathroom sink.
The Legend
Every diagram comes with a “legend” or key. If you see a symbol you don’t recognise, check the legend. It functions like the index of a book, translating the abstract symbols into plain English.
Common Uses of Riser Diagrams in Home Plumbing Projects
When do you actually pull this diagram out of the drawer? It isn’t just for looking at; it is a functional tool for several specific scenarios.
Renovations and Home Additions
This is the most common use case. Let’s say you want to turn a spare bedroom into an en-suite bathroom. You need to know if there is a water supply riser nearby that you can tap into. Without a diagram, you are flying blind. With a riser diagram, you can see that a 3/4-inch supply line runs through the shared wall. This makes the project feasible and affordable. If the nearest riser is across the house, you might rethink your plans.
Inspections and Audits
For homebuyers and sellers, this document is gold.
- Buyers: You can spot potential code violations. If the diagram shows a bathroom with no vent stack, that is a red flag for future plumbing problems (like sewage smells).
- Sellers: Having an up-to-date diagram shows you have maintained the home well, increasing buyer confidence.
Emergency Repairs
When a pipe bursts or a leak appears, panic sets in. A riser diagram helps you locate the isolation valves quickly. If you know that Valve A controls the entire second floor, you can shut it off immediately to minimise water damage while keeping the kitchen downstairs operational.
Professional vs. DIY Use
- Architects & Plumbers: They use these for blueprints to ensure the load on the system is calculated correctly. They need to ensure that when you flush the toilet, the shower doesn’t scald the person standing in it.
- Homeowners: You use it for simple modifications. If you are replacing a vanity, the diagram helps you understand what is behind the wall before you start drilling.
Real Estate Value
In fast-moving property markets, such as the booming real estate sector in Lahore, having detailed documentation like a riser diagram can actually boost your home’s value. It acts as a “health record” for the house. Just as you would want to see maintenance records for a used car, buyers want to see the plumbing history of a home.
How to Read and Interpret a Plumbing Riser Diagram Step-by-Step
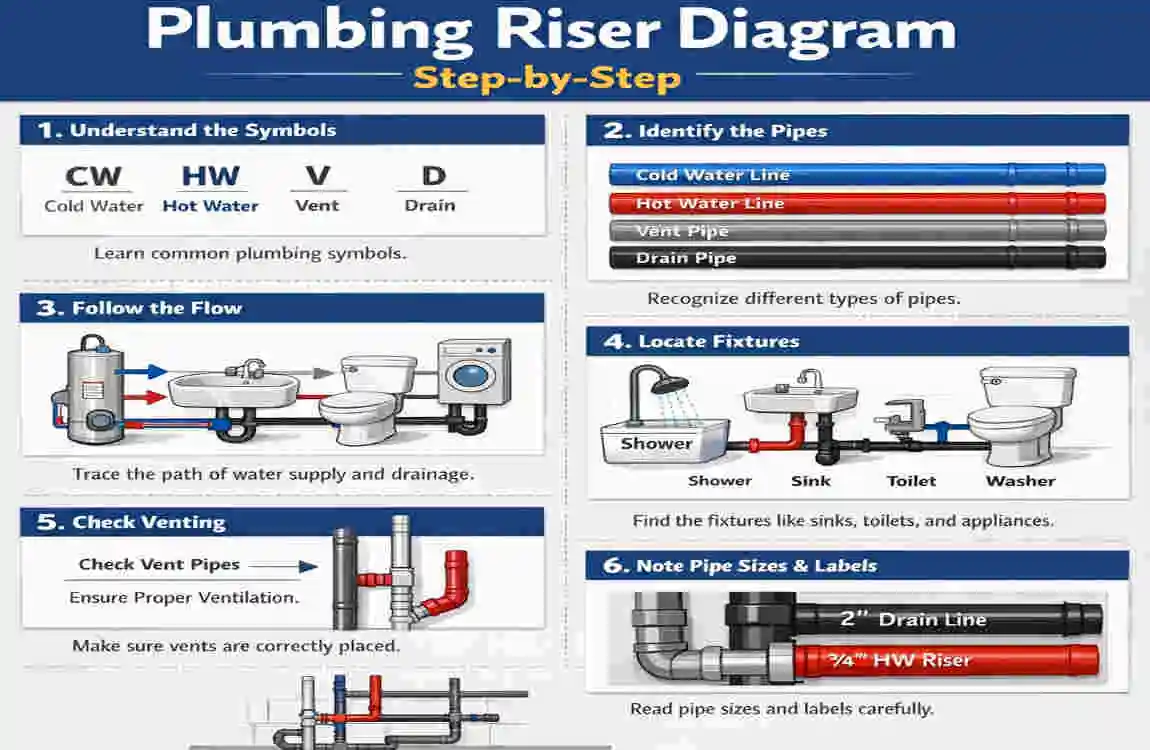
Reading these diagrams might feel like deciphering hieroglyphics at first, but once you know the logic, it is straightforward. Follow this step-by-step tutorial to master reading your riser diagram home plumbing chart.
Start at the Base
Always begin your journey at the bottom of the page. This represents the lowest point of your house (the basement or slab foundation). Look for the Water Meter symbol or the main entry pipe coming from the street. This is your starting point.
Trace the Risers Upward
Follow the vertical lines going up from the meter. These are your risers.
- Trace the Supply Lines. Watch where they split. You will see horizontal lines branching off at different elevations—these represent your different floors.
- Identify the Fixtures. Follow a branch to the end. Does it end in a circle (sink)? A square (shower)? This tells you what that pipe is feeding.
Check the Vents
This is the part most people miss. Look for lines that go up from a fixture and exit through the roof. These are your vents.
- Why it matters: Vents allow air into the system. Without them, water draining creates a vacuum (like putting your thumb over a straw), which slows drainage and sucks water out of P-traps, allowing sewer gas into your home.
Decode Colours and Codes
- Blue/Dashed Lines: usually Cold Water.
- Red/Solid Lines: usually Hot Water.
- Black/Thick Lines: usually Waste/Soil pipes.
- Labels: Look for text like “3/4 CW” (3/4 inch Cold Water) or “4 PVC” (4-inch PVC waste pipe).
Troubleshooting Tip
Use the diagram to spot cross-connections. This is a dangerous situation where clean water supply lines might be accidentally connected to wastewater lines (common in older, DIY-patched homes). If you see a supply line connecting to a waste line without an air gap or backflow preventer on the diagram, call a pro immediately.
DIY Tips: Creating Your Own Simple Riser Diagram for Home Plumbing
What if your home didn’t come with a diagram? Don’t worry. You can create a functional DIY riser diagram home plumbing sketch yourself. You don’t need to be an artist; you need to be observant.
Tools Needed
You don’t need expensive equipment. Gather these simple items:
- Graph paper (makes drawing straight lines easier).
- A pencil and a good eraser.
- A measuring tape.
- A flashlight (for looking under sinks and in crawlspaces).
- Optional: Free software like SketchUp or Floorplanner (if you are tech-savvy).
Step-by-Step Creation Process
Sketch the Layout. Draw a horizontal line for each floor of your house (Basement, Ground, 1st Floor, etc.). Leave plenty of space between them.
Locate the Main Stack. Find your main soil stack. This is usually a large (3-4 inch) pipe running vertically through the house, often hidden in a wall near the bathrooms. Draw this as a thick vertical line cutting through your floor lines.
Map the Fixtures Walk room by room.
- “Okay, on the first floor, I have a kitchen sink.” Draw a symbol for the sink on the 1st-floor line.
- Look under the sink. Connect the drain pipe to the main stack you drew.
- Draw the hot and cold water lines connecting to the sink.
Label Directions and Materials. Add arrows to show which way the water flows.
- Supply lines flow UP.
- Drain lines flow DOWN.
- Add notes on what you see: “Copper pipe,” “Old iron pipe,” “New PVC.”
Verify Vents. Go outside and look at your roof. Do you see pipes sticking out? Those are the vent terminations. Make sure your drawing connects the drain lines up to these roof points.
Safety First!
When investigating your plumbing for this project, never cut into a wall or pipe unless you are 100% sure what it is. If you are poking around in crawlspaces, wear a mask and gloves. Always know where your main water shutoff is before you start any inspection.
A Local Tip for Lahore Residents
If you are in Punjab or specifically Lahore, building construction varies. Many local plumbers rely on memory rather than paper. If you draft a DIY riser diagram, you can show it to a local plumber to verify your work. Saying, “Local plumbers in Punjab can verify your DIY riser diagram home plumbing,” is a great way to ensure accuracy. They might spot a “desi” fix or a bypass that isn’t standard code but is common in the area.
Tools and Software for Generating Professional Riser Diagrams
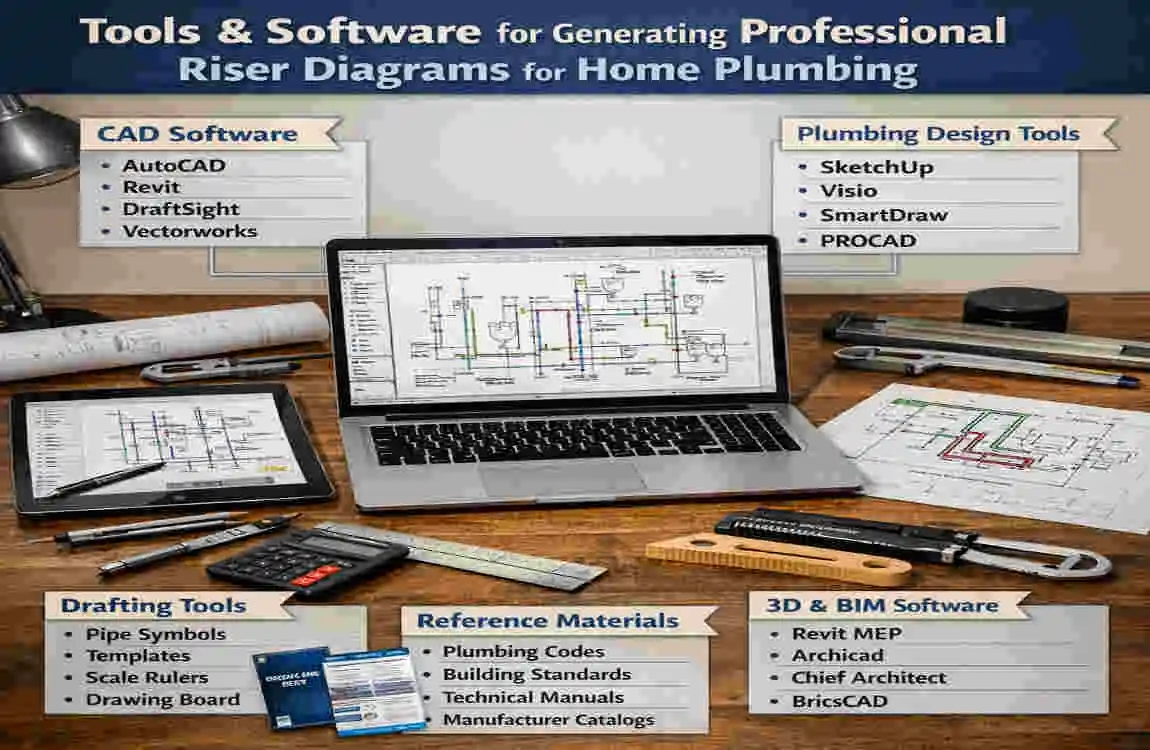
If hand-drawing feels too primitive, or if you need a digital copy to email to a contractor, there are excellent tools available.
Free Options
- LibreCAD: An open-source 2D CAD application. It has a learning curve but is powerful and completely free.
- Dia: A simple diagramming tool that is great for making flowcharts and schematic diagrams. It is less technical but easier to use.
Paid Professional Options
- AutoCAD: The industry standard. It is expensive and complex, but if you want professional-grade blueprints, this is it.
- Revit: This is for 3D Building Information Modelling (BIM). It generates riser diagrams automatically from a 3D model of the house.
Mobile Apps
- PlumbingCalc: While mostly for calculations, it helps with sizing.
- Magicplan: Allows you to scan a room with your camera and add plumbing annotations.
Pros and Cons
Tool TypeProsCons
Hand Drawn Free, fast, no learning curve. Hard to edit, looks unprofessional.
Free Software, clean look, shareable files. Limited features, some learning curve.
Pro Software Accurate, code-compliant, 3D. Very expensive, difficult to learn.
Frequently Asked Questions About Riser Diagrams in Home Plumbing
Q: What is a riser diagram home plumbing exactly? A: It is a vertical schematic drawing that maps out the water supply, waste, and vent pipes in a multi-story building, focusing on elevation rather than floor layout.
Q: Do all homes need a riser diagram? A: Yes, generally. While older homes may have lost theirs, modern building codes require them for new construction. They are crucial for passing inspections.
Q: Can I DIY a riser diagram? A: Absolutely. While a professional architect’s drawing is needed for official permits, a homeowner-created diagram is incredibly useful for personal maintenance and minor repairs.
Q: How much does a professional riser diagram cost? A: Costs vary wildly. In a market like Lahore, hiring a drafter to create a plumbing drawing might cost anywhere from PKR 5,000 to PKR 15,000, depending on the size of the house and the complexity of the system.
Q: What is the difference between a riser and a stack? A: They are often used interchangeably, but technically, a “riser” usually refers to vertical water supply pipes moving water up, while a “stack” refers to vertical DWV (Drain-Waste-Vent) pipes moving waste down or air up.