
Struggling with a stuck bathroom door handle? It’s a scenario we’ve all dreaded at some point—you turn the knob, and… nothing happens. Or maybe you’re just tired of looking at that rusty, squeaky hardware that dates your home back to the 90s. Whatever your reason, you are in the right place. This step-by-step guide shows you how to remove bathroom door handle hardware safely in under 15 minutes.
You might be thinking, “Shouldn’t I call a guy for this?” You could, but why spend $100+ on a plumber or handyman fees for something you can easily do yourself? Whether you are a renter in need of a quick fix or a homeowner looking to upgrade your style, learning how to remove bathroom door handle sets is a foundational DIY skill. It’s a quick win that saves money and boosts your confidence.
Why Your Bathroom Door Handle Needs Removing (And When to Call a Pro)
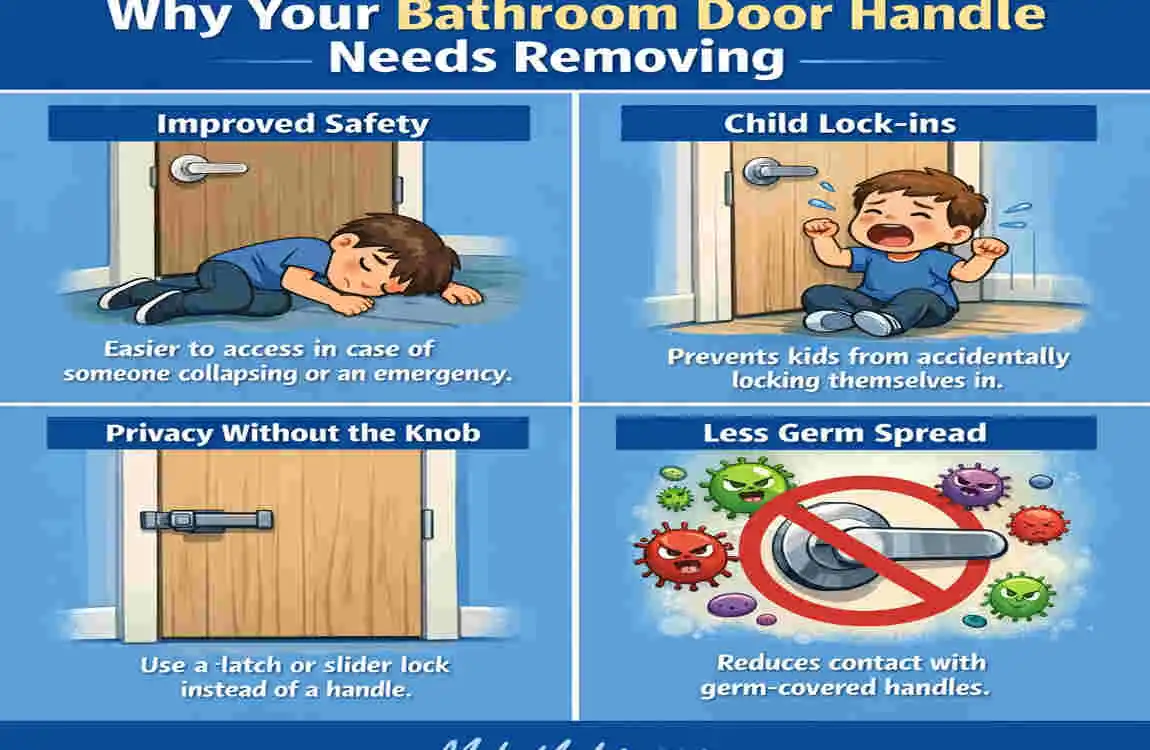
Before we start unscrewing things, let’s talk about why you are doing this. Recognizing the signs of a failing handle can save you from actually getting locked inside your bathroom (a claustrophobic nightmare we want to avoid!).
The most obvious sign is the “jiggle.” If you grab the knob and it moves significantly before the latch actually engages, the internal mechanism is wearing out. Other signs include a latch that sticks and won’t pop back out, a persistent squeaking noise that WD-40 won’t fix, or visible rust buildup. In high-humidity areas—like places with intense summers or poorly ventilated bathrooms—rust is the enemy number one for bathroom door hardware.
Replacing these handles does more than make the door work; it improves your home’s aesthetics and security. A sleek, matte black lever looks infinitely better than a tarnished brass knob. Plus, updated hardware is a subtle detail that adds to a home’s value. If you are planning to sell or want your home to feel “finished,” this is a great place to start.
However, there are times when you should put the screwdriver down. If the door frame itself is cracked or rotted, simply changing the handle won’t fix the problem. Also, if you have an antique mortise lock (those large, rectangular boxes slid into the door edge) or a high-tech smart lock you don’t understand, you should call a pro. A professional locksmith might cost around $150, but that is cheaper than replacing a door you accidentally destroyed.
Tools and Materials for Removing a Bathroom Door Handle
The best part about this project is that you don’t need a heavy-duty toolbox. You aren’t building a deck; you’re just taking apart some basic machinery. Most of these items are likely sitting in your kitchen drawer or garage right now.
Here is your essential toolkit for a successful DIY door handle removal:
- Screwdrivers: You will definitely need a Phillips head (the cross shape) and likely a Flathead (the straight line). Sizes #1 and #2 are standard.
- Allen Wrench / Hex Key: If you have a lever-style handle, these often use tiny set screws. The common sizes are 3/32″ or a metric 2.5mm. Check your IKEA spare parts bag; you might find one there!
- Needle-Nose Pliers: These are a lifesaver for gripping small pins or pulling out stubborn metal clips.
- Lubricant Spray: A can of WD-40 or a silicone-based spray is crucial if you are dealing with a stuck door handle due to rust.
- A Paperclip or Small Pin: Essential for privacy locks that have a tiny hole for release.
Optional but Helpful:
- Utility Knife: Great for cutting through layers of paint that might have sealed the handle to the door.
- Old Towel: Place this on the floor to catch falling screws and protect your flooring.
- Flashlight: To see into those tiny screw holes.
Step-by-Step Guide: How to Remove Bathroom Door Handle (Most Common Types)
Now, let’s get to the work. We are going to break this down so simply that you could do it with one hand tied behind your back (though please use both hands for safety!). We will focus on the two most common types: the standard knob and the lever handle.
Prep Your Bathroom Door (Safety First)
First things first: preparation. It might seem silly for a small job, but a little prep saves a lot of frustration. Start by clearing the area. Open the door halfway so you have access to both sides. Place your old towel or a drop cloth underneath the door. This catches any falling screws (which will bounce and roll under the vanity if you let them) and protects your floor from metal scratches or falling rust dust.
Next, take a close look at your hardware to identify what you are working with. Is it a round knob? A lever? Does it have a lock? If you see visible screws on the interior side of the door, you are in luck—this will be easy. If you see no screws at all, don’t panic; they are just hidden, and we will show you how to remove bathroom door handle plates that hide them.
Finally, give the handle a jiggle. If it feels exceptionally stiff or rusty, spray a little lubricant into the crevices now and let it sit for a few minutes while you get your tools ready.
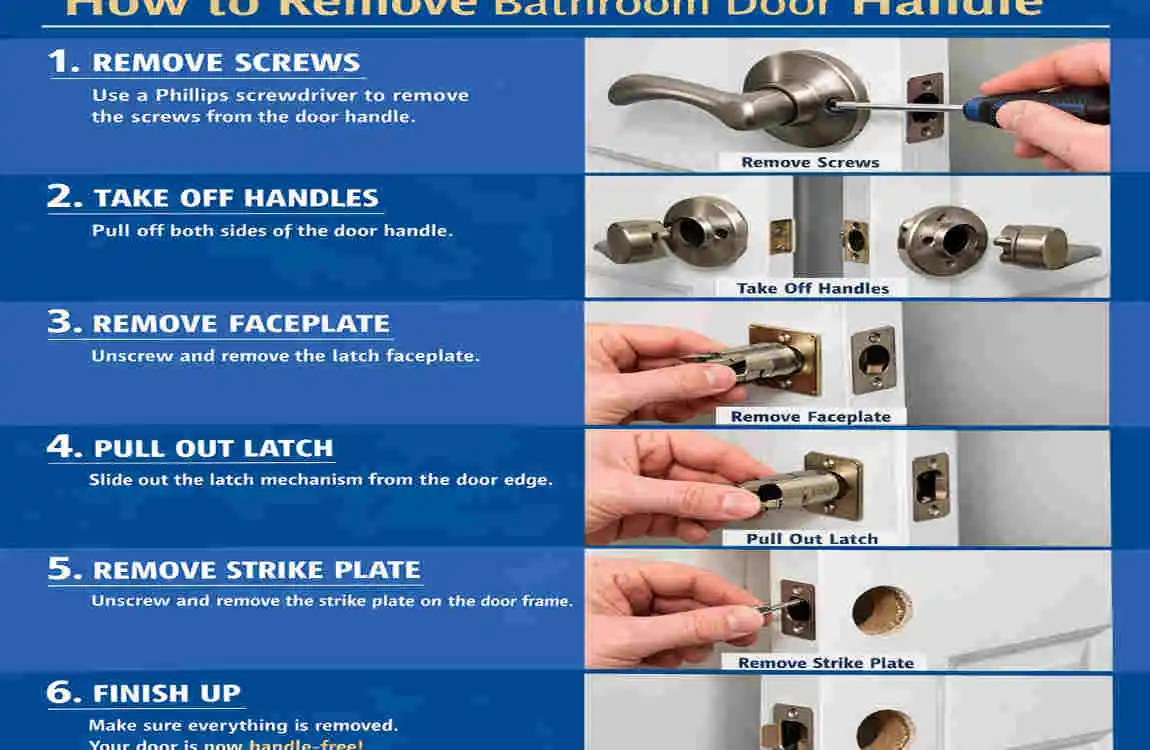
Remove the Door Knob or Lever Base
This is the main event. We need to get the “rose” (the round plate against the door) and the handle itself off.
For Exposed Screw Knobs: If you see two screws on the inside plate, unscrew them with your Phillips screwdriver. Hold the knob on the other side of the door while you do this, so it doesn’t fall off and hit your foot. Once the screws are out, the two halves of the knob will pull apart easily.
For Hidden Screw Knobs (The Tricky Ones): This is where people get confused when learning how to remove bathroom door handle hardware.
- Look for the Slot or Hole: Look closely at the “neck” of the doorknob (the stem between the round part and the door). You should see a tiny slot or a small round hole.
- Depress the Button: If it’s a hole, use a paperclip or a thin tool to push it in. You should feel a spring depress. If it’s a slot, use a small flathead screwdriver to push the tab in.
- Pull the Knob: While pressing that button/tab, pull the handle knob straight off the spindle. It should slide right off.
- Remove the Rose: Now you will see the mounting plate. Look for a small notch on the edge of the round plate against the door. Wedge your flathead screwdriver in there and gently pry the decorative cover off.
- Unscrew: The mounting screws are now exposed. Unscrew them, and the latch mechanism will be loose.
For Lever Handles: These often use a “set screw.” Look at the side or bottom of the lever handle base. You will see a tiny hexagonal hole. Insert your Allen wrench and turn counter-clockwise to loosen it. The handle should slide off, revealing the mounting screws underneath.
Detach the Latch Mechanism from the Door Edge
You have removed the handles, but the metal piece is still protruding from the side of the door. This is called the latch assembly.
- Locate the Edge Screws: Open the door and check the edges. You will see a metal rectangle (the faceplate) held in by two screws, with the latch tongue in the middle.
- Remove the Screws: Use your screwdriver to remove these two screws.
- Extract the Latch: Sometimes, the latch will slide out with your fingers. However, in bathrooms, layers of paint often glue this faceplate to the wood.
- The Knife Trick: If it’s stuck, take your utility knife and carefully score the paint around the rectangular plate. This breaks the seal. Then, slide your flathead screwdriver under the latch tongue and gently lever it out.
Visualizing the Door Anatomy: Imagine the door is a sandwich. The latch goes in the “meat” section, and the handles clamp the “bread” together. You have removed the bread; now you are pulling out the meat.
Fully Extract and Clean the Door Handle Hardware
At this point, you should have a gaping hole in your door. Congratulations! But you aren’t done yet.
Take the latch assembly you just pulled out and the handles you removed earlier. If you plan to reuse them (maybe you are just fixing the paint or the internal spring), they need a good cleaning. Bathroom humidity creates a gross paste of dust and rust inside these mechanisms.
Eco-Tip: Soak the metal parts (not the painted parts, just the internal mechanics) in a bowl of white vinegar for an hour. Scrub them with an old toothbrush. This removes rust better than harsh chemicals.
While the hardware is out, inspect the hole in the door (the “bore”). Is the wood crumbling? Is there old rot? If the wood is soft, fill the holes with wood filler and drill new pilot holes before installing a new handle to ensure it grips tightly.
Pro Hack: If you are taking handles off multiple doors (like painting the whole hallway), grab some Ziploc bags. Put the handle, the screws, and the latch for each door in its own bag. Tape the bag to the door it came from. Screws often vary slightly in length, and mixing them up is a headache you don’t need.
Test and Reinstall (or Upgrade)
You have successfully mastered removing bathroom door handle hardware! Now, what?
If you are reinstalling the old one, reverse the steps. Slide the latch in, screw it tight. Slide the spindle through the latch. Attach the handles and screw them together.
The Crucial Test: Before you close the door, operate the handle while the door is open. Does the latch tongue go in and out smoothly? If yes, close the door gently. Does it click shut? Does it lock?
If you are upgrading, this is the fun part. Modern bathroom trends are moving toward matte black or brushed nickel finishes. These aren’t just for looks; high-quality modern finishes are often treated to be more resistant to humidity and corrosion. Brands like Kwikset or Delta offer great “bed and bath” lines specifically designed for this environment.
Troubleshooting Common Problems When Removing Bathroom Door Handles
Even the best-laid plans can go wrong. Old houses, especially, like to throw curveballs. Here is how to handle the most common “stuck” situations when removing bathroom door handle sets.
The “Painted-Over” Nightmare: Landlords love to paint over everything, including the screws. If your screw heads are painted, your screwdriver won’t grip.
- The Fix: Use the tip of your utility knife or a sharp pick to scrape the paint out of the screw slots. Tap the screwdriver into the slot with a hammer gently to seat it before turning.
The Stripped Screw: You turned too hard, and now the screw head looks like a metal smoothie.
- The Fix: Place a wide rubber band over the screw head, then insert your screwdriver. The rubber fills the gaps and gives you grip. If that fails, you might need a screw extractor kit (cheap on Amazon).
The Seized Spindle: You removed the screws, but the handles won’t pull apart.
- The Fix: This is usually rust fusing the square metal bar (spindle) to the handle. Spray a generous amount of penetrating oil (like WD-40) into the gap between the handle and the door. Let it sit for 15 minutes. Then tap the spindle gently with the handle of your screwdriver to loosen it.
The Lever Won’t Budge: You removed the set screw, but the lever is stuck.
- The Fix: Sometimes levers screw onto the base as well as having a set screw. Try unscrewing the entire handle lever counter-clockwise.
Quick Troubleshooting Table:
Problem Quick Fix Estimated Time
Painted Screws Scrape with utility knife 2 mins
Seized Spindle WD-40 + Wait + Tap 15 mins
Stripped Screw Rubber band trick 1 min
Missing Tools Use a coin for large slots 1 min
Rust debris Vacuum out the door bore 3 mins
Bathroom Door Handle Types: Quick ID Guide Before Removal
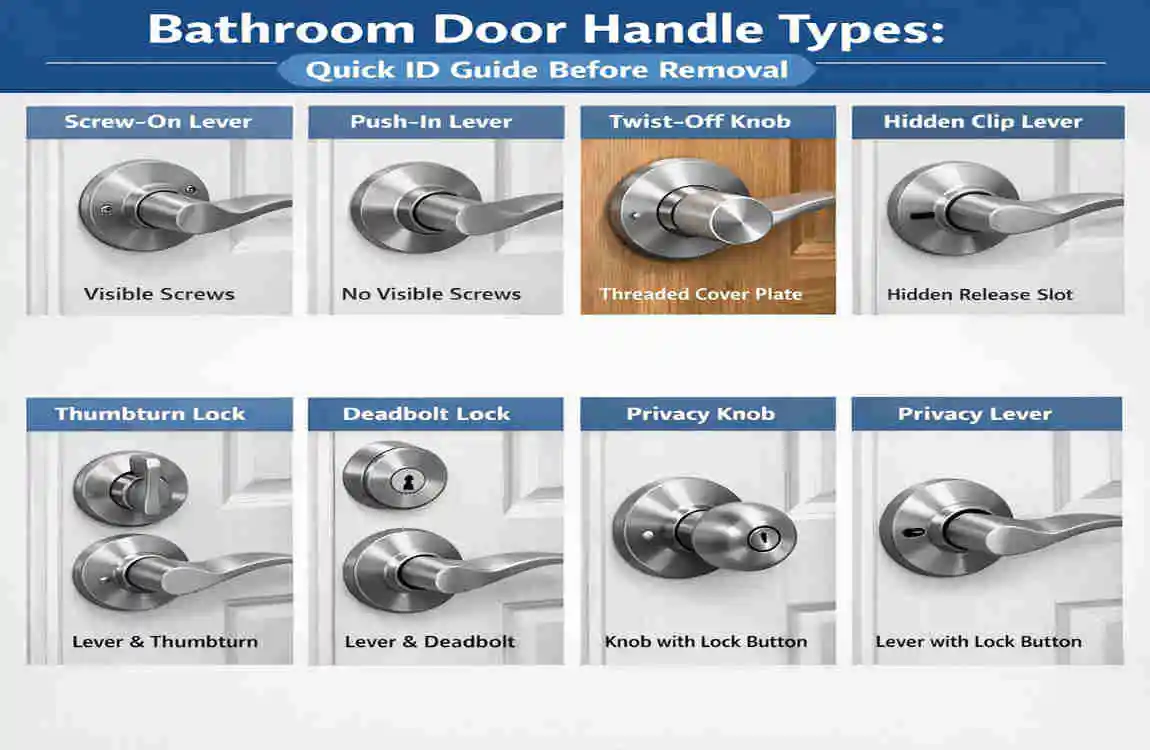
Knowing exactly what you are holding makes the job faster. Here is a quick ID guide to help you before you start.
- Doorknob (Round): The classic. Usually found in older homes. The gripping mechanism is a twisting rotation. These are the simplest to remove but the hardest to grip if your hands are wet.
- Lever Handle: A horizontal bar you push down. These are “ADA compliant” (easier for people with disabilities or arthritis). They rely on springs that can wear out, causing the “droopy handle” look.
- Dummy Handle: This handle doesn’t actually turn or latch. It’s just pulled to open (usually on linen closets). These screw directly into the face of the door with no latch mechanism.
- Privacy Lock: The standard for bathrooms. It features a locking pin or turn-button on the inside and a safety release hole on the outside.
Prevention Tips: Avoid Future Bathroom Door Handle Issues
Now that you know how to remove bathroom door handle sets, let’s make sure you don’t have to do it again anytime soon. The bathroom environment is harsh, but a little care goes a long way.
- Manage Humidity: This is the biggest killer of bathroom hardware. Ensure your bathroom fan is running during showers, or keep a window cracked. If you live in a region with high humidity (like Lahore during the monsoon or Florida in the summer), this is doubly important.
- Lubricate Annually: Once a year, spray a little silicone lubricant or graphite powder into the latch mechanism. Do not use standard WD-40 for maintenance (it attracts dust eventually); use a dedicated dry lube.
- Tighten Up: If you feel the handle getting loose, tighten the screws immediately. A loose handle puts stress on the internal springs, causing them to snap faster.
- Material Matters: When buying replacements, look for “PVD” finishes or solid brass/stainless steel. These resist corrosion much better than cheap zinc alloys.
FAQs: How to Remove Bathroom Door Handle
Q: How long does it take to remove a bathroom door handle?A: For a beginner, it typically takes 10 to 20 minutes. If the screws are painted over or rusty, it might take a bit longer to loosen them.
Q: Do I need special tools to remove bathroom door handle hardware? If you have a lever handle, you might need a small Allen wrench.
Q: Can I remove a bathroom door handle without visible screws?A: Yes! These are called “concealed screw” handles. You usually need to depress a small tab or pin on the neck of the knob to remove the handle, then pry off the decorative rose plate to reveal the screws.
Q: What’s the best replacement for bathroom door handles?A: Levers are generally better for bathrooms because they are easier to open with wet hands or if you have mobility issues. Matte black or brushed nickel are popular, durable finishes.
Q: How to remove a stuck bathroom door handle?A: If it is stuck due to rust, apply a penetrating lubricant like WD-40 and let it sit. Gently tap the handle with a rubber mallet or the back of a screwdriver to break the rust seal.