Hey there, fellow RV enthusiast! Have you ever parked your RV in your driveway and wondered if you could skip the hassle of dump stations by tapping into your home’s plumbing? That’s precisely what we’re diving into today: how to connect the RV to the house sewer. It’s a topic that’s gaining traction as more people embrace the RV lifestyle, whether for full-time living or weekend getaways.
Connecting your RV’s sewer system to your house plumbing can seem like a game-changer. It lets you handle waste disposal right at home, saving you time and trips to public facilities. But is it really that easy? We’ll break it down step by step, covering the benefits, potential pitfalls, and everything in between.
Understanding RV Sewer Systems vs. House Plumbing

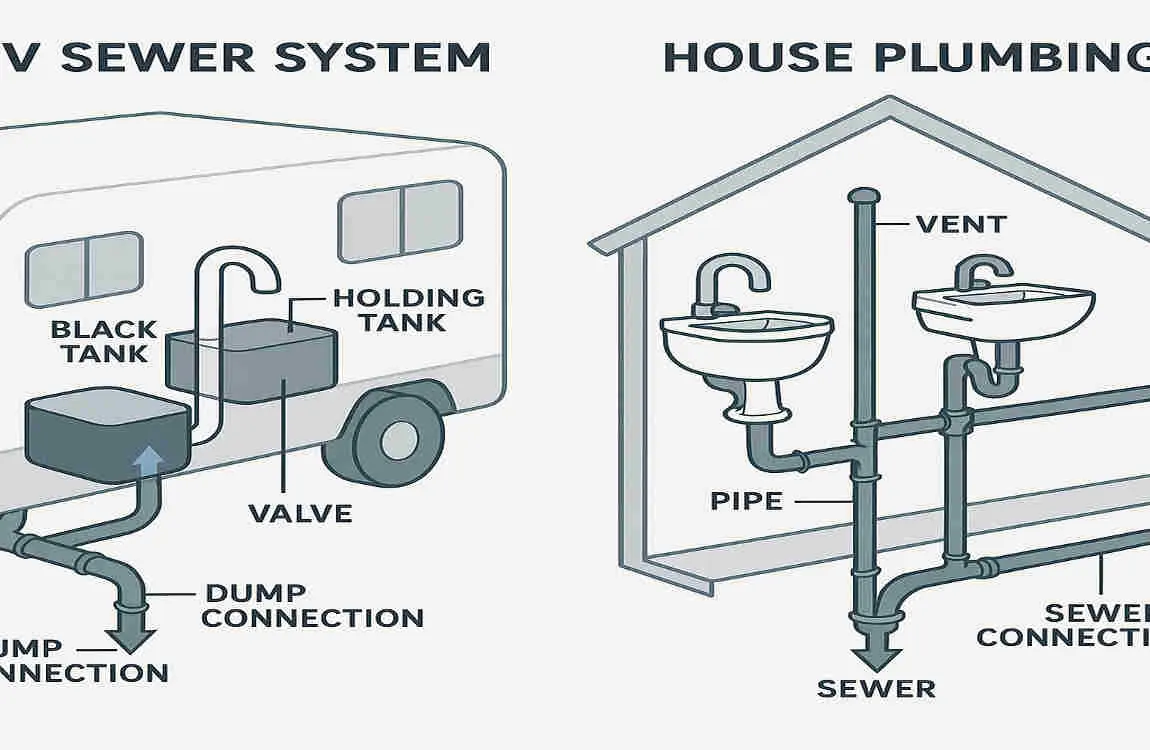
RV sewer systems and house plumbing might both deal with waste, but they’re like cousins from different worlds. Your RV has a compact setup designed for mobility, while your home’s plumbing is built for permanence. Understanding these differences is key before you even think about how to connect the RV to the house sewer.
Let’s start with the basics. In an RV, waste gets divided into two main types: black water and grey water. Black water is the stuff from your toilet—sewage that needs careful handling. Grey water comes from sinks and showers, which is less nasty but still requires proper disposal.
Types of RV Sewer Connections
RVs typically use tanks to store this waste until you can empty them. The black tank holds toilet waste, and the grey tank collects everything else. When you’re on the road, you connect a hose to a dump station to empty these tanks. It’s straightforward but not always convenient.
Now, compare that to house plumbing. Your home has a network of pipes that lead to a septic system or municipal sewer line. It’s designed for constant use, with larger pipes and built-in vents to handle odours and pressure.
Overview of House Sewer Plumbing Setup
Houses often have a cleanout point—a capped pipe outside where you can access the main sewer line. This is usually where plumbers snake out clogs. It’s sturdy, made from materials like PVC or cast iron, and connected to a system that can handle high volumes of waste without batting an eye.
But here’s where things get tricky. RVs use smaller hoses and fittings, often 3 inches in diameter, while house pipes might be 4 inches or more. Directly linking them isn’t always plug-and-play. You might face issues like mismatched sizes or pressure differences.
Challenges of Connecting the Two Systems Directly
Imagine forcing a square peg into a round hole—that’s sometimes what connecting feels like. RV systems aren’t built for long-term hookups, so you risk leaks or backups if not done right. Plus, house plumbing isn’t designed for the mobile nature of RVs, which could lead to clogs from RV-specific waste like toilet paper that doesn’t break down easily.
Don’t worry, though—many folks successfully make this work with the right know-how. As we explore how to connect the RV to the house sewer, you’ll see how to bridge these gaps safely.
Benefits of Connecting Your RV Sewer to House Plumbing
Why bother figuring out how to connect an RV to a house sewer? Let’s talk perks. First off, it’s all about convenience. Instead of hauling your RV to a dump station every few days, you can flush waste directly into your home’s plumbing system. Picture this: You’re camped out in your driveway for weeks, and waste disposal is as easy as using your home toilet.
This setup saves space too—no need for bulky portable tanks cluttering your yard. And let’s not forget the cost angle—dump station fees add up, especially if you’re a full-timer.
Convenience of Using Existing Plumbing
Your house already has a reliable plumbing setup, so why not use it? Connecting means you can run your RV’s sinks, shower, and toilet without worrying about tank levels. It’s like turning your driveway into a mini RV park.
Think about the time you’ll save—no more waiting in line at public dumps or dealing with messy hoses in unfamiliar places. You, the reader, might be nodding along if you’ve ever spilt grey water on your shoes—yuck!
Avoidance of Expensive and Space-Consuming Septic or Dump Stations
Building a dedicated septic for your RV? That could cost thousands and eat up yard space. Public dump stations aren’t free either, and they’re not always nearby. By connecting to your house, you bypass all that.
It’s a smart move for long-term parking, like during home renovations or family visits. You stay comfortable without the extra hassle.
Environmental Benefits of Properly Disposing of RV Waste
Proper connections mean waste goes where it should—into a treated system, not dumped illegally. This reduces pollution in rivers or campsites. You’re doing your part for the planet. It’s a win for eco-conscious RVers.
Plus, it encourages better habits, like using biodegradable products in your tanks, which break down more easily in house systems.
Potential Cost Savings Long Term
Over time, the savings pile up. Skip dump fees, reduce wear on your RV’s tanks, and avoid costly repairs from improper dumping. If you’re handy, the initial setup is a one-time investment. Imagine redirecting that money to fun road trips instead!
Of course, these benefits shine brightest when the connection is done correctly. Up next, we’ll weigh if it’s truly easy.
Is It Easy to Connect an RV Sewer to House Plumbing? — Factors to Consider
So, is it easy? Well, it depends. For some, it’s a weekend project; for others, it’s a headache. Let’s break down the factors so you can decide for yourself on how to connect the RV to the house sewer.
First, consider your skills. If you’re comfortable with house basic plumbing, you might breeze through it. But if pipes and fittings sound foreign, it could feel overwhelming.
Technical Knowledge and Plumbing Skills Required
You don’t need to be a pro plumber, but knowing how to handle tools like wrenches and sealants helps. We’re talking about measuring pipes, applying tape, and ensuring tight fits. If you’ve fixed a leaky faucet before, you’re good to go.
Ask yourself: Are you ready to get your hands dirty? If not, that’s okay—professionals exist for a reason.
Compatibility of Pipes and Fittings (Diameter, Material)
RV hoses are flexible and often rubber, while house pipes are rigid PVC or metal. Diameters might not match—your RV outlet could be 3 inches, but the house cleanout could be 4 inches. You’ll need adapters to bridge that.
Materials matter too. Cheap fittings can crack under pressure, so choose durable ones. It’s like matching puzzle pieces; get it wrong, and leaks happen.
Location and Accessibility of House Sewer Outlet
Where’s your house cleanout? If it’s buried or hard to reach, digging might be involved. Ideally, park your RV close to it for a short hose run. Long hoses increase clog risks.
Picture your setup: Can you easily access it without major yard work? If yes, you’re ahead.
Legal and Code Compliance Issues
Not every area allows this. Local codes might require permits or inspections. Ignoring them could lead to fines. Check your city’s rules before starting.
We’ll dive deeper into legal stuff later, but know this: Compliance keeps things safe and hassle-free.
Risks Involved, Such as Leaks, Clogs, and Backflow
Leaks can flood your yard, clogs might back up into your house, and backflow? That’s when waste flows the wrong way—gross and dangerous. These risks make proper setup crucial.
Weigh these factors, reader. Connecting could be straightforward if they align. If not, alternatives might suit you better.
Step-by-Step Guide: How to Connect RV to House Sewer
Ready to roll up your sleeves? Here’s a detailed, step-by-step guide on how to connect an RV to a house sewer. We’ll keep it simple, breaking it into manageable parts. Remember, safety first—wear gloves and work in a well-ventilated area.
This isn’t rocket science, but patience is key. Let’s walk through it together.
Gather Necessary Tools and Materials
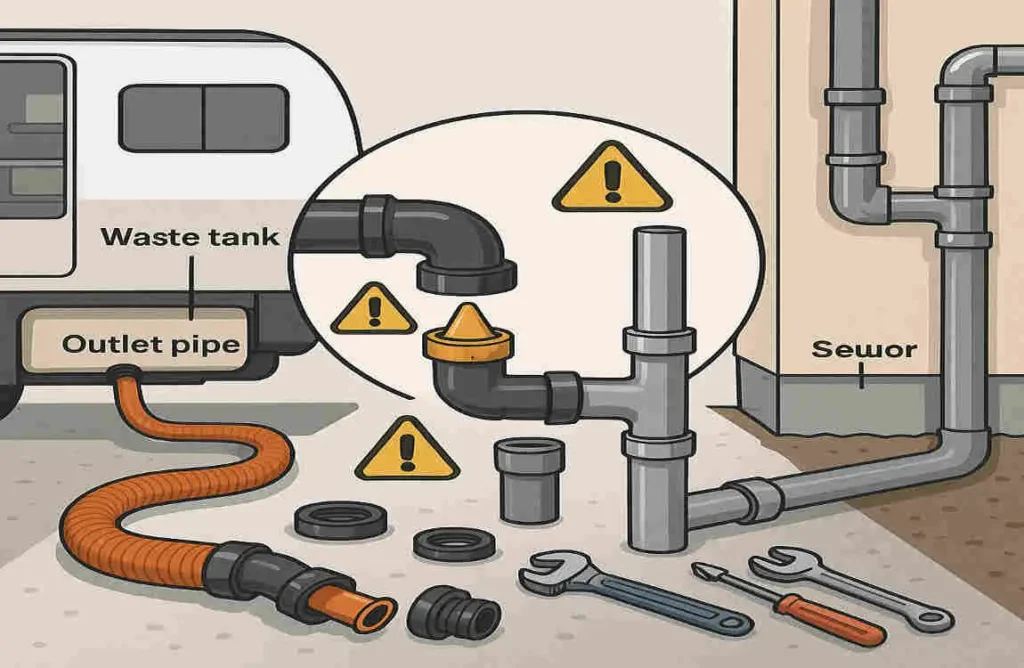
Start by collecting what you need. You’ll want pipe fittings to match sizes, a backflow preventer to stop reverse flow, a sewer hose adapter for your RV, and extras like elbows, clamps, and plumber’s tape.
Don’t skimp here—quality materials prevent future headaches. Head to a hardware store or online for these.
Locate House Sewer Cleanout or Access Point
Find your home’s sewer cleanout. It’s often a white PVC cap sticking out of the ground near your foundation. Unscrew it carefully to inspect.
If it’s not obvious, check your home’s blueprint or call a plumber for help. Accessibility is everything.
Disconnect and Prepare RV Sewer Outlet
Empty your RV tanks first at a dump station. Then, disconnect any existing hoses and clean the outlet valve. Wipe away debris for a fresh start.
This step ensures no old gunk causes issues right away.
Connect Sewer Hose Adapter to RV Outlet
Attach the adapter to your RV’s sewer outlet. Use clamps to secure it tightly. Apply plumber’s tape to threads for a leak-proof seal.
Double-check— a loose connection here spells trouble later.
Attach Hose Securely to House Sewer Cleanout with Proper Sealants and Fittings
Run your sewer hose from the RV to the cleanout. Use elbows if needed for bends. Seal everything with tape or silicone, and clamp it down.
Make sure the hose slopes downward for gravity flow. No uphill battles!
Install a Backflow Prevention Device to Avoid Reverse Flow
Screw in a backflow preventer near the house end. This valve stops sewage from flowing back into your RV. It’s a must for safety.
Test it by running water—ensure it works as advertised.
Test the System for Leaks and Proper Flow
Flush your RV toilet and run sinks. Watch for leaks along the hose and at connections. Check flow— it should drain smoothly without backups.
If something’s off, tighten or adjust. Better now than later!
Routine Inspection and Maintenance Tips
Once connected, inspect weekly. Look for wear, clean vents, and flush with water regularly. This keeps things flowing.
We’ll cover more maintenance later, but start strong here.
Tools and Materials Needed for Connection
To make connecting an RV to a house sewer a success, having the right tools is half the battle. Let’s list them out with quick explanations.
Here’s a handy table to visualise it:
Tool/Material Description: Why You Need Approximate Cost
Sewer Hose Adapter Converts RV outlet to standard hose size. Ensures compatibility $10-20
Backflow Preventer Valve that stops reverse sewage flow, prevents contamination $15-30
Flexible Sewer Hose (20-30 ft) Durable hose for waste transfer Main connection line $25-50
Pipe Fittings/Elbows Connectors for bends and size matching Customises the setup $5-15 each
Clamps and Plumber’s Tape Secures hoses and seals threads Leak prevention $5-10
Wrench Set For tightening fittings , Basic assembly tool $20-40
Gloves and Safety Goggles Protective gear keeps you safe from mess $10-20
You can buy these at stores like Home Depot or Amazon for affordability. Opt for high-quality, UV-resistant materials—they last longer outdoors. Using cheap stuff might save pennies now, but it will cost you big in repairs later. Trust me, reader, investing here pays off.
Legal and Safety Considerations
Before you dive into how to connect an RV to a house sewer, let’s talk rules and risks. Ignoring these could land you in hot water—literally.
Local codes vary, so check with your city hall. Some places ban direct connections to prevent overload on municipal systems.
Local Plumbing Codes and Regulations for Connecting RV Sewer to House Plumbing
Many areas require your setup to meet building codes, like using approved materials. It’s about ensuring the system handles extra waste without issues.
Do your homework—contact local authorities. You might need a permit, especially if modifying pipes.
Permit and Inspection Requirements
In some spots, you’ll need a permit and post-install inspection. This verifies everything’s safe and compliant. It’s a small step for peace of mind.
Skipping it? Fines could hit, or worse, insurance issues if something goes wrong.
Health and Safety Risks Associated with Improper Sewage Connections
Bad connections risk exposure to harmful bacteria. Leaks can contaminate soil or water, affecting your family’s health.
Always prioritise hygiene—use sanitisers and avoid direct contact with waste.
Using Backflow Prevention to Avoid Contamination
We mentioned this earlier, but it’s worth repeating: A backflow device is your shield against sewage reversing into your home or RV. Install it properly to block contamination.
Think of it as a one-way street for waste.
How to Properly Dispose of RV Waste Through House Plumbing
Flush responsibly—use RV-safe toilet paper and avoid chemicals that harm septic systems. Empty tanks gradually to prevent overload.
This keeps your home plumbing happy and healthy.
Common Challenges and Troubleshooting Tips
Even with the best setup for connecting an RV to a house sewer, challenges can still arise. Let’s tackle them head-on so you’re prepared.
Leaks are common if seals degrade. Check and replace tape or clamps regularly.
Leak Prevention and Seal Maintenance
Inspect connections monthly. Apply fresh sealant and tighten clamps. A little maintenance goes a long way.
If you spot a drip, fix it immediately—don’t let it escalate.
Dealing with Clogs and Slow Drainage
Clogs happen from buildup. Flush with hot water and enzyme cleaners weekly. Avoid flushing non-biodegradable items.
For stubborn ones, use a plumbing snake gently.
Handling Odours and Venting Issues
Odors? Ensure proper venting. Add a vent cap if needed to release gases. Baking soda flushes help neutralise smells.
Keep things fresh—your nose will thank you!
What to Do If Sewage Backs Up into the House Plumbing
Stop using the system immediately. Disconnect and call a house plumber. It may indicate a deeper issue, such as a complete failure of the septic system.
Better safe than sorry, right?
When to Call a Professional Plumber
If troubleshooting stumps you, pros have the tools and expertise. Don’t risk DIY disasters—know your limits.
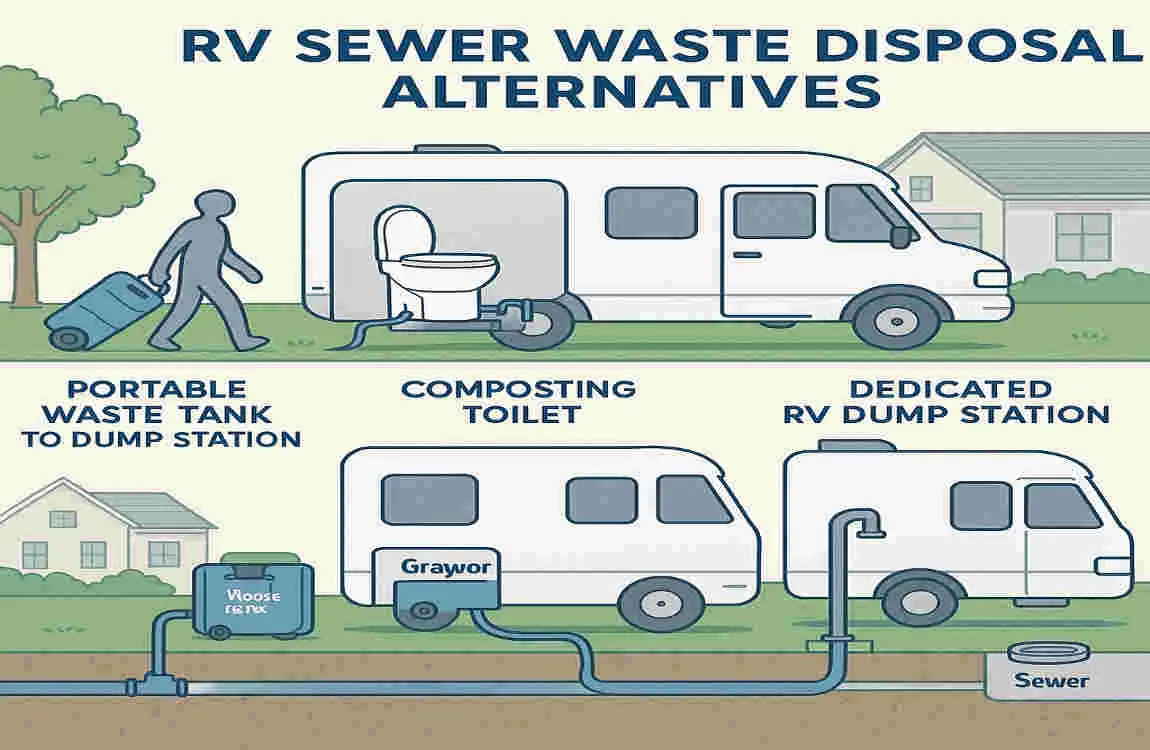
Alternatives to Connecting RV Sewer Directly to House Plumbing

Not sold on how to connect the RV to the house sewer? No problem—there are solid alternatives.
Consider public dump stations. They’re widespread and easy, though they require trips.
Using RV Dump Stations and Portable Waste Tanks
Portable tanks let you empty at home without connections. Wheel them to your toilet or a dump site. It’s low-commitment.
Great for short stays.
Installation of Dedicated RV Septic Systems
For permanent setups, install a separate septic tank for your RV. It’s pricey but independent from your house.
Think long-term if you’re parking often.
Using Portable Macerator Pumps for Waste Disposal
These pumps grind waste and pump it through smaller hoses to distant drains. Handy for tricky locations.
They’re portable powerhouses—worth considering.
Best Practices for Maintaining Your RV Sewer Connection
Once connected, maintenance is your best friend for connecting an RV to a house sewer. Let’s cover tips to keep it running smoothly.
Inspect every two weeks. Look for cracks, leaks, or wear.
Periodic Inspection Schedule
Set a calendar reminder. Catch issues early to avoid big fixes.
Proper Cleaning and Flushing Techniques
Flush with clean water after each use. Use tank treatments to break down waste.
Here’s a quick numbered list of flushing steps:
- Close RV valves.
- Run hot water through the lines.
- Add cleaner and let it sit.
- Flush thoroughly.
- Inspect for residue.
Simple.
Winterising Your RV Sewer Line Connection
In cold weather, insulate hoses and drain lines completely. Add antifreeze to prevent freezing.
Don’t let winter wreck your setup.
Tips to Extend the Life of Hoses and Fittings
Store hoses coiled and out of the sun. Replace every 2-3 years. Quality care equals longevity.

