
We have all been there. You are standing in your bathroom, staring at that old vanity, and thinking, “If this sink were just two feet to the left, this whole room would look twice as big.” You may be in the middle of a full-blown renovation, or you may be trying to make a small adjustment to improve the flow of your home. The dream is there, but then reality hits you: the plumbing.
Most homeowners freeze up when they think about pipes. The immediate reaction is usually to call a professional. But when you get that quote back and see that a plumber might charge anywhere from $200 to $500 just for a few hours of work, that dream renovation starts to feel a lot more expensive. This is where knowing how to move house bathroom sink plumbing can be a total game-changer for your budget.
Tools and Materials You’ll Need
Before we touch a single pipe, we need to make sure you have the right gear. There is nothing worse than being halfway through a job, water dripping into a bucket, and realizing you are missing a crucial tool.
Luckily, learning how to move house bathroom sink plumbing doesn’t require thousands of dollars in equipment. You probably have most of these items in your garage or junk drawer already. If you don’t, you can grab them at your local hardware store for a fraction of the cost of a plumber.
The Basic Tool Kit
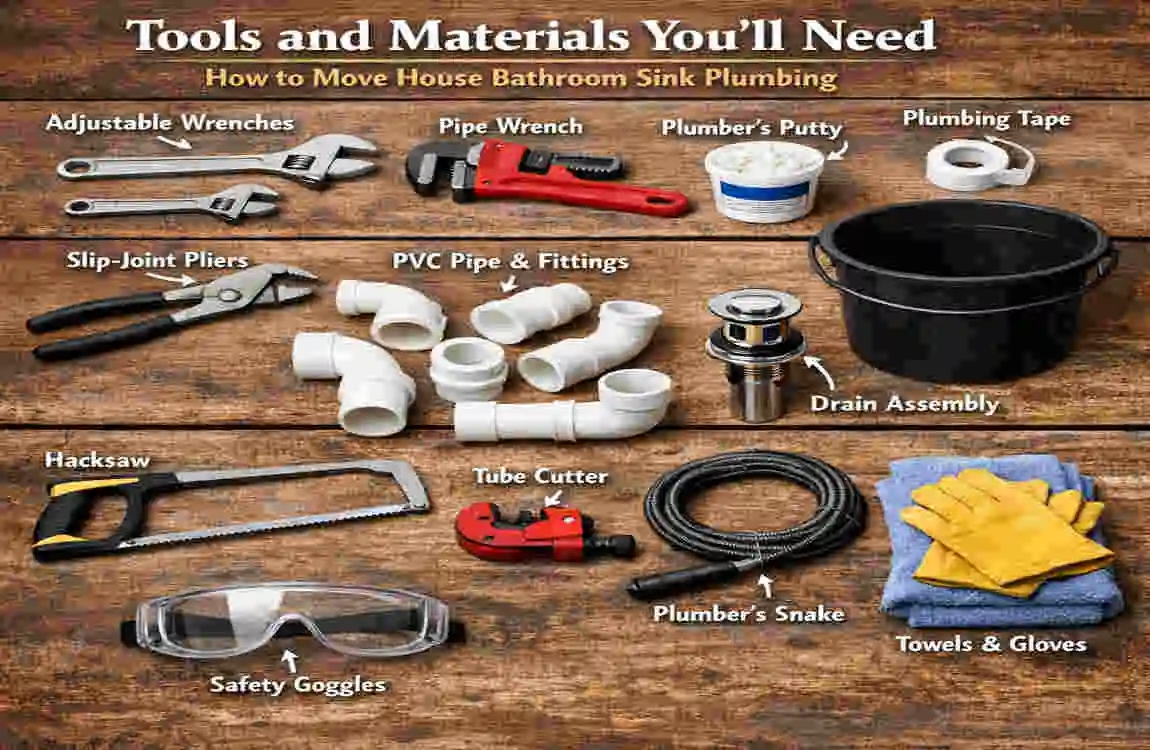
Here are the absolute essentials you will need to get the job done:
- Adjustable Wrench: This is the MVP of plumbing. You will use this to loosen the nuts on supply lines and compression fittings. An 8-inch or 10-inch wrench is usually perfect.
- Channel-Lock Pliers: These are great for gripping larger pipes, especially the slip nuts on the drain trap. They give you the leverage you need to twist off stubborn plastic or metal rings.
- Bucket and Towels: Plumbing always involves a little bit of water, even when the valves are off. Keep a bucket handy to catch the “P-trap water” (more on that later) and old towels to wipe up spills.
- Screwdriver Set: You will likely need both a Phillips head (the cross shape) and a flathead screwdriver to remove the sink from the wall or vanity cabinet.
- Pipe Cutter or Hacksaw: If you are altering the length of PVC pipes, you might need to cut them. A simple hacksaw works wonders here.
Plumbing Supplies
Depending on your specific setup, you might need a few replacement parts:
- P-Trap Kit: This is the curved pipe beneath the sink. If yours is old or grimy, buy a new PVC P-trap kit. They are cheap (usually under $15) and easy to install.
- Flexible Supply Lines: These braided stainless steel hoses connect your water valves to the faucet. If you are moving the sink further away from the wall pipes, longer supply lines are a lifesaver.
- Plumber’s Tape (Teflon Tape): This white tape wraps around threaded pipes to create a watertight seal.
- Plumber’s Putty: Used for sealing the drain flange inside the sink.
Pro Tip: If you are buying new supplies, budget around $50 to $100 total. That is still significantly cheaper than the minimum call-out fee for a pro!
Safety Precautions Before You Start
We know you are excited to get started, but safety has to come first. Plumbing isn’t dangerous in the same way electrical work is, but it can cause significant property damage if you aren’t careful. Water damage is real, and it happens fast.
The Golden Rule: Shut It Off
The absolute most important step in learning how to move house bathroom sink plumbing is shutting off the water. You need to locate the shutoff valves underneath your sink. There should be two knobs: one for hot water and one for cold.
Turn them clockwise (to the right) until they stop. If your house is older and doesn’t have isolation valves under the sink, you will need to find the main water shutoff valve for the entire house and turn that off. Do not skip this!
Watch Out for “Trap” Hazards
The water sitting in your P-trap (the U-shaped pipe) isn’t just water. It acts as a seal to block sewer gases from entering your home. When you remove it, you might catch a whiff of sewer gas. It’s unpleasant but generally harmless in small doses. However, keep the room ventilated.
Also, be aware of your local building codes. If you are doing a massive relocation involving tearing down walls and moving the main stack, you might need a permit. For a simple disconnect-and-move, you are usually in the clear, but it never hurts to check.
Step-by-Step Guide: How to Move House Bathroom Sink Plumbing
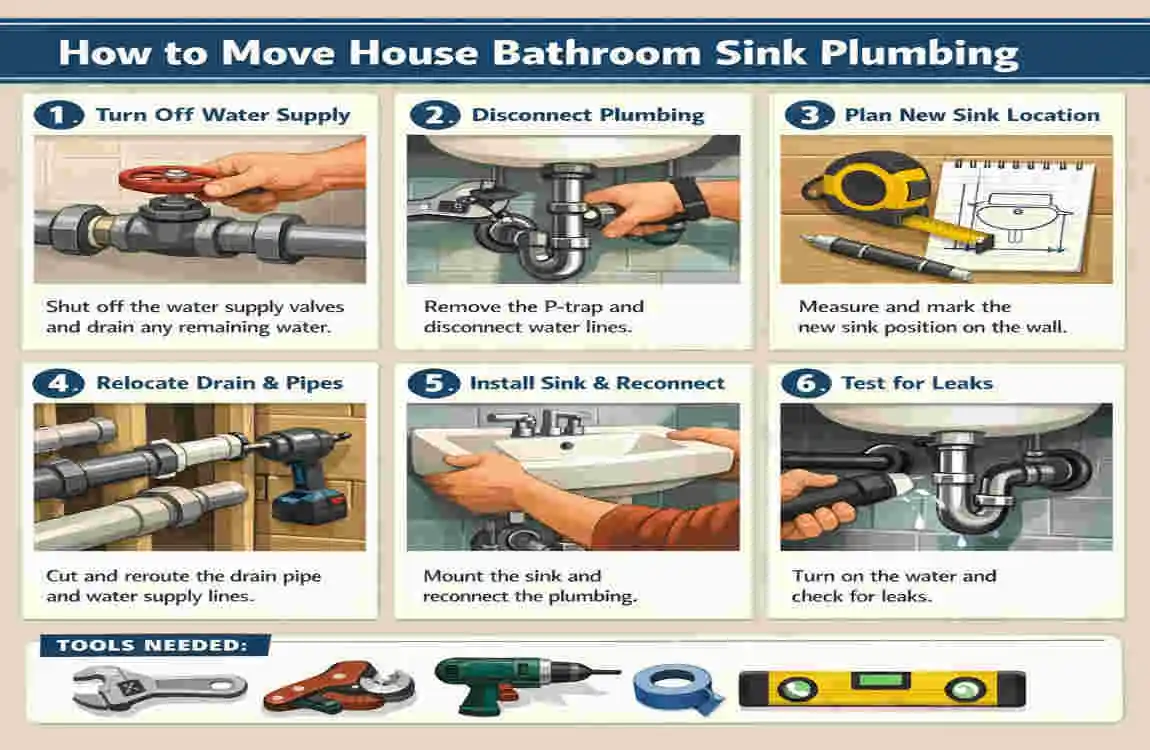
Now that we are prepped and safe, let’s get to the work. We have broken this down into bite-sized chunks so you can follow along easily. This process generally takes a beginner about 2 to 4 hours.
Shut Off Water and Prep the Sink
We mentioned this in safety, but now we are doing it for real. You need to verify that the water is actually off.
- Close the Valves: Twist the hot and cold valves underneath the sink until they are tight.
- Drain the Pressure: Go up to the faucet and turn it on. If the water stops flowing after a few seconds, you are safe. If it keeps running, your valves might be faulty, and you’ll need to shut off the main house water.
- Identify the Lines: If you aren’t an expert, it helps to take a piece of masking tape and label your supply lines “Hot” and “Cold.” When you are reconnecting things later, you will thank yourself.
Why this matters: There is always residual water and pressure in the lines. By opening the faucet after shutting the valves, you prevent water from spraying in your face when you unscrew the pipes.
Disconnect the Drain and P-Trap
This is the messy part. Under your sink, you will see a curved pipe that looks like a “U” or a “J.” This is the P-trap. Its job is to hold a small amount of water to block sewer smells.
The Bucket Method: Before you loosen anything, place your bucket directly underneath this curved pipe. It is full of water (and maybe some hair or gunk), and gravity guarantees it will fall when you loosen the nuts.
Loosening the Slip Nuts:
- Locate the large nuts at both ends of the U-bend. These are called slip nuts.
- Try to twist them counterclockwise by hand. Plastic nuts often loosen easily.
- If they are stuck (or made of metal), use your Channel-Lock pliers. Grip gently so you don’t crack the pipe, and give it a firm turn.
- Once the nuts are loose, the trap should slide right off. Dump the water and gunk into your bucket—do not pour it down the sink you are working on!
Hygiene Tip: This is a great time to clean that P-trap or buy a new one. Over the years, soap scum and hair build up inside, slowing down your drain.
Remove and Relocate the Sink
With the water lines disconnected and the drain pipe removed, your sink is now structurally free from the plumbing system. Now you need to detach it from its location physically.
For Pedestal Sinks: These are usually bolted to the floor and the wall. You will need to use your wrench to remove the floor bolts at the base of the pedestal. Then, look underneath the basin for toggle bolts holding it to the wall. Have a friend help you support the basin while you unscrew it.
For Vanity Cabinets: These are often screwed into the wall studs through the back of the cabinet. Use your screwdriver to back these screws out. Use a utility knife to slice through any caulk sealing the countertop to the wall.
The Move: Carefully lift the sink. Porcelain is heavy and slippery, and it cracks easily if dropped. If you are moving the sink to a new house, wrap it in moving blankets immediately. If you are moving it across the room to relocate bathroom sink plumbing, set it down gently on cardboard to protect your floors.
Prepare New Location and install Sink
This is where the magic happens. You are setting up your sink in its new home.
Positioning: Move your vanity or pedestal to the new spot. If you are shifting it a few feet, you need to check if your existing plumbing pipes (sticking out of the wall) can still reach the sink.
Extending the Lines: If your new location is a bit further away from the water source than before, you don’t necessarily need to rip open the wall to move the pipes.
- Supply Lines: Buy longer flexible braided supply lines. You can get them in lengths up to 30 inches or more. Screw one end to the shutoff valve and the other to the faucet underneath the sink.
- Drain Lines: If the drain alignment is slightly off, you can use flexible drain extensions or an accordion-style P-trap. However, be careful with accordion pipes as they can trap debris. The best bet is to cut new PVC pipe to extend the reach from the wall to your sink’s new location.
Reconnecting:
- Secure the sink/vanity to the wall in the new spot.
- Apply plumber’s tape to the threads of your supply valves.
- Screw on the supply lines and tighten with your wrench.
- Reassemble the P-trap. Make sure the rubber washers (O-rings) are seated correctly inside the slip nuts to prevent leaks. Tighten these by hand, then give a quarter-turn with pliers.
Test for Leaks and Final Checks
You have successfully learned how to move house bathroom sink plumbing and put everything back together. Now comes the moment of truth.
The Slow Turn-On: Do not just rip the valves open. Turn the water shutoff valves counterclockwise slowly. Listen for the sound of water rushing in.
Check for Drips: Grab a dry tissue or paper towel. Wipe it around every connection point—the supply lines, the P-trap nuts, and the faucet connection. If the tissue comes away wet, you have a leak.
- If it leaks: Don’t panic. Usually, it just means you need to tighten a nut slightly more. Give it another quarter turn.
- The Flood Check: Once the drips are gone, run the faucet for 5 minutes. Fill the sink with water and pull the stopper to let it drain all at once. This tests the drain pressure.
If the floor stays dry, congratulations! You have done it.
Common Mistakes to Avoid When Moving Bathroom Sink Plumbing
Even with the best instructions, things can go wrong. Here are the most common pitfalls DIYers stumble into when they try to relocate bathroom sink plumbing.
- Over-Tightening Nuts: This is the number one mistake. Tightening plastic nuts is better, but over-tightening plastic nuts can crack them, causing immediate leaks. Over-tightening metal nuts can strip the threads. Tighten until snug, then stop.
- Forgetting the O-Rings: Inside the P-trap connections, there are plastic or rubber washers. If you forget to put these back in, or if they are pinched/twisted, water will pour out.
- Ignoring the Vent: Every drain needs a vent (a pipe that goes up to the roof) to allow air in so water can flow out. If you move your sink too far from the main stack without venting it, you might hear “glug-glug” sounds or have slow drainage.
- Reusing Old Seals: If you take apart an old drain, the rubber gaskets are probably brittle. Spend the $2 to buy new washers. It is cheap insurance against leaks.
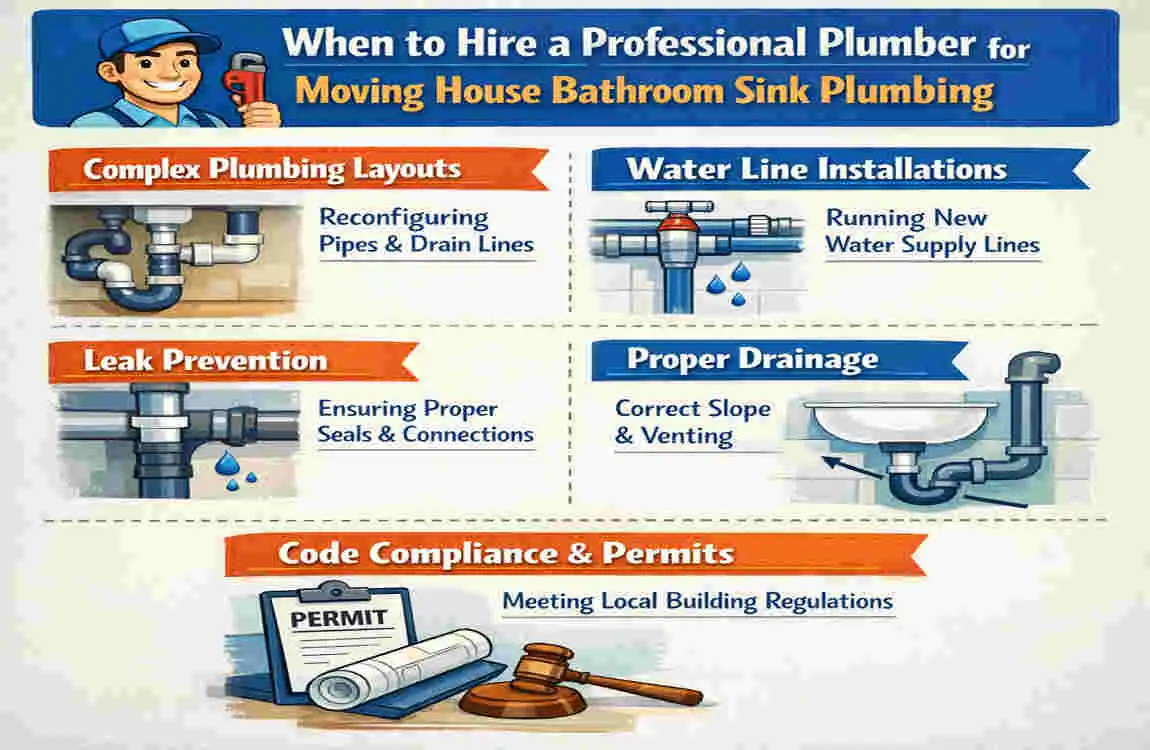
When to Hire a Professional Plumber
We are all for DIY, but there are times when knowing how to move house bathroom sink plumbing isn’t enough. Sometimes, the job is just too big or complex.
If you encounter any of the following, it is time to call in the cavalry:
- Moving the “Rough-In”: If you want to move the sink to the opposite side of the room, you will need to open the walls and move the actual drain stack and vent pipes. This is major surgery and requires professional code compliance.
- Lead or Galvanized Pipes: If your home is very old and has lead pipes or rusted galvanized steel, they can crumble when you touch them. A pro knows how to transition these to modern PEX or copper safely.
- Sewer Smells: If you can’t get rid of a sewage smell after moving the sink, you may have a venting issue that requires an expert diagnosis.
Cost Comparison: DIY vs. Pro
Feature DIY Relocation Professional Plumber
Estimated Cost $50 – $100 (Supplies) $200 – $600+ (Labor & Parts)
Time Required 2 – 4 Hours 1 – 2 Hours
Tools Needed Basic wrench, bucket, pliers None (they bring their own)
Difficulty Level Moderate Easy (for you!)
Best For Minor moves, swapping vanities Major layout changes, moving lines in walls
FAQs
How long does it take to move house bathroom sink plumbing?
For a beginner, expect the project to take between 2 to 4 hours. This includes shutting off the water, disconnecting everything, moving the unit, and reconnecting it. If you run into stuck bolts or need to run to the store for parts, it might take an afternoon.
Can I reuse the old P-trap parts?
Yes, you can, provided they aren’t cracked or brittle. However, we highly recommend cleaning them thoroughly. If the plastic washers look squished or hard, replace those washers to ensure a good seal.
Is it legal for renters to move bathroom plumbing?
Generally, no. Most lease agreements prohibit tenants from performing plumbing work. Always check with your landlord before touching any valves or pipes to avoid losing your security deposit.
What if my supply lines don’t reach the new location?
This is a common issue! You don’t need to move the pipes in the wall. You can buy longer flexible braided supply lines. They come in various lengths and can easily bridge a gap of several feet.