
Building a lean-to roof is one of the most practical, cost-effective, and rewarding home improvement projects you can tackle. Unlike complex gable or hip roofs that require advanced carpentry gymnastics, a lean-to roof is straightforward. It is a single slope—a shed roof—that relies on your existing house for support.
The idea of calculating angles, handling pitch, and making those mysterious “birds mouth” cuts can feel intimidating. Many people assume they need a degree in geometry or twenty years of construction experience to get it right. So, they call a contractor. A professional installation can easily run you $2,000 or more for a small addition.
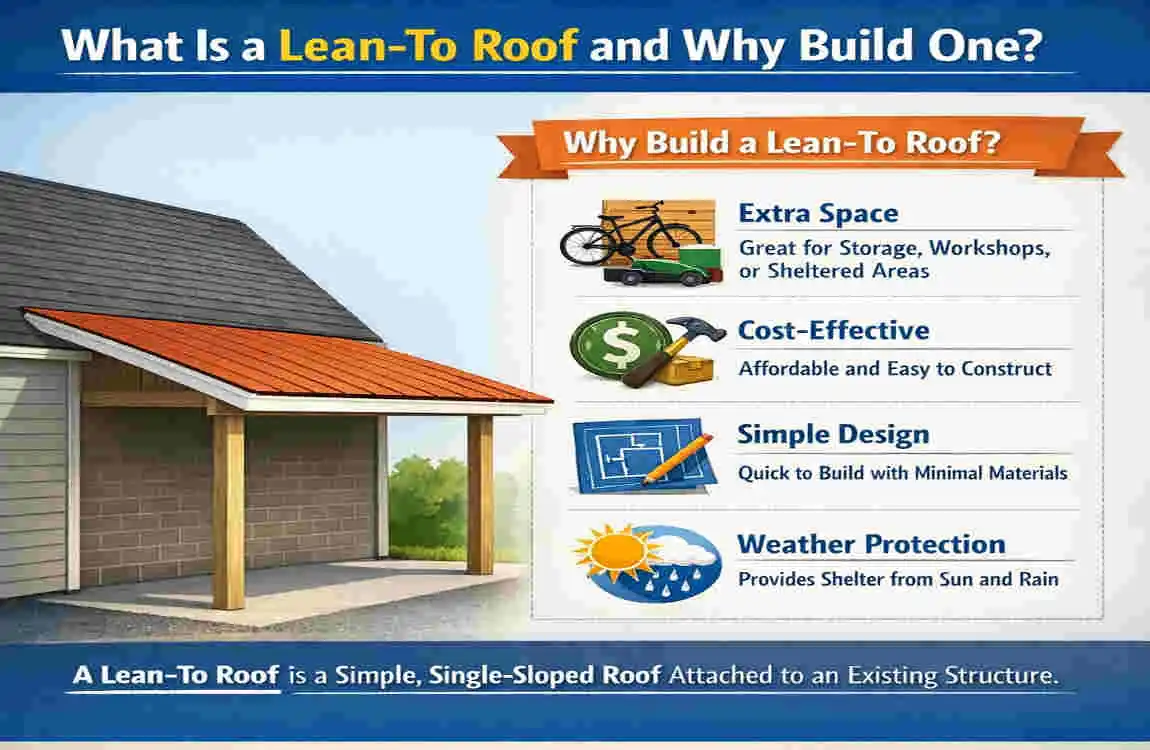
What Is a Lean-To Roof and Why Build One?
Before we dive into the sawdust and measurements, let’s make sure we are all on the same page about what we are actually building.
A lean-to roof (often called a shed roof or a skylight roof) is the simplest roof style. Imagine a flat piece of plywood. Now, lift one side of it higher than the other. That’s it. That is the basic geometry.
Structurally, it is a single-sloped roof surface that is usually attached to a taller wall—typically the side of your existing house or a garage. The rafters “lean” against the main structure, hence the name.
Why Is This the Best Project for DIYers?
If you are learning how to cut rafters for a lean-to roof, you have chosen the perfect entry point into carpentry. Here is why:
- Simplicity: You don’t have to worry about ridges, hips, valleys, or matching two sides perfectly. You are dealing with one plane and one angle.
- Drainage: Because of the slope, rain and snow slide right off. You don’t have to worry about water pooling as you do with flat roofs.
- Space Efficiency: It maximizes height on the house side (great for tall doors or windows) and lowers the profile on the yard side.
Common uses for this design include covering a deck to create an outdoor living space, building a carport to protect your vehicle, or adding a simple storage extension for garden equipment.
To help you decide if this is the right choice for your home, here is a quick breakdown of the pros and cons:
Feature Pros (The Good Stuff)Cons (Things to Consider)
Cost: Extremely affordable due to fewer materials and less waste. Adds less resale value than a complex gable addition.
Construction Fast to build; forgiving for beginners. Limited span; you can’t go excessively wide without support posts.
Aesthetics Modern, clean, and unobtrusive. It can look “tacked on” if not designed to match the house.
Durability: Excellent water runoff; easy to shingle or use metal roofing. High wind uplift risk if not tied down correctly (hurricane ties are a must!).
Tools and Materials Needed to Cut Rafters for a Lean-To Roof
You wouldn’t try to bake a cake without a mixing bowl, and you shouldn’t try to cut rafters without the right gear. Having the correct tools makes the difference between a frustrating weekend and a smooth project.
Essential Tools List
You don’t need to buy out the entire hardware store, but there are a few non-negotiables:
- Circular Saw: This is your workhorse. A standard 7-1/4 inch circular saw is perfect for cutting 2×6 or 2×8 lumber.
- Speed Square (Rafter Square): A triangle-shaped tool, usually made of aluminum. It is absolutely critical for marking angles. Do not try to guess the angles; the speed square does the math for you.
- Tape Measure: Get a sturdy 25-foot tape with a wide blade so it doesn’t flop around when you are measuring long spans.
- Chalk Line: This helps you snap a perfectly straight line across the tops of your rafters if you need to trim them after installation, or to mark your ledger board on the house.
- Level: A 4-foot level is best for ensuring your posts and ledger board are perfectly plumb and level.
- Hammer and Framing Pencil: A thick carpenter’s pencil won’t break on rough lumber like a standard No. 2 pencil will.
- Safety Gear: This is not optional. Safety glasses to protect against flying wood chips, ear protection (saws are loud!), and sturdy work gloves.
Materials Breakdown
- Lumber: You will likely be using 2×6 or 2×8 boards for the rafters. If your lean-to is outside, make sure you buy pressure-treated lumber. This wood is treated with chemicals to resist rot, bugs, and moisture.
- Ledger Board: The board that bolts to your house.
- Hardware: Joist Hangers: Metal brackets that hold the rafters to the ledger board.
- Hurricane Ties: Metal clips that secure the rafters to the outer beam so the wind doesn’t lift the roof off.
- Galvanized Nails/Screws: “Galvanized” means they won’t rust.
Cost Estimate
If you are budgeting, expect to pay roughly $10 to $25 per rafter, depending on the length of the wood and lumber prices in your area.
Pro Tip: If you don’t own a circular or chop saw, consider renting one. However, a decent circular saw costs about the same as a two-day rental, so it is often better to buy it and keep it for future repairs.
Planning Your Lean-To Roof: Measurements and Design
Okay, grab your notepad. This is the part where people get nervous, but I promise we will keep the math simple. Accurate planning ensures that when you actually cut rafters for a lean-to roof, they fit like a glove.
The Three Magic Numbers
You need to know three things before you buy a single piece of wood:
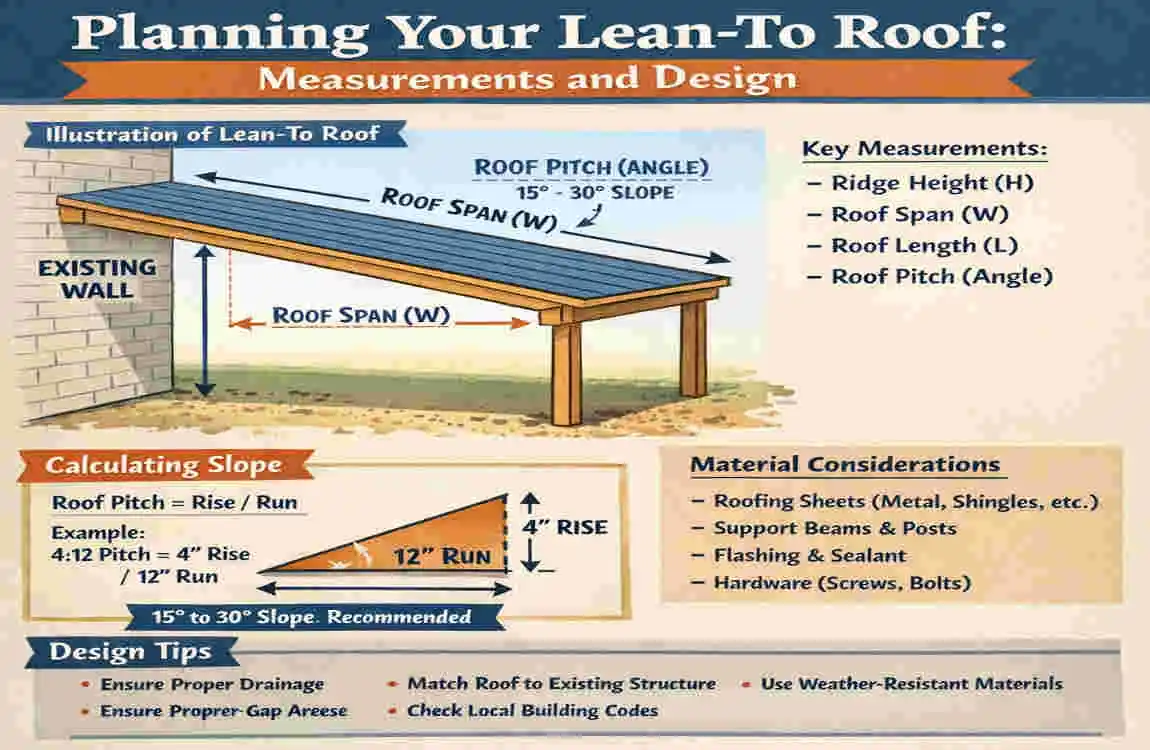
- The Run: The horizontal distance from the house wall to the outside edge of your support beam. Think of it as the “floor” distance.
- The Rise: The difference in height between the roof and the outer wall. If the ledger board is 10 feet high and the outer beam is 8 feet high, your Rise is 2 feet.
- The Span: This determines the thickness of your wood. For most DIY lean-to roofs, 2x6s work for shorter spans, while 2x8s or 2x10s are needed for wider porches.
Calculating Rafter Length
We need to go back to high school math for just one second—Pythagoras’ Theorem ($a^2 + b^2 = c^2$).
To find the length of your rafter (not including the overhang): $$ \sqrt{(Run)^2 + (Rise)^2} = \text{Rafter Length} $$
Example: Let’s say your roof extends 10 feet (the Run) and rises 2 feet (the Rise).
- $10 \times 10 = 100$
- $2 \times 2 = 4$
- $100 + 4 = 104$
- The square root of 104 is roughly 10.2 feet.
So, your rafter needs to be at least 10.2 feet long between the supports. You will then add extra length to the overhang (the part that extends past the posts). Usually, an overhang of 12 to 18 inches looks best.
Sketching Your Layout
Draw a simple diagram—Mark where your rafters will go. Standard spacing is 16 inches on-center or 24 inches on-center. This means the center of one rafter is 16 (or 24) inches away from the center of the next one.
If you plan to apply heavy snow loads to this roof, stick to 16-inch spacing. If it’s just a light shade structure, 24 inches might be fine.
Understanding Rafter Angles and Birdsmouth Cuts
This is the secret sauce. If you master this section, you have officially mastered how to cut rafters for a lean-to roof.
Lean-To Roof Rafter Pitch Explained
Roofers talk about “pitch.” Pitch is just the angle of the roof, described as a ratio. It tells you how many inches the roof rises for every 12 inches of horizontal run.
- A 4:12 pitch means the roof goes up 4 inches for every foot of length.
- A 1:12 pitch is very flat (barely any slope).
- A 12:12 pitch is very steep (a 45-degree angle).
For a lean-to, a 2:12 to 4:12 pitch is very common. It’s steep enough to drain water but flat enough to walk on if necessary.
Why Do You Need a Birdsmouth Cut?
You cannot just rest a slanted board on a flat beam; it will wobble and slide. You need to cut a notch into the rafter so it sits flat and securely on the top plate of your wall.
This notch is called a birdsmouth because, well, it looks like an open bird’s beak. It consists of a vertical cut (the heel) and a horizontal cut (the seat).
How to Calculate Rafter Angles
This is where your Speed Square becomes your best friend. Look at the hypotenuse (the long edge) of the square. You will see numbers listed under “Common Top Cut” or “Pitch.”
If you decided on a 4:12 pitch, you literally line up the pivot point of the square on the edge of the board and rotate it until the “4” on the Common scale lines up with the edge of the board. Draw your line. Boom—that is your angle.
Common Angles Reference:
- 3:12 Pitch: ~14 degrees
- 4:12 Pitch: ~18.4 degrees
- 5:12 Pitch: ~22.6 degrees
- 6:12 Pitch: ~26.5 degrees
Step-by-Step Guide: How to Cut Rafters for a Lean-To Roof
Alright, put on your safety glasses. We are going to cut some wood. We will focus on making one perfect “pattern rafter.” Once you have one perfect rafter, you will trace it onto all the other boards.
Mark Your Rafter Template
Grab your straightest, cleanest piece of lumber. This will be your template. If this one is wrong, they will all be wrong, so take your time.
Place the board on sawhorses. First, determine the “crown.” Look down the edge of the board. Most wood curves slightly. You want the “hump” of the curve facing up (towards the sky). This is the top of your rafter.
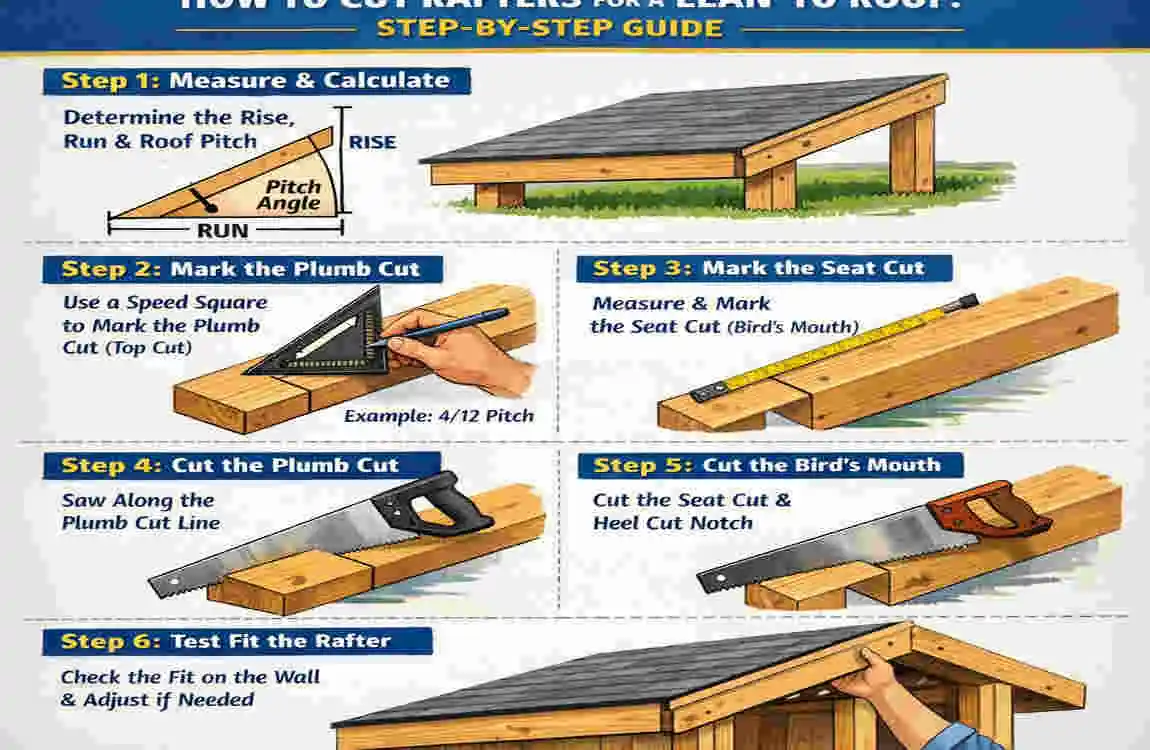
The Top Plumb Cut: Go to one end of the board. This is the end that will touch your house.
- Hold your speed square pivot point against the top edge.
- Rotate the square to your pitch number (e.g., the number 4 mark).
- Draw a line along the straight edge of the square.
- This line is your plumb cut. When the rafter is slanted, this cut will be perfectly vertical, sitting flush against your ledger board.
Measure the Length and Mark the Bird smouth
Now, hook your tape measure on the top tip of that plumb line you just drew. Measure down the board the exact length of your Run calculation (from the math section earlier). Make a mark on the side of the board.
This mark represents the outside edge of your supporting wall or beam.
Now, we mark the Birdsmouth:
- Place your speed square at that mark, using the same pitch angle (e.g., the 4 mark). Draw a line. This is the Heel Cut (vertical).
- Now, slide the square to draw a perpendicular line to the heel cut. This is the Seat Cut (horizontal).
- Critical Rule: The seat cut should be the width of your wall (usually 3.5 inches for a 2×4 wall or 5.5 inches for a beam).
- Don’t cut too deep! The birdsmouth should never eat up more than 1/3 of the depth of the rafter. If you cut out too much wood, the rafter will snap under a heavy snow load.
Cut the Top Plumb and Tail Overhang
Before you pick up the saw, let’s finish the markings. You don’t want the rafter to end right at the beam; you want an overhang.
From the birdsmouth heel cut, measure the desired overhang (e.g., 12 inches). Use your speed square to draw one final line parallel to the plumb cut. This is the Tail Cut.
Time to Cut:
- Secure the board with clamps.
- Set your circular saw depth so it cuts just through the wood.
- Cut the Top Plumb Cut first.
- Cut the tail. Cut at the bottom.
Making the Birdsmouth Cut (The Tricky Part)
Cutting the birdsmouth requires finesse.
- Use your circular saw to cut along the Heel Line. Stop the saw blade exactly where the lines meet in the corner. Do not overcut!
- Cut along the Seat Line. Again, stop exactly at the corner.
- Because the circular saw blade is round, it won’t cut all the way through the wood at the bottom corner.
- Finish the cut with a handsaw or a jigsaw. This keeps the notch clean and maintains the rafter’s structural integrity.
- Knock out the block of wood. You should have a clean, triangular notch.
Test Fit and Cut the Rest
Stop! Do not cut the other 10 rafters yet.
Take your template rafter and lift it into position.
- Does the top flush cut sit tight against the ledger board?
- Does the birdsmouth sit flat on the outer beam?
- Is it level?
If it fits perfectly, congratulations! You have done the hard part.
Now, take that template, lay it over your other boards, and trace the pattern precisely. This method (called “gang cutting” if you clamp them, or just “pattern tracing”) ensures that every single rafter is identical. If you measured each one individually, slight variations would make your roof look wavy.
Install the Rafters:
- Nail the birdsmouth into the top beam (toe-nailing) or use hurricane ties (recommended).
- Secure the top end into the joist hangers on your ledger board.
Safety Tips and Common Mistakes When Cutting Lean-To Roof Rafters
Working with power tools and heavy lumber overhead has risks. Here is how to keep all your fingers and avoid a roof collapse.
Top Safety Rules
- Watch for Kickback: When cutting the birdsmouth, the saw can bind. Grip the saw firmly with both hands and never stand directly behind the blade path.
- Secure Your Workpiece: Never try to hold the wood with one hand and saw with the other. Use clamps or sawhorses.
- Ladder Safety: When installing, ensure your ladder is on solid ground. Don’t overreach; move the ladder.
Common Mistakes to Avoid
- The “Seat Cut” is Too Wide: If your seat cut is wider than the beam it sits on, the rafter will split. The seat cut should match the beam width (e.g., 3.5 inches).
- Overcutting the Notch: As mentioned, cutting deeper than 1/3 of the board width weakens the rafter significantly. If you need a deeper cut, you need a wider board (upgrade from 2×6 to 2×8).
- Ignoring the Crown: If you don’t face the “hump” of the wood up, your roof will sag over time. If you install humps up and down, your roof will look like a roller coaster.
Finishing Your Lean-To Roof: Sheathing to Shingles
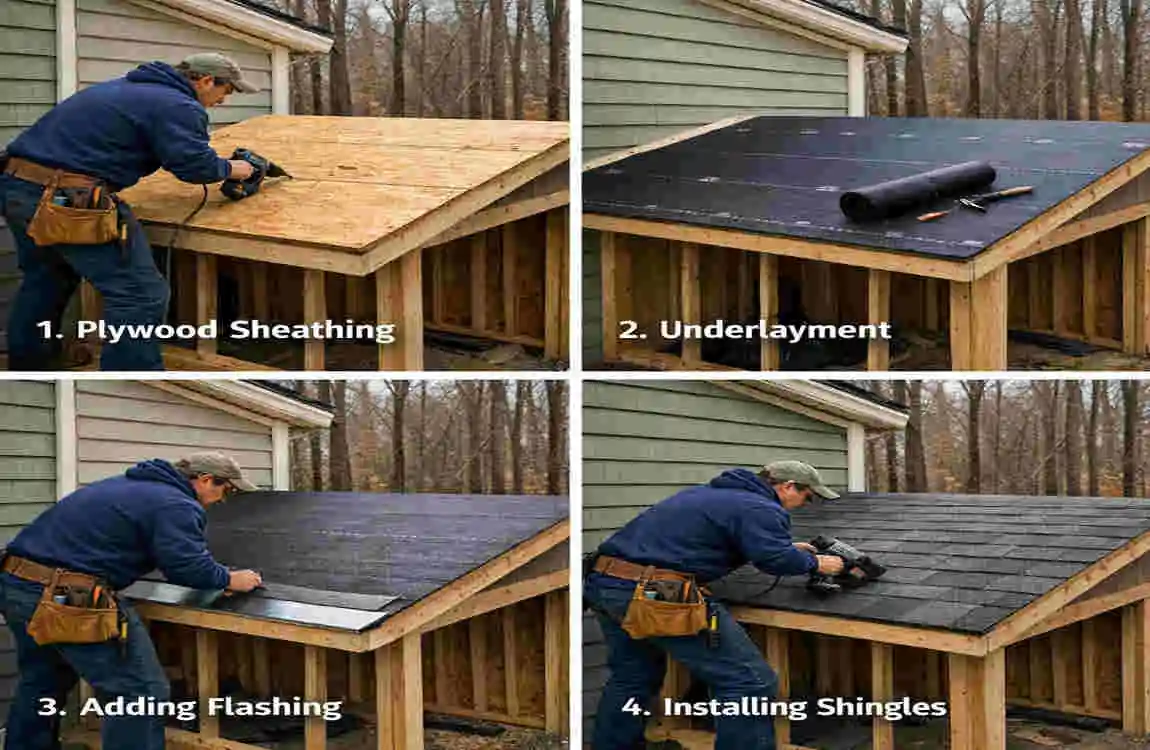
Once your rafters are cut and installed, you have a beautiful skeleton. Now you need to put some skin on it.
- Sheathing: Nail sheets of plywood or OSB (Oriented Strand Board) across the rafters. This ties everything together and makes the structure rigid.
- Drip Edge: install metal drip edging along the eaves. This stops water from curling back under the shingles and rotting your wood.
- Underlayment: Roll out roofing felt or synthetic underlayment. This is your second line of defense against leaks.
- Roofing Material: For a lean-to with a low slope (low pitch), be careful with standard shingles. If the pitch is very low (below 2:12), shingles might leak. In that case, use roll roofing or corrugated metal sheets. Metal roofing is fantastic for lean-to structures because it’s lightweight and easy to install in long sheets.
Cost Breakdown and Time Estimate for DIY Lean-To Roof
Is it worth your time? Absolutely. Here is what you can expect for a standard 10×12-foot lean-to roof.
Component Estimated Cost Estimated Time
Rafters (approx. 10 boards) $150 – $250 2 – 3 hours (cutting)
Hardware (Hangers, screws) $50 – $80 –
Tool Rental (if needed) $50 – $100 –
Roofing / Sheathing $300 – $500 4 – 6 hours
TOTAL $550 – $1,000 1 – 2 Days
Compare that to a contractor quote of $2,500+, and you are paying yourself a very nice hourly wage to learn a new skill!
FAQs: How to Cut Rafters for a Lean-To Roof
Q: How deep should the birdsmouth cut be? A: The golden rule is never cut more than one-third of the depth of the rafter. For a 2×6 (which is actually 5.5 inches wide), your vertical heel cut should be no more than about 1.5 to 1.75 inches deep.
Q: Can I use metal rafters instead of wood? A: Yes, steel C-channel rafters are common for carports. However, cutting them requires an angle grinder or a metal chop saw, and the attachment methods (welding or self-tapping bolts) differ. Wood is generally easier for DIYers.
Q: What is the best pitch for a beginner to cut? A: A 4:12 pitch is a sweet spot. It creates a nice angle for water runoff, it looks standard for most homes, and the math is easy to read on the speed square.
Q: Do I need to cut rafters if I use brackets? A: There are products called “rafter ties” or adjustable brackets that can pivot to the angle of the roof. These can sometimes eliminate the need for a birdsmouth cut on the bottom, but you will still need to cut the top angle (plumb cut) to fit against the house.