Introduction
Welcome to our blog post on how to stagger architectural shingles! If you’re a homeowner or DIY enthusiast looking to spruce up your roof, you’ve come to the right place. Architectural shingles not only provide excellent protection for your home but also add a touch of elegance and style. In this article, we’ll guide you through the process of properly staggering these shingles, ensuring a beautiful and durable finish that will make your neighbors green with envy. So grab your tools and let’s get started on this exciting roofing adventure!
Materials Needed
When it comes to staggering architectural shingles, having the right materials is essential. Here are some key items you’ll need to get started:
1. Architectural Shingles: These are specifically designed for durability and aesthetics. Make sure to choose high-quality shingles that match the style of your home.
2. Roofing Nails: You’ll need plenty of roofing nails to secure the shingles in place. Opt for galvanized nails as they are less prone to rusting.
3. Hammer or Nail Gun: A hammer can be used if you prefer a hands-on approach, while a nail gun can make the process faster and more efficient.
4. Utility Knife: A sharp utility knife will come in handy for cutting shingles as needed, especially around edges and corners.
5. Chalk Line: This tool will help you create straight lines on your roof, ensuring a professional-looking installation.
6. Ladder or Scaffolding: Depending on the height of your roof, you may need a sturdy ladder or scaffolding system for safe access.
7. Safety Gear: Don’t forget about safety! Wear gloves, goggles, and non-slip footwear to protect yourself while working at heights.
Remember, these are just some of the basic materials needed for staggering architectural shingles. Be sure to consult with professionals or reference detailed guides before starting your project!
Step One
Before you begin staggering architectural shingles, it’s crucial to make sure your roof is ready for installation. This step sets the foundation for a successful project and ensures that your shingles will be properly aligned and secure.
First, gather all the necessary materials and tools. You’ll need a ladder, safety equipment such as gloves and goggles, a roofing hammer or nail gun, roofing nails or screws, and of course, the architectural shingles themselves.
Next, inspect the roof for any damage or issues that may affect the installation process. Look out for loose or missing shingles, rotting wood, or signs of water damage. It’s important to address these issues before proceeding with installing new shingles.
Clean any debris off the surface of your roof using a broom or blower. This includes leaves, branches, dirt – anything that could interfere with proper adhesion between the old and new shingles.
Once everything is clear and in good condition, install underlayment if needed. Underlayment provides an extra layer of protection against moisture and helps improve overall stability.
Remember to take safety precautions throughout this entire process by wearing appropriate gear like non-slip shoes and working during favorable weather conditions.
By thoroughly preparing your roof in Step One,you’ll set yourself up for success when it comes time to stagger those beautiful architectural shingles! So let’s move on to Step Two – aligning the first row…
Step Two
Laying the First Row of Shingles
Now that you’ve completed step one, it’s time to move on to the next phase of staggering architectural shingles – laying the first row. This is a crucial step in ensuring a sturdy and visually appealing roof.
Start by placing your first shingle at the bottom edge of the roof, making sure it overhangs slightly. Align it with your chalk line to ensure straightness and accuracy. Secure it in place using roofing nails, being careful not to hammer them too tightly as this can damage the shingle.
Continue installing subsequent shingles along the bottom row, overlapping each one by about 4-6 inches. This overlap helps prevent water from seeping through gaps between the shingles and ensures proper drainage.
As you work your way up, be mindful of maintaining consistent spacing between each shingle. Using a spacer tool or even a spare set of hands can help ensure equal spacing throughout.
Remember to always follow manufacturer guidelines for installation and consider consulting with a professional roofer if you’re unsure about any steps along the way.
Stay tuned for step three, where we’ll delve into additional techniques for staggering architectural shingles like a pro!
Step Three
Now that you have completed the first two steps, it’s time to move on to the crucial task of staggering your architectural shingles. This step is essential for achieving a visually appealing and durable roof.
To start, carefully place the next row of shingles above the previous row. Make sure there is a minimum overlap of 6 inches between each shingle. This overlap helps prevent water from seeping through and ensures better wind resistance.
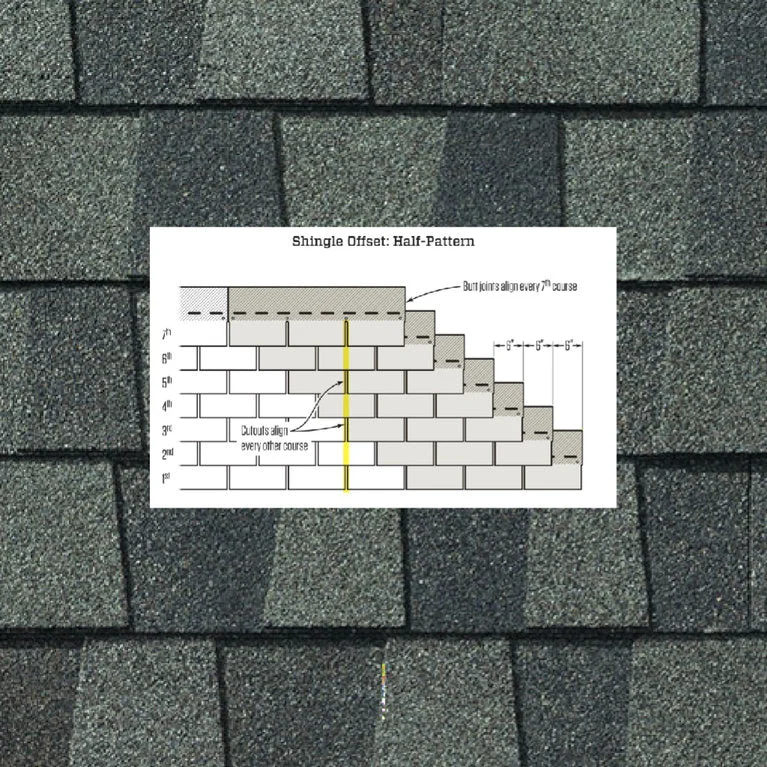
As you progress across each row, remember to vary the vertical alignment of the shingles. By doing this, you create an attractive pattern that adds dimension and interest to your roof. It also helps distribute weight evenly, enhancing its structural integrity.
Take note not to line up any horizontal seams from one row to another. Doing so can weaken your roof’s protective barrier against moisture infiltration. Instead, offset each seam by at least 12 inches horizontally for optimal performance.
Throughout this process, pay close attention to maintaining straight lines and even spacing between individual shingles within each row. Using chalk lines or other guides can assist in achieving accuracy.
Remember that proper installation techniques are vital for long-lasting results and ensuring warranty coverage if applicable. If you’re unsure about any aspect of this process or if your project requires specialized skills, don’t hesitate to consult with a professional roofing contractor.
By following these guidelines during Step Three – staggering the architectural shingles – you’ll be well on your way to creating an aesthetically pleasing and dependable roof structure!
Tips and Tricks
Now that you have learned the steps to stagger architectural shingles, let’s dive into some additional tips and tricks to ensure a successful installation.
1. Plan Ahead: Before starting the project, take the time to plan out your layout. This will help you determine how many shingles you will need and identify any potential challenges or obstacles.
2. Use Full Shingles at Start and End Rows: To maintain a clean appearance, use full shingles at both the start and end rows of each section. This will create a seamless transition between sections.
3. Nail Placement: When nailing down the shingles, be sure to follow manufacturer guidelines for nail placement. Using too few nails can lead to loose or damaged shingles, while using too many can cause them to crack or buckle.
4. Maintain Proper Overhang: It is important to maintain a consistent overhang throughout the installation process. Typically, this is around 1/2 inch for most architectural shingle designs. This overhang helps protect against water damage and provides an aesthetically pleasing look.
5. Consider Weather Conditions: If possible, choose a day with mild weather conditions for installing architectural shingles. Extreme heat or cold can affect their flexibility and make them more difficult to work with.
6. Keep Safety in Mind: Whenever working on your roof, always prioritize safety first! Make sure you have proper footwear with good traction and consider using safety harnesses or ropes for added security.
7. Clean Up as You Go: As you progress through each section of staggering your architectural shingles, be sure to clean up any debris along the way.
This not only keeps your work area tidy but also prevents potential hazards from falling objects when working overhead.
By following these tips and tricks,you’ll be well-equipped to install architectural singles in a professional manner.
Be patient,take your time,and don’t rush through each step.
The end result will be worth the effort,providing you with a beautiful and durable roof for years to