
To dry water trapped under laminate flooring in your home, act quickly to prevent damage. First, identify the source of the moisture and stop any active leaks. Then, remove affected flooring sections if possible to allow air circulation. Use fans, dehumidifiers, or heaters to speed up drying and prevent mould growth. Monitoring laminate flooring moisture levels is essential to ensure complete drying and avoid long-term damage.
Understanding the problem
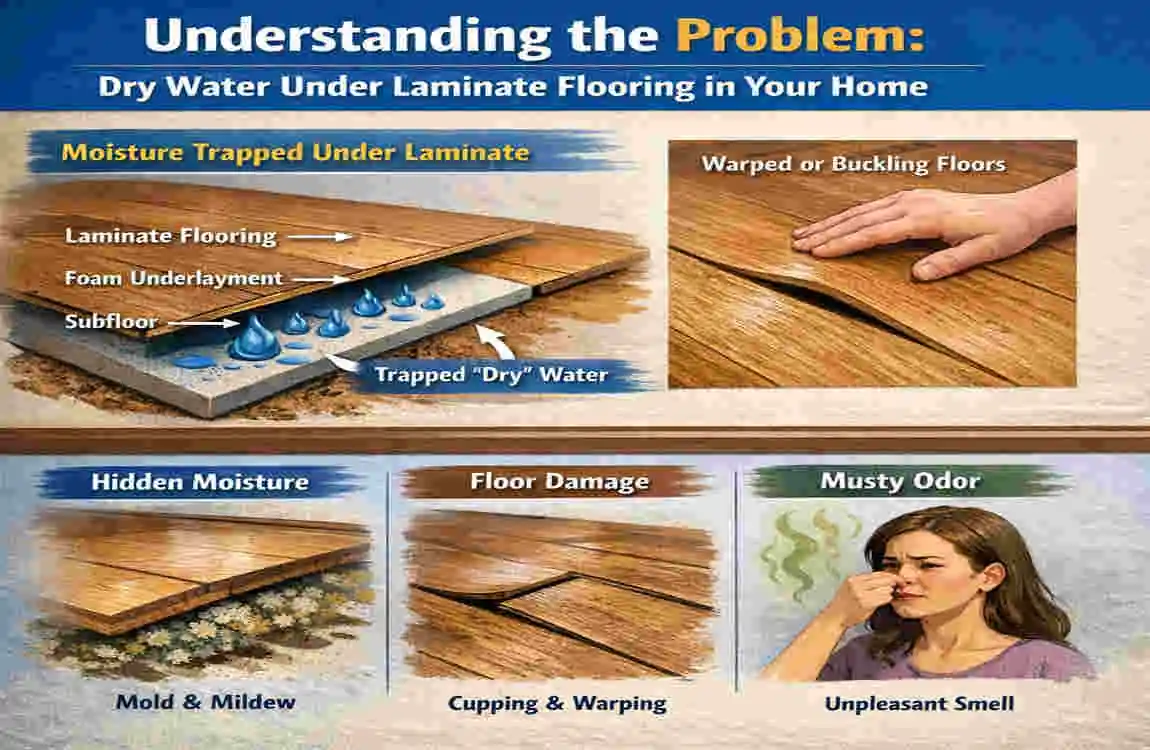
Water accumulation under laminate flooring can lead to serious issues. Often, homeowners are unaware of the problem until it becomes severe. The hidden moisture can warp and damage your floors over time.
Laminate flooring is designed to mimic wood but is not waterproof. This makes it highly susceptible to water damage if spills or leaks occur. Because these floors sit atop a foam pad, trapped moisture can linger for days or even weeks without proper intervention.
Ignoring the issue doesn’t just impact aesthetics; it creates an environment conducive to mould and mildew growth. These unwelcome guests pose health risks and further complicate home maintenance efforts.
Causes of water under laminate flooring
Water can find its way under laminate flooring due to several common issues. One major cause is the leakage of pipes or plumbing fixtures. A small crack can lead to significant water accumulation over time.
Another frequent culprit is high humidity levels in your home. Moisture from cooking, showering, or inadequate ventilation can seep into the flooring materials, creating problems.
Flooding events are also a concern. Heavy rains or overflowing gutters can result in water intrusion that seeps beneath your beautiful floors.
Steps to dry water under laminate flooring
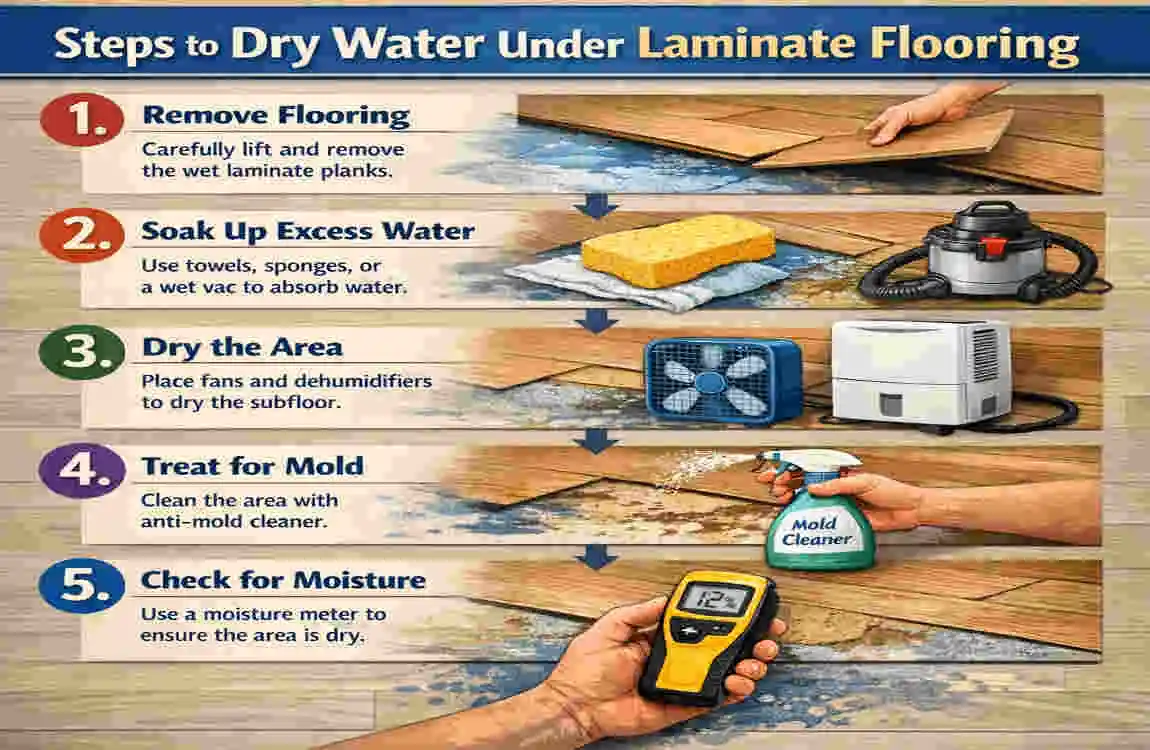
Start by pinpointing the affected area. Look for signs of warping or buckling in the laminate. This will help you understand how widespread the issue is.
Next, remove any visible water using towels or a wet vacuum if available. Act quickly to minimise damage and prevent mould growth.
Once you’ve cleared excess moisture, it’s time to bring in a dehumidifier or fans. Placing these tools around the area can significantly speed up evaporation.
If there’s still moisture lurking beneath, carefully lift the flooring planks. Make sure not to break them as you do this. Allow everything underneath to dry out completely before reinstalling.
Identify the affected area
Start by scrutinising your laminate flooring. Look for any signs of warping, buckling, or discolouration. These are telltale indicators that water has seeped underneath.
Use a flashlight to illuminate darker corners and crevices. Sometimes, the damage isn’t apparent until you closely examine every inch of the floor.
Pay attention to areas near appliances or plumbing fixtures where leaks might originate. Check around sinks, dishwashers, and washing machines—these spots are often prone to moisture accumulation.
Remove excess water
Once you’ve identified the affected area, it’s time to tackle the water. Begin by using towels or mops to soak up any standing water on top of the laminate flooring. This is crucial for preventing further damage.
If the spill is extensive, consider using a wet vacuum. These machines are designed to extract large volumes of liquid efficiently and can save you time and effort.
Use a dehumidifier or fans
Once you’ve removed excess water, using a dehumidifier can work wonders. These machines pull moisture from the air and help speed up the drying process significantly. Please place it in the affected area to create an optimal environment for drying.
If you don’t have a dehumidifier handy, fans are your next best option. Position them strategically around the room. Make sure they blow air across damp surfaces to enhance evaporation.
Combining both tools can be especially effective. While the dehumidifier lowers humidity levels, fans circulate airflow, preventing stagnant pockets of moisture that could linger under your laminate flooring.
Lift the flooring and dry underneath
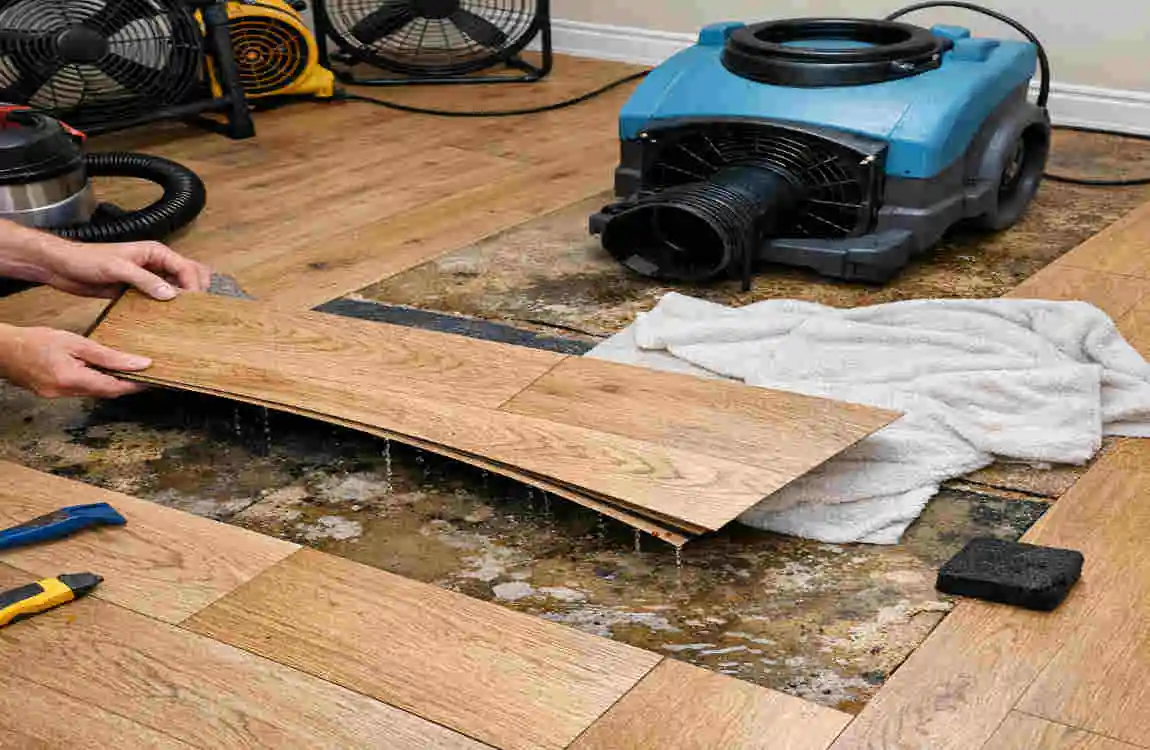
If the water persists after your initial efforts, lifting the laminate flooring may be necessary. Start by carefully removing baseboards or trims to access the edges of the planks.
Once you have exposed the seams, gently pry up a few boards using a flat tool. Be cautious not to damage them during this process. It’s essential to lift only as much flooring as needed to let air circulate beneath.
After raising these sections, use towels or rags to soak up any remaining moisture underneath. This step is crucial in preventing mould and further damage.
Introduce fans for better airflow under the lifted planks. Positioning them strategically will accelerate drying time and effectively reduce humidity levels in that space. Ensure you monitor progress regularly; everything must dry thoroughly before reassembling your home flooring.
Preventing future water damage
Preventing future water damage requires proactive measures. Start by regularly inspecting your plumbing for leaks or signs of wear. Even small drips can lead to significant problems over time.
Consider using moisture barriers when installing laminate flooring, especially in areas prone to spills or humidity. This extra layer can help protect against unforeseen water exposure.
Keep an eye on indoor humidity levels. Using a dehumidifier in damp spaces, such as basements, will create a drier environment and reduce the likelihood of moisture accumulation beneath your floors.
Educate household members about promptly cleaning up spills and addressing any flooding issues immediately. Quick action is key to minimising potential damage.
Professional help vs DIY
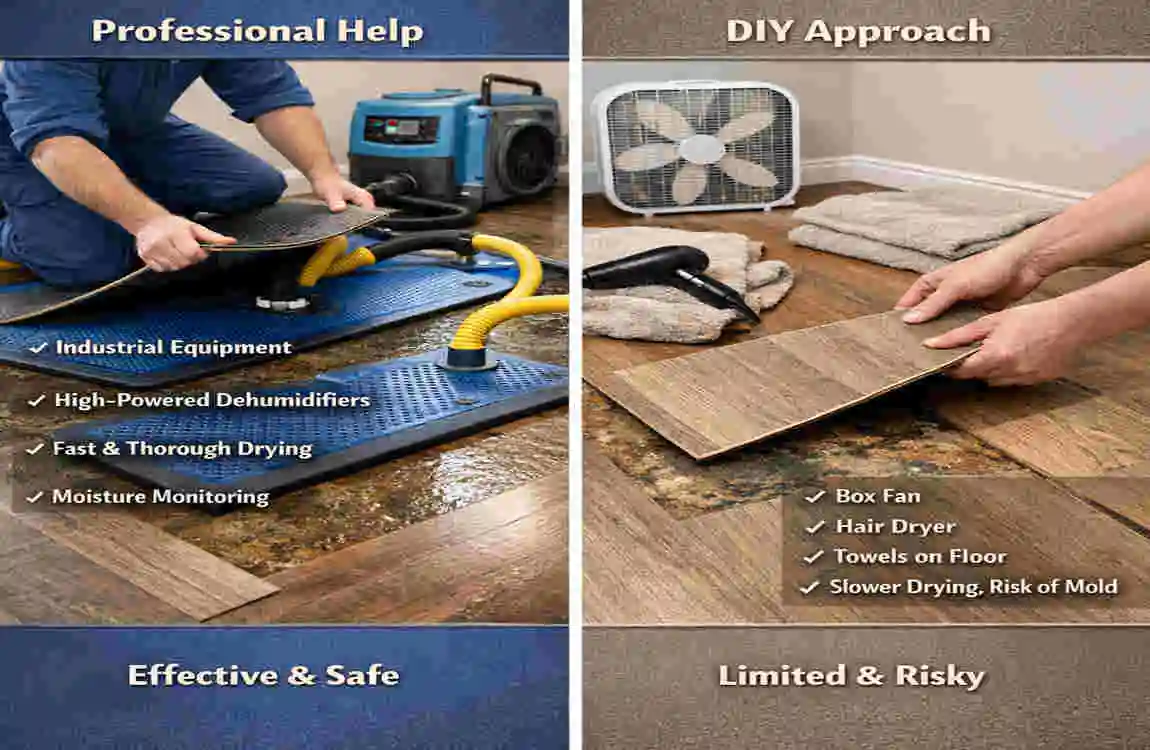
When faced with water under laminate flooring, deciding whether to call in professionals or tackle the issue yourself can be daunting. Both options have their merits and drawbacks.
Hiring a professional provides expertise and experience. They understand the nuances of moisture damage and possess specialised tools for effective drying. This route often leads to quicker resolution, minimising potential long-term damage.
On the flip side, DIY solutions can save you money. With some research and effort, homeowners can effectively manage minor leaks or spills. However, improper techniques might worsen the situation, leading to mould growth or warped flooring.
FAQ: How to Dry Laminate Flooring With Water Under It
Can laminate flooring dry out if water gets under it?
Sometimes, yes—but only if you act fast. If the water sits too long, the laminate core can swell, warp, or separate, and damaged planks may need replacement.
What should I do first?
Stop the water source right away. Then remove all standing water using towels, a wet vacuum, or a mop.
How do I dry water trapped under laminate flooring?
Use this basic process:
- Remove surface water
- Take off baseboards or trim carefully to open airflow
- Lift a few planks if possible, especially near the wet area
- Use fans, dehumidifiers, and air conditioning
- Dry the subfloor completely before reinstalling anything
Can I use a hair dryer or heater?
You can use gentle airflow, but avoid strong direct heat. Too much heat can warp the laminate or make the damage worse.
How long does it take to dry?
Usually 24 to 72 hours, but it can take longer depending on how much water got underneath and what type of subfloor you have.
How do I know if the laminate is ruined?
Signs of permanent damage include:
- Swelling
- Buckling
- Soft spots
- Peaked edges
- Musty smell
- Discoloration
If you notice these, the affected planks often need to be replaced.
Do I need to remove the flooring?
If only a small area got wet and you caught it quickly, maybe not. But if water spread underneath for hours or days, lifting planks is usually the safest option.
Can mold grow under laminate flooring?
Yes. If moisture stays trapped underneath, mold and mildew can develop, especially on the underlayment or subfloor.
When should I call a professional?
Call a pro if:
- The leak was large
- Water sat for more than 24 hours
- You smell mold
- The floor feels spongy
- The planks are warping or lifting
What is the biggest mistake to avoid?
Don’t just dry the top surface and assume it’s fixed. The real problem is often under the planks.