
Your bathroom is one of the most important rooms in your home, and keeping it pristine isn’t just about appearances. It’s about creating a healthy, comfortable environment for you and your family.
Here’s the thing though. Even if you’re diligent about scrubbing your toilet bowl regularly, there’s one sneaky spot that often gets overlooked – the area under the toilet rim. You know, that hidden ledge where water flows from those tiny holes? Yeah, that place. It’s like the forgotten corner of your bathroom that secretly harbors all sorts of unpleasant surprises.
Today, we’re diving deep into the nitty-gritty of how to clean under toilet rim effectively. We’ll explore why this often-neglected area deserves your attention, what tools you’ll need, and most importantly, how to tackle this cleaning bathroom house challenge like a pro.
Understanding the Toilet Rim Area
What Exactly Is the Toilet Rim?
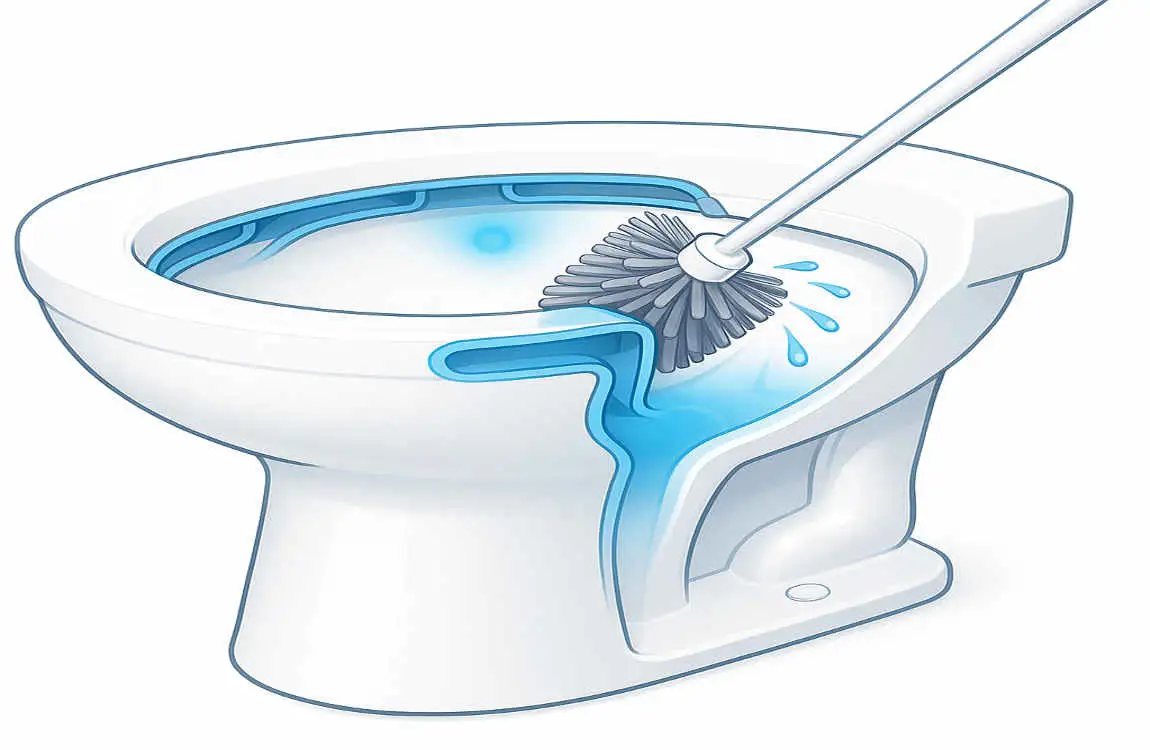
Before we roll up our sleeves and get to work, let’s take a moment to understand what we’re dealing with. The toilet rim is that curved edge at the top of your toilet bowl. It’s not just a simple edge though – it’s actually a complex design feature with small holes (called rim jets or rim holes) that release water when you flush.
These rim jets are strategically placed to create a swirling water pattern that helps clean the bowl. Pretty clever, right? But here’s the catch – this same design that helps keep your toilet clean also creates the perfect hiding spots for dirt, bacteria, and mineral deposits.
Common Issues Lurking Under the Rim
You might be wondering what’s really going on under there. Well, brace yourself because it’s not pretty:
Mineral buildup is probably the most common culprit. If you live in an area with hard water, those minerals in your water supply gradually accumulate under the rim. They form crusty, white or yellowish deposits that can eventually block those important rim jets.
Bacteria and mold absolutely love the dark, moist environment under the toilet rim. These microorganisms can multiply rapidly, creating unsightly black or orange stains. And yes, they’re as gross as they sound.
Rust stains can also develop, especially in older toilets or homes with iron-rich water. These stubborn orange-brown marks aren’t just ugly – they can be incredibly difficult to remove once they’ve set in.
Health and Hygiene Implications
Now, I don’t want to alarm you, but ignoring the area under your toilet rim isn’t just a cosmetic issue. It’s a genuine health concern. Those bacteria colonies we mentioned? They can include harmful pathogens like E. coli and other disease-causing microorganisms.
Every time you flush, tiny water droplets (called toilet plume) can spray into the air, potentially carrying these germs around your bathroom. If the rim jets are partially blocked by buildup, the water flow becomes uneven, making this problem even worse.
Why Cleaning Under the Toilet Rim Is Essential
Preventing Bad Odors and Stains
Have you ever walked into your bathroom and noticed a mysterious unpleasant smell that just won’t go away? You’ve cleaned everything visible, used air fresheners, but that funky odor persists. There’s a good chance the culprit is hiding under your toilet rim.
Bacteria and mold growth under the rim produce waste products that create those stubborn bathroom odors. No amount of surface cleaning or air freshener will solve the problem if you’re not addressing the source. Regular rim cleaning eliminates these odor-causing organisms at their root.
Maintaining Overall Bathroom Hygiene
Think of your bathroom as an ecosystem. Every surface is connected, and neglecting one area affects the whole space. When you clean under the toilet rim regularly, you’re not just improving that one spot – you’re elevating the hygiene level of your entire bathroom.
Clean rim jets ensure proper water flow during flushing, which means better bowl cleaning with each use. This creates a positive cycle where your toilet stays cleaner longer, requiring less frequent deep cleaning sessions.
Avoiding Costly Damage or Repairs
Here’s something that might surprise you – neglecting rim cleaning can actually damage your toilet. When mineral deposits build up extensively, they can completely block rim jets. This forces water to find alternative paths, potentially causing:
- Uneven wear on toilet components
- Reduced flushing efficiency
- Water backing up in unexpected places
- Premature toilet replacement needs
Professional plumbers often report finding toilets with rim jets so clogged that the entire flushing mechanism has been compromised. A little preventive cleaning can save you hundreds of dollars in repair or replacement costs.
Impact on Toilet Longevity and Efficiency
Your toilet is built to last decades with proper care. However, mineral buildup and bacterial growth under the rim can significantly shorten its lifespan. When rim jets become blocked, your toilet has to work harder to achieve the same flushing power.
This extra strain affects various components over time. The fill valve, flapper, and other internal parts wear out faster when the system isn’t functioning as designed. By keeping those rim jets clean and clear, you’re essentially giving your toilet the maintenance it needs to serve you well for years to come.
Best Tools and Cleaning Supplies Needed
Essential Cleaning Tools for Rim Cleaning
Let’s talk tools. Having the right equipment makes all the difference between a frustrating cleaning experience and getting the job done efficiently. Here’s what you’ll want in your cleaning arsenal:
Toilet Brushes
- Angled toilet brushes are your best friend for rim cleaning. Look for ones with bristles that curve to match the toilet’s contour
- Rim-specific brushes have a unique design that allows you to scrub directly under the rim without awkward maneuvering
- Disposable toilet wands with angled heads offer convenience and hygiene for quick cleanups
Alternative Scrubbing Tools
- Old toothbrushes work wonderfully for detailed scrubbing in tight spaces
- Pumice stones are fantastic for removing stubborn mineral deposits without scratching porcelain
- Bottle brushes with long, flexible handles can reach deep under the rim
- Denture cleaning brushes have the perfect size and stiffness for rim cleaning
Protective Gear
- Rubber gloves are non-negotiable – protect your hands from harsh chemicals and bacteria
- Safety goggles prevent splashes from getting in your eyes
- Face mask helps avoid inhaling cleaning fumes or disturbed particles
Best Cleaning Agents and Solutions
Now for the fun part – choosing your cleaning weapons. The market offers countless options, but not all are created equal for rim cleaning.
Natural Cleaning Solutions
White vinegar is a rim-cleaning superstar. Its acidic nature dissolves mineral deposits while killing bacteria. Plus, it’s safe, cheap, and eco-friendly.
Baking soda acts as a gentle abrasive that scrubs away stains without damaging porcelain. When combined with vinegar, it creates a fizzing action that helps lift stubborn deposits.
Lemon juice offers similar benefits to vinegar with a more pleasant scent. The citric acid cuts through buildup effectively.
Commercial Cleaners
Gel toilet bowl cleaners with angled nozzles are designed specifically for under-rim application. They cling to surfaces longer, giving the active ingredients more time to work.
Bleach-based cleaners provide powerful disinfection but require careful handling and good ventilation.
Enzyme cleaners use beneficial bacteria to break down organic matter – great for eco-conscious cleaners who still want professional results.
Comparison Table: Natural vs. Chemical Cleaners
| Aspect | Natural Cleaners | Chemical Cleaners |
|---|---|---|
| Cost | Very affordable | Moderate to expensive |
| Safety | Generally safe for all users | Require careful handling |
| Environmental Impact | Minimal | Can be harmful |
| Effectiveness on Minerals | Good with patience | Excellent and fast |
| Disinfecting Power | Moderate | Very strong |
| Fume Production | Minimal | Often strong |
| Storage Requirements | Simple | Need secure storage |
Step-by-Step Guide: How to Clean Under Toilet Rim
Preparation Steps
Before diving into the cleaning process, proper preparation sets you up for success. Trust me, taking a few minutes to prepare will make the actual cleaning much more effective and safer.
First, ensure your modern bathroom has adequate ventilation. Open windows, turn on the exhaust fan, or prop open the door. Good airflow prevents you from breathing in cleaning fumes and helps surfaces dry faster.
Next, gather all your supplies in one place. There’s nothing worse than realizing mid-clean that you forgot something important. Put on your rubber gloves and any other protective gear you’re using.
If you’re dealing with severe buildup, you might want to lower the water level in the toilet bowl. Simply turn off the water supply valve behind the toilet and flush once. This gives you better access to the rim area without water splashing back at you.
Detailed Cleaning Instructions
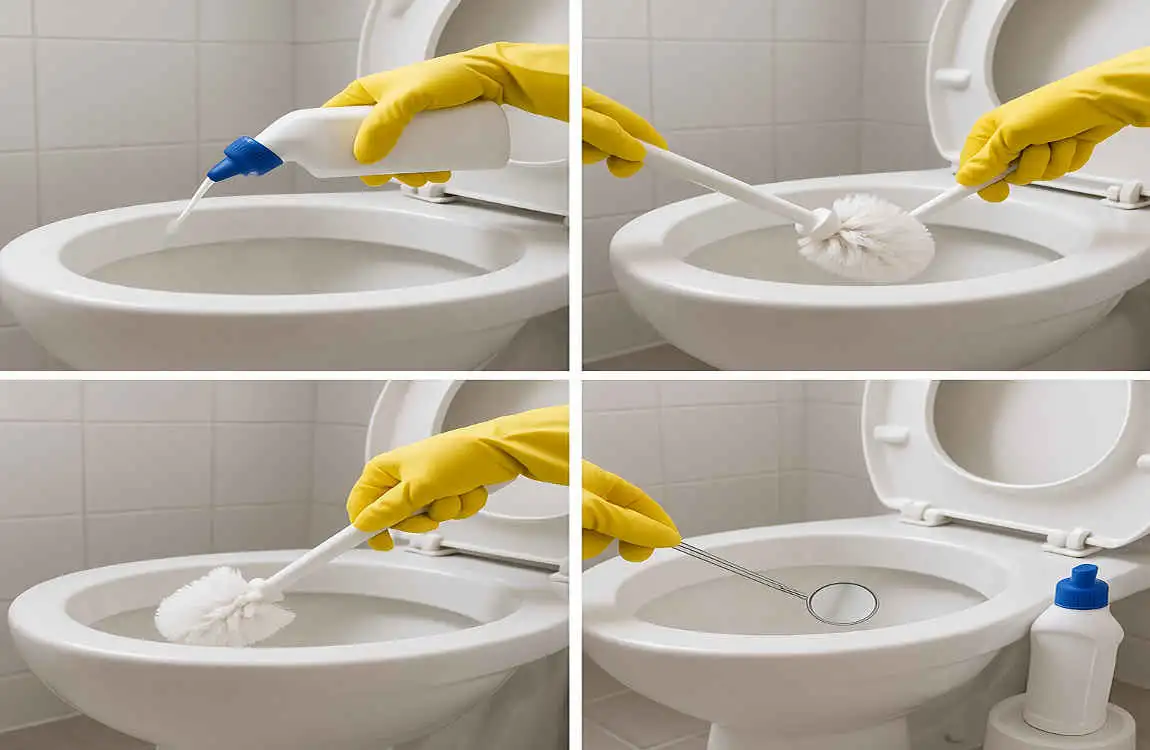
Apply Your Chosen Cleaning Agent
Start by applying your cleaner generously under the rim. If using a commercial gel cleaner, squeeze it slowly around the entire rim, making sure to get into all the nooks and crannies. For natural solutions like vinegar, use a spray bottle with an angled nozzle or carefully pour it under the rim.
Here’s a pro tip: work in sections rather than trying to cover the entire rim at once. This ensures thorough coverage and prevents the cleaner from dripping down before it has a chance to work.
Master the Scrubbing Technique
Now comes the elbow grease part. Using your angled brush or chosen tool, scrub in small circular motions under the rim. Pay special attention to the rim jets – you might need to use a toothbrush or small bottle brush to clean inside these holes properly.
Don’t rush this step. Thorough scrubbing is key to breaking up stubborn deposits. If you encounter particularly tough buildup, apply more cleaner and let it sit for a few minutes before scrubbing again.
Let the Cleaner Work Its Magic
After initial scrubbing, allow the cleaner to sit for at least 10-15 minutes. This dwell time is crucial for breaking down mineral deposits and killing bacteria. For natural cleaners like vinegar, you might want to wait 30 minutes or even longer for best results.
During this waiting period, you can clean other parts of your bathroom. Just don’t forget about your toilet!
Final Scrub and Flush
Return for a second round of scrubbing. You’ll often find that deposits come off much easier after the cleaner has had time to work. Focus on any areas that still show staining or buildup.
Once satisfied with your scrubbing, flush the toilet several times to rinse away all loosened debris and cleaning residue. If you lowered the water level earlier, remember to turn the supply valve back on first.
Inspect and Repeat if Necessary
Use a flashlight or phone light to inspect under the rim. Don’t be discouraged if some stains remain after your first attempt. Severe buildup often requires multiple cleaning sessions.
For stubborn areas, repeat the entire process. Sometimes switching between different cleaning methods (like using vinegar first, then a commercial cleaner) provides better results.
Tips for Avoiding Damage While Cleaning
Never use metal scrapers or steel wool on porcelain surfaces. While these might remove buildup quickly, they’ll leave permanent scratches that actually make future cleaning harder.
Avoid mixing different chemical cleaners. This is dangerous and can create toxic fumes. If switching products, thoroughly rinse between applications.
Be gentle around the rim jets. These holes are precisely sized for optimal water flow. Aggressive scrubbing with hard objects could damage them.
Tips and Tricks for Sparkling Results
Regular Maintenance Tips
The secret to a consistently clean toilet rim? Don’t wait for visible buildup. Establishing a regular cleaning schedule prevents those stubborn deposits from forming in the first place.
I recommend a quick rim clean once a week as part of your regular bathroom routine. This doesn’t need to be a deep clean – just a quick spray with vinegar or your preferred cleaner, a brief scrub, and a flush. These five-minute sessions save you from hour-long deep cleans later.
Create a cleaning reminder on your phone or add it to your household chore chart. Consistency is key, and having a reminder helps establish the habit.
Using Rim Blocks and Automated Cleaners
Gel rim blocks that stick under the rim provide continuous cleaning action with every flush. While they don’t replace manual cleaning, they significantly extend the time between deep cleans.
In-tank cleaning tablets slowly release cleaning agents into the water, helping prevent mineral buildup. Just be cautious with these if you have pets that might drink from the toilet.
Automatic toilet bowl cleaners that hang on the rim offer similar benefits. Look for ones specifically designed to clean under the rim with each flush.
Homemade Cleaning Solutions You Can Try
Want to save money and avoid harsh chemicals? Here are some effective DIY rim cleaners:
Vinegar and Baking Soda Paste: Mix 1/2 cup baking soda with enough vinegar to form a paste. Apply under the rim and let sit for 30 minutes before scrubbing.
Borax and Lemon Juice: Combine 1/4 cup borax with fresh lemon juice to create a powerful, natural cleaner that smells great too.
Hydrogen Peroxide Spray: Mix equal parts hydrogen peroxide and water in a spray bottle for a disinfecting cleaner that’s safe and effective.
Cleaning Frequency Recommendations
- Light cleaning: Once a week for maintenance
- Deep cleaning: Monthly for average households
- Heavy-duty cleaning: Every 2 weeks for hard water areas
- Professional-level cleaning: Quarterly for optimal toilet health
Keeping Your Toilet Fresh After Cleaning
After all that hard work, you want your toilet to stay fresh as long as possible. Drop a few drops of essential oil (like tea tree or eucalyptus) in the toilet tank for natural deodorizing with each flush.
Keep the bathroom well-ventilated to prevent moisture buildup that encourages bacterial growth. Run the exhaust fan during and after showers.
Consider installing a toilet night light. Being able to see what you’re aiming at (especially for the gentlemen) means less mess and easier maintenance.
Troubleshooting Common Problems
Dealing with Stubborn Limescale and Rust
Sometimes, despite your best efforts, those mineral deposits just won’t budge. Don’t give up! Here’s how to tackle the toughest buildup:
For severe limescale, create a stronger acidic solution by heating white vinegar (don’t boil it) and applying it hot under the rim. The heat helps the acid work faster. Let it sit for at least an hour before scrubbing.
Rust stains require a different approach. Commercial rust removers work well, but you can also try a paste made from cream of tartar and hydrogen peroxide. Apply thickly, wait 30 minutes, then scrub gently.
CLR (Calcium, Lime & Rust remover) is specifically formulated for these tough deposits. Use it according to package directions, ensuring good ventilation.
Handling Mold and Mildew
Black or orange stains under the rim often indicate mold or mildew growth. These require disinfection, not just cleaning.
Bleach solutions (1 part bleach to 10 parts water) effectively kill mold spores. Apply carefully, let sit for 10 minutes, then scrub and rinse thoroughly.
For a natural alternative, use straight hydrogen peroxide or tea tree oil mixed with water. These have antifungal properties without the harsh fumes of bleach.
After treating mold, address the moisture problem that allowed it to grow. Improve bathroom ventilation and check for any leaks around the toilet.
Preventing Toilet Bowl Discoloration
Sometimes cleaning under the rim can reveal or cause discoloration in the toilet bowl. This usually happens when mineral deposits dissolve unevenly, leaving streaks or patches.
To prevent this, always clean the entire toilet when doing rim maintenance. Use the same cleaner throughout for consistent results.
If discoloration occurs, do a full toilet cleaning with a mild abrasive like baking soda to even out the appearance.
When to Call a Professional
Sometimes, DIY cleaning isn’t enough. Call a plumber if:
- Rim jets remain blocked after multiple cleaning attempts
- You notice cracks or damage under the rim
- The toilet isn’t flushing properly despite clean rim jets
- There’s persistent sewage odor that cleaning doesn’t fix
Eco-Friendly Cleaning Options
Green Cleaning Products That Work
Being environmentally conscious doesn’t mean sacrificing cleaning power. Many eco-friendly products work just as well as traditional cleaners for rim maintenance.
Plant-based enzyme cleaners use natural bacteria to break down organic matter and mineral deposits. They’re safe for septic systems and won’t harm aquatic life.
Citric acid powder (available at brewing supply stores) provides powerful mineral-dissolving action without toxic fumes. Mix with water to create an effective rim cleaner.
Seventh Generation and Method make toilet cleaners specifically designed for rim cleaning with plant-based ingredients.
DIY Natural Cleaners for Sensitive Households
For families with allergies, pets, or small children, natural cleaners provide peace of mind. Here’s a simple recipe that works great:
All-Purpose Rim Cleaner:
- 2 cups white vinegar
- 1 cup water
- 20 drops tea tree essential oil
- 10 drops lavender essential oil
Mix in a spray bottle and shake before each use. The tea tree provides antimicrobial properties while lavender adds a pleasant scent.
Effectiveness of Eco-Friendly Methods
You might wonder if green cleaners really work as well as chemical alternatives. The answer is yes – with a few caveats.
Natural cleaners often require longer contact time to achieve the same results. What a chemical cleaner might do in 10 minutes, a natural solution might need 30 minutes to accomplish.
They also benefit from more frequent application. Because they’re gentler, using them more often prevents heavy buildup that requires harsh chemicals.
The combination of mechanical action (scrubbing) with natural cleaners often produces results equal to chemical cleaners alone.
How Cleaning Under the Toilet Rim Fits Into Overall Bathroom Care
Coordinating with Other Cleaning Tasks
Smart bathroom cleaning is about working efficiently. When you clean under the toilet rim, it makes sense to tackle related tasks simultaneously.
Start from the top down – clean the toilet tank top, then the rim, then the bowl, and finally the base and floor around the toilet. This prevents re-contaminating cleaned areas.
While your rim cleaner is dwelling, clean the sink and counter. By the time you’re done, the toilet cleaner has had time to work its magic.
Use similar products throughout the bathroom when possible. If you’re using vinegar for the toilet rim, use it on faucets and shower doors too for consistent results.
Importance of Regular Deep-Clean Routines
Establishing a bathroom deep-clean routine that includes rim cleaning prevents overwhelming buildup. Here’s a suggested schedule:
Weekly: Quick rim spray and scrub, toilet bowl cleaning, surface wiping Monthly: Thorough rim deep clean, grout cleaning, exhaust fan dusting Quarterly: Full bathroom deep clean including inside toilet tank, caulk inspection, and drain maintenance
Multi-Purpose Tools and Techniques
Many tools you use for rim cleaning work great elsewhere in your bathroom:
- That angled toilet brush? Perfect for cleaning around faucet bases
- Pumice stones remove soap scum from glass shower doors
- Old toothbrushes clean grout lines beautifully
- Vinegar solutions work on virtually every bathroom surface